In the late 70s, the first home personal computers available to a wide range of consumers began to appear in the world. These included the Apple II, TRS-80, the first Commodore models, and other computers. These computers were intended not only for games, but also for teaching, programming, computing and design.
Around this time, enthusiasts began to appear who sought to make the computer do something amazing and unusual, not just calculations for spacecraft and nuclear rockets. So, these people formed a new cyber culture - the demoscene, the peculiarity of which was the creation of a demo - a story video sequence created by a computer in real time. Basically, a demo is a symbiosis of art and programming. Over time, the demoscene acquired a competitive character, and people began to organize demoparties - events where the creators of the demo met and held computer art contests.
The main genres of demoscene are demo, megademo, trackmo, and intro (small demos, limited in file size: 64kb, 16kb, 1kb and even 128, 64 and 32 bytes!). But that's where we will finish talking about the history of demoscene (you can read more about this subculture on the Wiki), and instead move on to the culture’s current activities, and even a peak behind the curtain of making a demo.
Oddly enough, the demoscene is still alive, and demoparties are held on a regular basis around the world. For one of these demoparties, we decided to create a small intro, the purpose of which is to invite people to another party. Such a subgenre is called invitro (invitation + intro). Thus, our goal was to complete several tasks: create an intro, show it on a demoparty, and invite all the guests of this demoparty to our party in Russia. And that’s what we need:
Since the NES capabilities (we chose CNROM mapper) are quite limited, we decided to create a simple scroll, like old Commodore 64 intros. We also decided to add an equalizer effect based on the Multimatograf logo. Despite its simplicity, our intro was ranked 7 out of 10. Let's watch the whole intro (party release).
Now it's time to figure out how it works, from start to finish.
It was this main part of the intro that was created first. We came up with the rest as we worked on the creeping line. We went through several gradient and logo options that we placed on the background layer of the console:
Until the current one was finally approved:
In order to make the blue gradient and the red logo, we had to use 3 palettes with common colors in each of them:
We wanted to create the illusion of a stationary gradient and a “flying” logo, so we decided to use a checkerboard gradient.
As it turned out later, this was a mistake, since chess-like dithering on CRT TVs will look completely different from what it looks like in the emulator:
Indeed, this moire does not look very good. However, since the background had already been created, and the intro was supposed to be shown from the emulator, we decided to leave it as it is.
Outcomes:
The creeping line is separated from the main screen by a zero-hit. This technique has been used in many classic games, such as the HUD in Super Mario. But unlike Super Mario, both parts of our split screen have their own independent scrolling. It is very simple to implement one-way scrolling on the NES, in fact, all platformers are made this way: each new character (or landscape column in the case of Super Mario) is drawn in the next nametable every +16 pixels, then the camera moves 16 pixels to the right, and everything is repeated again.
To improve scrolling, two effects have been added:
Outcomes:
NES allows you to split the screen into at least two parts, each of which can be scrolled autonomously. These two parts were enough for us both for the logo and for the scroller.
For clarity, we propose to see how the upper camera of the logo looks inside the console:
And the bottom one:
In fact, our team has little in common with the Nesdev Community, which we love and respect so much. This is also the name of the Telegram channel, in which we discuss everything related to consoles, their programming, and news. The look of the logo was chosen by analogy with the Titan logo in their Overdrive demo, which, in turn, parodied the style of Sega's corporate logo. l thought that went well:
But due to the limited amount of free space on the cartridge, after some revisions, it was decided to remove the large fade tables, so we made the fade effect simpler:
Also in the final release, we added a few details so as not to steal the name from the Nesdev community:
First, we googled the reference of the matching patterns:
Then we adapted it for the NES:
This picture contains 387 unique tiles, while a single NES page only allows 256 tiles.
To display the remaining 131 tiles, we also used the zero-hit technique: the first graphic page is displayed before the split, the second after.
Or that way: tileset #1 and #2
The palette has 3 colors + background. So we can implement 4 phases of monochrome animation within one tile using a combination of sprite tiles and background tiles.
To do this, we draw the first three phases of animation in the sprite tile with palette indices 1, 2, 3 (for clarity, each phase is highlighted in red, blue and green, respectively) and the background tile as the fourth animation tile.
In theory, it looks like this:
Phase 1: palette index 1 = white, others = background color (black);
Phase 2: palette 1 and 2 = white, others = background color;
Phase 3: palette 1, 2, 3 = white.
Phase 4: remove the sprite and print the final phase using background tile.
Let's see what happens in the console sprite layer at this time:
In order to simplify the work, a prototyping utility (javascript + html) was created:
Among other things, we decided to fill the empty space of the cartridge with our next idea: we touched upon the “coronavirus” hysteria that is relevant today. And, looking at how the date of the Vologda party is postponed due to quarantine, we decided at all costs to “protect” the Multimatograf party from the coronavirus. We created several spline trajectories along which the viruses were supposed to fly, and placed the spacecraft at the bottom of the screen.
We assigned pilot Kevin to control the spaceship, then we created sound effects for the appearance of viruses chains, as well as a score counter, and a greetings list like a High score table:
But since there still was free space on the cartridge, we added a boss:
Inspired by the Castlevania boss, our bat has been refined into a great addition to our intro:
This was not enough for us, so we added a high score table, a screen with instructions, and we also redrawn all the sprites so as not to use the draft sprites that we borrowed from existing games (Galaga, Legendary Wings). So, we have created a simple - but quite suitable for tournament competition - game with unpretentious gameplay: in a limited time, the player must destroy as many nasty viruses as possible and score the maximum number of points.
Manual:
The time is displayed in the upper left corner as an hourglass icon. Approximately a minute before the end of the game, the clock icon will flicker, indicating that the time will expire soon.
Enemies attack in waves: 3 waves of viruses (“super viruses” may appear in each of these waves, it is not recommended to miss them, as additional points are awarded for them). After the completion of 3 waves, the boss spawns, then the game cycle repeats again: 3 waves and the boss, until the time runs out.
The boss has 10 hit points, for each of which the player earns 1 point. Additional points are awarded when you defeat the boss.
With each hit on the ship, the player loses 1 hit point and is temporarily stunned. If an encounter occurs during a boss fight, the boss regains 1 hit point.
Outcomes:
We also took care of the music, using one of the old Soviet pop hits as an intro and covering this song for the main soundtrack with a nice bass line and funky beat.
The music was prototyped with the Vortex Tracker, ZX Spectrum chiptune editor.
Then we transferred the score from this tracker to FamiTracker and polished it up.
We wish you well. Play games and watch the demos!
Code, sound fx: Alexander “mr287cc” Tokmakov
Code, fx, graphics, javascript: Alexander “TMK” Solodkov
Music, sound fx: Oleg “n1k-o” Nikitin
Hardware wizard: Vladimir “dude_bfg” Ivanov
Mastermind of the pack: Damir “Adam Bazaroff” Nasyrov
Cart manufacturer: Mega Cat Studios
Source code: github
Playable ROM file (final release).
]]>
Controls in video games are a tough subject. I could explain to you how all the platformers in Action 52 require you to jump and then press a direction button to move in the air, but that doesn’t really illustrate just how wrong that feels. Likewise, I could tell you that all the skaters in Tony Hawk’s Pro Skater accelerate like something just exploded behind them, but what does that tell you? Is that good? Bad?
In my years of debating and discussing the hobby, I’ve come up with strategies to describe controls; you really have to use broad strokes. The minutiae of how controls work and don’t work are vast: button layout, gravity, speed, acceleration, momentum, environmental responses, collision detection, even camera control. It’s a lot to dive into when someone just wants to know whether a game is as smooth as butter or as sticky as molasses.
To illustrate this, we’re going to dive into a few classic examples of games that nailed their controls, sometimes without any previous game to show them how it was done.
While Super Mario Bros. may hold the crown as the most ubiquitous platformer, its controls were less than perfect. Inventive, yes, definitely. They incorporated momentum based movement that asked you to trade between precision controls and speed. Personally, I don’t think I ever let go of the B button. I might have an indent on my thumb.
I’d consider Mega Man to be the gold standard of platformer controls. In terms of speed, jump precision, and gravity, it just felt amazing. The games are notorious for their instant death and treacherous platforming, but the blue bomber’s movements were more than up to the task. This movement system would be expanded upon to great effect in the Mega Man X series, which added the dash jump into the mix and made magic.
While it may not have invented the fighting genre, Street Fighter II was definitely responsible for popularizing it. Moreover, its special move system, which incorporated circular movement on the stick as well as “charging” in a direction, would be duplicated to this day by others in the genre.
The series didn’t nail this method on the first try -- the original Street Fighter controlled like a one-wheeled shopping cart -- but Street Fighter II was able to refine and perfect it. There’s a good reason why no fighting game since could escape comparison to this venerable title.
The early days of 3D graphics were a nightmarish hellscape. While flight sims and driving games were able to make use of the new dimension to some effect, the platformer -- a cornerstone of the 8 and 16-bit eras -- struggled to adapt. Then Super Mario 64 came along and laid the groundwork for how things should be done. Not everyone listened, however, that’s how we ended up with Superman on the N64.
Shigeru Miyamoto, creator of the Mario series, had a vision, and Nintendo backed him fully. He knew that for 3D to work, the camera had to be completely in the hands of players. The Nintendo 64’s somewhat unusual controller was designed completely around this philosophy, with one analogue stick and a quartet of “C-buttons.”
The analogue stick allowed players to move Mario in any way they could imagine: he could tip-toe, sprint, or even just walk. He was also given a full arsenal of jumps to get him places. He could bounce off walls, flip, and triple jump. He was even given a suite of novel powerups that allowed him to fly or made him as heavy as a statue. It’s amazing how deep the controls are in a game of this vintage.
I can’t profess to being a fan of Gears of War; something about steering around a giant walking fridge with subwoofers on its pecks kind of does nothing for me. However, I am at least reverent for what it did for its console generation. The “stop-and-pop” shooter would become a hallmark, supplanting the Half-Life formula and Halo formula as the go-to for shooters.
It didn’t congeal in a vacuum, however. Its cover-based and over-the-shoulder shooting would be pioneered by Winback in 1999. Even Resident Evil 4 can claim a greater contribution to the third-person shooter in 2005. However, I’d argue that none hit the mark as well as Gears of War did in 2006. It refined an popularized cover-based shooting, introduced the “roadie run,” and made over-the-shoulder the default camera angle for years. And who can forget that chainsaw rifle?
These are, no doubt, not the only titles that nailed their controls, but they’re certainly some of the more high-profile examples. Additionally, you’d have a tough time convincing me that any racing game controlled better than Mario Kart 8. And to answer a hypothetical question from earlier, Tony Hawk’s Pro Skater’s controls were complete magic.
So what games have made your hands feel good? Is there a racing game with physics so real they blow your mind? Did Robotron’s twin sticks delight your palms? Was NBA Jam capture the sport better than any other game? Was WWF No Mercy the pinnacle of pro wrestling games (it was). Let us know!
]]>
The indie market is a churning stew. Different ingredients mingle and new ones get dropped in all the time, sometimes overpowering all other flavours. Zombies, crafting, Metroidvania -- they have all had their moments to shine and sometimes even find themselves mixed together in the same pot. Yet, perhaps the most recent ingredient to be dropped into the concoction is the Roguelike. It’s a bit tricky to define, and the term’s current usage is debated, so perhaps the best place to start with explaining it is to tell you about Rogue itself.
Back in the primordial days of computing, a lot of game design was being done by college students learning to program. This is because computers of the time were massive, vacuum-tube filled monstrosities that would take up large rooms. This wouldn’t change until the creation of the microprocessor and the release of the “1977 Trinity” of personal computers, but that’s a different subject entirely.
In the late ‘70s, students were beginning to experiment with programming low-memory games using ASCII graphics. Rogue was interestingly, not the first Roguelike, either. Predating it was 1978’s Beneath the Apple Manor for Apple II and Sword of Fargoal in 1979. Rogue would simply get more exposure because of the existence of ARPANET, an early form of the internet that connected schools and government offices, which allowed it to be distributed into the hands of other budding programmers.
The genre features that would one day be lifted from this venerable game were two core values: permadeath and procedural generation. In the game, you would navigate dungeons, gather weapons and items, and should you fall in combat, it was back to the start of the game. The levels and encounters are all created randomly, meaning each experience was something new.
The idea of the Roguelike sprang from this starting point. Students would find themselves enamored by Rogue’s clever design, and would attempt to replicate all of its mechanics. Since the sourcecode was not readily available, this often mean creating the new games from scratch. The most popular two examples are 1982’s Hack and 1983’s Moria, both of which took the permadeath and procedural generation of Rogue and twisted it with their own flavours.
For years, Roguelikes were largely popular with programmers. Its features didn’t creep into the arcade or console markets for years until the Mystery Dungeon series landed on the Super Famicom in 1993, with Torneko no Daibouken: Fushigi no Dungeon, a spin-off of the Dragon Quest series. It too included both permadeath and randomly created dungeons. The series would eventually make it to North American shores with Chocobo’s Dungeon 2 in 1998 for the Playstation. However, it would remain one of the few Roguelikes to exist on consoles.
In the 2000’s, the indie market would do what it does best and incorporated Roguelike elements into genres that are otherwise unrelated. 2008’s Spelunky is often cited as one of the most influential pioneers of what would become referred to as the Roguelite genre. It took the basic elements of permadeath and randomly generated dungeons, but shifted it to a side-scrolling perspective.
It wouldn’t take long before these mechanics exploded into the spotlight with games like Binding of Isaac, FTL: Faster Than Light, and Rogue Legacy. Each containing a different approach to the formula, but always including permadeath and procedural generation.
However, like everything when it comes to games, the definition of Roguelike and Roguelite would become progressively more murky. Even as early as games like Spelunky, permanence would be added to the permadeath mechanic. As you got further and further into your adventure, you would unlock things that would stay with you as long as your save file remained intact. Especially common is shortcuts that allow you to skip to later stages, so you don’t always have to start at the beginning.
However, the permadeath feature has been twisted in so many ways, it’s rarely considered a requirement anymore to be gifted the term Roguelite. The moniker is commonly attached to any game that contains random elements, such as Mega Cat Studios’ own Bite the Bullet. The world’s first run-and-gun-and-eat, feature a heaping portion of run-and-gun shooter, RPG, and, of course, Roguelite. Dig in!
]]>
Anyone who grew up through the era of 8 and 16-bit consoles already has a good idea where this is going. Back in the early days of gaming, companies loved competing with one another in every way possible. It wasn’t simply a chase for the best IP or technology: the most wild and outlanding accessories had to accompany the game room of every superfan. Many of these controllers only supported, or were optimized, to be used with only one or a few specific games. Others claimed to improve your ability to set a high score, or increased the precision of your controller universally. Unsurprisingly, most of these were far from what was advertised, and even the best of them were barely functional.
You can’t make a list about peripherals without including this classic: The Power Glove. Released in 1989 and manufactured by Adams Gentile Entertainment, the Power Glove was featured in that same year’s movie “The Wizard”. It had normal NES buttons on the back of the forearm part of the glove, which of course meant you could only use these buttons with one hand. These buttons were programmable, which on its own would’ve been pretty useful, but really, just imagine trying to play most NES games with just one hand and you’ll quickly understand how this functionality was mostly wasted.
While it certainly looked impressive, unfortunately, that’s about all this iconic accessory did. It does make for a common photo-prop for headshots of major cheese streamers and champion level-memes.
Of course, the main appeal of the Power Glove was the motion controls, as the idea of controlling a game with hand gestures sounded very futuristic at the time. Unfortunately, these motion controls were extremely basic and inaccurate, leading to much frustration and cementing the reputation of this device as the very image of cool looking but mostly useless peripherals.
Now, you might look at this device and think “Hey, isn’t that just a piece of rectangular plastic?” but here’s the thing...you’d be absolutely right. This thing looks like it was made to scam oblivious present-buying grandparents. It’s advertising claimed it would “speed up your game” by holding your controller so you could press buttons more quickly, but placing your controller on this thing would just make it awkward to use. Not much more to say on this one honestly.
You could maybe argue that it allowed you to more easily mash two buttons really fast with your fingertips?
Now this one is really interesting, maybe even ahead of its time in some ways. Released in 1994 by the Aura Systems company, the Aura Interactor was meant to be a sort of full body rumble pak. It consisted of a vest and a seat cushion that translated bass sound waves into vibration that allowed you to better “feel” the game’s impacts using actuators. Compatible with the Super Nintendo, Sega CD and Sega Genesis consoles, it certainly worked as advertised (which is worth mentioning considering some of the other devices on this list) but it had a steep price of $100 at launch, so it’s adoption was very limited.
Some would consider the Aura Interactor to be the first haptic suit to be commercially available.
Unfortunately, while being very impressive from a technology standpoint, haptic feedback did very little to enhance the 2D games of the time. A modern take on such a device could be really useful in today’s much more advanced VR games though.
Another piece of complex tech (for the time) that sounds like a great idea for about 10 seconds. You can look at the box and picture yourself controlling a fighting game such as Mortal Kombat or Street Fighter with your movements, but in truth this octagon simply had motion sensors which were each mapped to one the console’s buttons, which means it was effectively a very inefficient early motion controller.
Even years later, many players were dissatisfied with the functional but sometimes quirky motion controls of the Wiimote and Kinect, so imagine what it felt like to try to win a game of Mortal Kombat using this device.
The way you used this was by standing inside the octagon, which had 16 zones where the sensors would pick up movement and map it to a button. This would work reasonably well for the controller’s face buttons, but controlling the d-pad and therefore your character’s movement by waving your hands over a sensor was barely usable. Oh and it cost $80 when it came out in 1993, that didn’t do it any favors either.
You’ve probably heard of this one, and there’s a bit of a backstory to it. In 1985 when Nintendo first brought their NES to the US, the American video game market was in ruins following a huge crash in 1983 which would probably require an article of its own to properly explain. So Nintendo decided to market their console from a different angle, introducing it as a fancy interactive toy. For this purpose, they created R.O.B (Robotic Operator Buddy). This little guy was the focus of Nintendo’s early marketing campaign for the NES and it worked well enough. After a few years they just quietly stopped producing it, but the goal was already met and the NES had a successful launch.
R.O.B didn’t exactly work great in the two games he was made for, but marketing data showed the friendly little robot was the deciding factor in getting an NES for many kids at that crucial time.
Only two games were officially released for R.O.B: Gyromite and Stack-Up. In Gyromite he placed spinning “gyros” on red and blue buttons that pressed down the A or B buttons on the second player’s controller, opening or closing color coded pillars that blocked the way of the player in this puzzle platformer. Stack-up had the player control R.O.B to pick up colored blocks and match the ones shown on the screen.
The early days of gaming were full of little gimmicks, devices and accessories that in many cases were frankly absolutely useless, but many others were early attempts at concepts that came back later when the technology finally caught up, such as motion controls and haptic feedback. Not all of these devices were blatant cash grabs, and it’s important to see the way game developers have been trying to innovate since the very beginning of the medium’s history. Some of the concepts in these devices are still being worked on and explored today, and developers will surely continue to impress us with new and unexpected ideas, despite the inherent risks that come with attempting such innovation in any medium.
Title | Size | Mirroring | Mapper | Common Designation | Notes |
10 Yard Fight | 32k PRG / 8k CHR | H | 0 | NROM |
10 Yard Fight (J) | 16k PRG / 8k CHR | H | 0 | NROM |
100 In 1 - Contra Function 16 | 1024k PRG / 0k CHR | V | 15 | 100-in-1 Contra Function 16 | Multicard |
100 Kiyagyou | 128k PRG / 128k CHR | H | 1 | MMC1 |
100 Man Doru Kid | 256k PRG / 0k CHR | H | 2 | UNROM |
110 in 1 Menu | 16k PRG / 8k CHR | V | 0 | NROM |
1200 In 1 | 512k PRG / 0k CHR | H | 227 | ---- |
1942 (J) | 32k PRG / 8k CHR | H | 0 | NROM |
1943 | 128k PRG / 0k CHR | H | 2 | UNROM |
1943 (J) | 128k PRG / 0k CHR | H | 2 | UNROM |
1944 | 128k PRG / 0k CHR | H | 2 | UNROM |
1999 Hore Mitakotoka Sekimatsu | 256k PRG / 128k CHR | V | 4 | MMC3 |
3D Worldrunner | 256k PRG / 0k CHR | V | 34 | Nina-1 |
58 In 1 | 1024k PRG / 512k CHR | H | 225 | ---- |
58 In 1 Menu | 16k PRG / 8k CHR | V | 0 | NROM |
72 In 1 | 1024k PRG / 512k CHR | H | 225 | ---- |
720 | 128k PRG / 0k CHR | V | 1 | MMC1 |
76 in 1 Menu | 32k PRG / 0k CHR | H | 0 | NROM |
8 Eyes | 128k PRG / 128k CHR | H | 4 | MMC3 |
8 Eyes (J) | 128k PRG / 128k CHR | H | 4 | MMC3 |
'89 Dennou Hosi Uranai | 256k PRG / 0k CHR | H | 1 | MMC1 |
Title | Size | Mirroring | Mapper | Common Designation | Notes |
A-Ressya De Ikou | 128k PRG / 16k CHR | H | 1 | MMC1 |
Abadox | 128k PRG / 128k CHR | H | 1 | MMC1 |
Abadox (J) | 128k PRG / 128k CHR | H | 1 | MMC1 |
Abarenbou Tengu | 128k PRG / 128k CHR | H | 4 | MMC3 |
Acchi Kocchi Socchi | 128k PRG / 128k CHR | H | 1 | MMC1 |
Action 52 | 1536k PRG / 512k CHR | H | 228 | Action 52 |
Addams Family, The | 128k PRG / 128k CHR | H | 1 | MMC1 |
Addams Family, The (Pugsley) | 128k PRG / 128k CHR | H | 1 | MMC1 |
Adventure Island | 32k PRG / 32k CHR | H | 3 | CNROM |
Adventure Island 2 | 128k PRG / 128k CHR | H | 4 | MMC3 |
Adventure Island 3 | 128k PRG / 128k CHR | H | 4 | MMC3 |
Adventures in the Magic Kingdom | 128k PRG / 128k CHR | H | 1 | MMC1 |
Adventures of Bayou Billy | 128k PRG / 128k CHR | V | 1 | MMC1 |
Adventures of Bayou Billy (PAL) | 128k PRG / 128k CHR | H | 1 | MMC1 |
Adventures of Captain Comic | 64k PRG / 64k CHR | V | 11 | Colour Dreams |
Adventures of Dino-Riki | 32k PRG / 32k CHR | V | 3 | CNROM |
Adventures of Lolo | 32k PRG / 32k CHR | H | 1 | MMC1 |
Adventures of Lolo (J) | 32k PRG / 32k CHR | H | 4 | MMC3 |
Adventures of Lolo 2 | 32k PRG / 32k CHR | H | 4 | MMC3 |
Adventures of Lolo 3 | 128k PRG / 128k CHR | H | 1 | MMC1 |
Adventures of Rad Gravity, The | 128k PRG / 128k CHR | H | 1 | MMC1 |
Adventures of Rad Gravity (PAL) | 128k PRG / 128k CHR | H | 1 | MMC1 |
Adventures of Rocky & Bullwinkle | 128k PRG / 120k CHR | H | 4 | MMC3 | Missing 8k |
Adventures of Tom Sawyer, The | 128k PRG / 128k CHR | V | 1 | MMC1 |
Afterburner 2 (J) | 128k PRG / 256k CHR | V | 68 | Sunsoft 4 |
Ai Sensei no Oshiete Watashi no Hosi | 256k PRG / 128k CHR | H | 32 | Irem G-101 |
Aigiina no Yogen | 128k PRG / 0k CHR | V | 2 | UNROM |
Air Fortress | 128k PRG / 32k CHR | H | 1 | MMC1 |
Air Fortress (J) | 128k PRG / 128k CHR | H | 1 | MMC1 |
Airwolf | 32k PRG / 128k CHR | H | 1 | MMC1 |
Airwolf (PAL) | 32k PRG / 128k CHR | H | 1 | MMC1 |
Akira | 128k PRG / 256k CHR | V | 4 | MMC3 |
Akuma Kun | 128k PRG / 128k CHR | H | 16 | Bandai |
Akuma no Shoutaijou | 128k PRG / 128k CHR | H | 4 | MMC3 |
Akumajo Dracula | 128k PRG / 0k CHR | V | 2 | UNROM |
Akumajo Dracula 3 | 256k PRG / 128k CHR | V | 24 | VRC6 |
Akumajo Dracula 3 [Hacked] | 256k PRG / 128k CHR | V | 16 | Bandai |
Al Unser Jr's Turbo Racing | 128k PRG / 128k CHR | V | 1 | MMC1 |
Alfred Chicken | 128k PRG / 0k CHR | H | 2 | UNROM |
Algos no Senshi | 128k PRG / 0k CHR | V | 2 | UNROM |
Alien 3 | 128k PRG / 128k CHR | H | 4 | MMC3 |
Alien Syndrome (J) | 128k PRG / 128k CHR | H | 1 | MMC1 |
All Pro Basketball | 128k PRG / 128k CHR | V | 1 | MMC1 |
Alpha Mission | 32k PRG / 32k CHR | H | 3 | CNROM |
Altered Beast | 128k PRG / 128k CHR | H | 4 | MMC3 |
Amagon | 128k PRG / 0k CHR | V | 2 | UNROM |
America Oudan no Ultra Quiz | 512k PRG / 0k CHR | V | 4 | MMC3 |
American Dream | 128k PRG / 128k CHR | H | 1 | MMC1 |
American Gladiators | 128k PRG / 128k CHR | H | 1 | MMC1 |
Ankoku Sinwa | 256k PRG / 0k CHR | H | 1 | MMC1 |
Anpan Man no Hiragana Daisuki | 128k PRG / 128k CHR | H | 4 | MMC3 |
Antarctic Adventure | 16k PRG / 8k CHR | H | 0 | NROM |
Anticipation | 32k PRG / 32k CHR | H | 1 | MMC1 |
Arabian Dream Sharezerd [Hacked] | 256k PRG / 0k CHR | V | 6 | FFE F4xxx |
Arch Rivals | 128k PRG / 0k CHR | H | 7 | AOROM |
Archon | 128k PRG / 0k CHR | H | 2 | UNROM |
Arctic | 128k PRG / 0k CHR | V | 2 | UNROM |
Argus | 32k PRG / 16k CHR | V | 3 | CNROM |
Arkanoid | 32k PRG / 8k CHR | V | 0 | NROM |
Armored Scrum Object | 32k PRG / 32k CHR | H | 3 | CNROM |
Artelius | 128k PRG / 32k CHR | H | 1 | MMC1 |
Asmikkun Land | 128k PRG / 128k CHR | V | 4 | MMC3 |
Asterix (PAL) | 128k PRG / 0k CHR | V | 2 | UNROM |
Astro Robo Sasa | 32k PRG / 8k CHR | V | 0 | NROM |
Astyanax | 128k PRG / 128k CHR | H | 4 | MMC3 |
Athena | 128k PRG / 0k CHR | V | 2 | UNROM |
Athena (J) | 128k PRG / 0k CHR | V | 2 | UNROM |
Athletic World | 32k PRG / 32k CHR | H | 3 | CNROM |
Atlantis no Nazo | 32k PRG / 24k CHR | V | 1 | MMC1 |
Attack Animal Gakuen | 128k PRG / 0k CHR | V | 2 | UNROM |
Attack of the Killer Tomatoes | 128k PRG / 128k CHR | H | 1 | MMC1 |
AV Pachi Slot | 32k PRG / 64k CHR | H | 3 | CNROM |
Title | Size | Mirroring | Mapper | Common Designation | Notes |
B-Wings | 32k PRG / 8k CHR | H | 0 | NROM |
Babel no Tou | 32k PRG / 32k CHR | H | 4 | MMC3 |
Baby Boomer | 64k PRG / 16k CHR | V | 11 | Colour Dreams |
Back to the Future | 32k PRG / 8k CHR | V | 0 | NROM |
Back to the Future 2/3 | 128k PRG / 128k CHR | V | 1 | MMC1 |
Bad Dudes | 128k PRG / 128k CHR | H | 4 | MMC3 |
Bad News Baseball | 128k PRG / 128k CHR | V | 1 | MMC1 |
Bad Street Brawler | 128k PRG / 0k CHR | V | 1 | MMC1 |
Baken Hissyougaku Gate-In | 256k PRG / 0k CHR | H | 1 | MMC1 |
Bakusyou Jinsei Gekijyou | 256k PRG / 128k CHR | H | 33 | TC0190 / TC0350 |
Bakusyou Jinsei Gekijyou 3 | 256k PRG / 256k CHR | H | 4 | MMC3 |
Ballblazer | 128k PRG / 0k CHR | V | 2 | UNROM |
Balloon Fight | 16k PRG / 8k CHR | V | 0 | NROM |
Balloon Fight (PAL) | 16k PRG / 8k CHR | H | 0 | NROM |
Baltron | 32k PRG / 8k CHR | V | 0 | NROM |
Banana | 32k PRG / 32k CHR | V | 3 | CNROM |
Bananan no Ouiji Daibouken | 128k PRG / 128k CHR | H | 4 | MMC3 |
Bandit Kings of Ancient China | 256k PRG / 128k CHR | H | 5 | MMC5 |
Barbie | 128k PRG / 128k CHR | H | 1 | MMC1 |
Bard's Tale, The | 128k PRG / 0k CHR | H | 1 | MMC1 | Possible bad dump? |
Bard's Tale, The (J) | 256k PRG / 0k CHR | H | 1 | MMC1 |
Bard's Tale 2, The | 256k PRG / 0k CHR | H | 1 | MMC1 |
Barker Bill's Trick Shooting | 64k PRG / 112k CHR | H | 1 | MMC1 |
Bart vs. the Space Mutants | 128k PRG / 128k CHR | V | 1 | MMC1 | Perhaps missing 128k in the PRG |
Bart vs. the World | 256k PRG / 128k CHR | H | 4 | MMC3 |
Bartman Meets Radioactive Man | 256k PRG / 128k CHR | H | 4 | MMC3 |
Base Wars | 128k PRG / 128k CHR | H | 4 | MMC3 |
Baseball | 16k PRG / 8k CHR | H | 0 | NROM |
Baseball (J) | 16k PRG / 8k CHR | H | 0 | NROM |
Baseball Simulator 1000 | 128k PRG / 128k CHR | V | 1 | MMC1 |
Baseball Stars | 128k PRG / 128k CHR | V | 1 | MMC1 |
Baseball Stars (J) | 128k PRG / 128k CHR | V | 1 | MMC1 |
Baseball Stars 2 | 256k PRG / 128k CHR | H | 4 | MMC3 |
Bases Loaded | 256k PRG / 64k CHR | H | 1 | MMC1 |
Bases Loaded 2 | 256k PRG / 128k CHR | H | 1 | MMC1 |
Bases Loaded 3 | 256k PRG / 128k CHR | H | 4 | MMC3 |
Bases Loaded 4 | 256k PRG / 128k CHR | H | 4 | MMC3 |
Batman | 128k PRG / 128k CHR | H | 4 | MMC3 |
Batman (J) | 128k PRG / 128k CHR | H | 69 | Sunsoft 5 |
Batman (PAL) | 128k PRG / 128k CHR | H | 4 | MMC3 |
Batman - Return of the Joker | 128k PRG / 256k CHR | H | 69 | Sunsoft 5 |
Batman Returns | 128k PRG / 256k CHR | V | 4 | MMC3 |
Battle Chess | 256k PRG / 0k CHR | H | 1 | MMC1 |
Battle City | 16k PRG / 8k CHR | H | 0 | NROM |
Battle of Olympus, The | 128k PRG / 0k CHR | V | 1 | MMC1 |
Battle Stadium | 128k PRG / 128k CHR | V | 1 | MMC1 |
Battle Storm | 128k PRG / 128k CHR | V | 1 | MMC1 |
Battletoads | 256k PRG / 0k CHR | H | 7 | AOROM |
Battletoads (PAL) | 256k PRG / 0k CHR | H | 7 | AOROM |
Battletoads / Double Dragon | 256k PRG / 0k CHR | H | 7 | AOROM |
Batu and Teree | 128k PRG / 0k CHR | V | 2 | UNROM |
Be-Bop High School | 128k PRG / 128k CHR | H | 1 | MMC1 |
Bee 52 | 65k PRG / 0k CHR | V | 71 | Camerica | Bad dump? |
Beetlejuice | 128k PRG / 0k CHR | H | 7 | AOROM |
Best of the Best | 256k PRG / 0k CHR | V | 2 | UNROM |
Best Play Pro Yakyuu | 128k PRG / 32k CHR | V | 1 | MMC1 |
Best Play Pro Yakyuu 2 | 256k PRG / 0k CHR | H | 1 | MMC1 |
Best Play Pro Yakyuu Special | 256k PRG / 0k CHR | H | 1 | MMC1 |
Bible Adventures | 64k PRG / 64k CHR | V | 11 | Colour Dreams |
Big Bird's Hide and Speak | 256k PRG / 128k CHR | H | 1 | MMC1 |
Big Nose Freaks Out | 256k PRG / 0k CHR | V | 71 | Camerica | |
Bigfoot | 128k PRG / 128k CHR | H | 1 | MMC1 | |
Bikkuri Man World Gekitotu Sei Sensi | 256k PRG / 0k CHR | V | 1 | MMC1 | |
Bill and Ted's Excellent Adventure | 128k PRG / 128k CHR | H | 1 | MMC1 | |
Bill Elliot's NASCAR Challenge | 128k PRG / 256k CHR | H | 4 | MMC3 | |
Binary Land | 16k PRG / 8k CHR | H | 0 | NROM | |
Bio Senshi Dan | 128k PRG / 128k CHR | H | 66 | 74161/32 | |
Bionic Commando | 256k PRG / 0k CHR | V | 1 | MMC1 | |
Bird Week | 16k PRG / 0k CHR | V | 3 | CNROM | |
Birdy Rush | 128k PRG / 128k CHR | H | 1 | MMC1 | |
Black Bass, The | 128k PRG / 0k CHR | H | 2 | UNROM | |
Black Bass, The (J) | 128k PRG / 0k CHR | H | 2 | UNROM | |
Black Bass 2, The | 128k PRG / 0k CHR | H | 2 | UNROM | |
Blades of Steel | 128k PRG / 0k CHR | V | 2 | UNROM | |
Blades of Steel (PAL) | 128k PRG / 0k CHR | V | 2 | UNROM | |
Blaster Master | 128k PRG / 128k CHR | H | 1 | MMC1 | |
Blaster Master (PAL) | 128k PRG / 128k CHR | H | 1 | MMC1 | |
Bloody Warriors | 256k PRG / 0k CHR | V | 1 | MMC1 | |
Blue Marlin, The | 128k PRG / 128k CHR | H | 4 | MMC3 | |
Blue Shadow | 128k PRG / 128k CHR | H | 4 | MMC3 | |
Blue Train Satsujin Jiken | 128k PRG / 256k CHR | H | 16 | Bandai | This is possibly a hacked version, since Irem made the game. |
Blues Brothers, The | 128k PRG / 0k CHR | V | 2 | UNROM | |
Bo Jackson Baseball | 128k PRG / 184k CHR | H | 4 | MMC3 | |
Bokosuka Wars | 32k PRG / 8k CHR | V | 0 | NROM | |
Boku Dracula Kun | 128k PRG / 128k CHR | V | 23 | VRC2B | |
Bomber King | 128k PRG / 0k CHR | V | 2 | UNROM | |
Bomberman (J) | 16k PRG / 8k CHR | V | 0 | NROM | |
Bomberman 2 (J) | 128k PRG / 0k CHR | V | 2 | UNROM | |
Booby Kids | 128k PRG / 0k CHR | H | 2 | UNROM | |
Boulder Dash | 128k PRG / 128k CHR | H | 1 | MMC1 | |
Boulder Dash (J) | 32k PRG / 32k CHR | H | 1 | MMC1 | |
Boy and His Blob, A | 128k PRG / 128k CHR | H | 1 | MMC1 | |
Breakthru | 128k PRG / 128k CHR | H | 1 | MMC1 | |
Brush Roller | 16k PRG / 8k CHR | V | 3 | CNROM | |
Bubble Bobble | 128k PRG / 32k CHR | H | 1 | MMC1 | |
Bubble Bobble (PAL) | 128k PRG / 32k CHR | H | 1 | MMC1 | |
Bubble Bobble 2 | 128k PRG / 128k CHR | H | 4 | MMC3 | |
Bucky O' Hare | 128k PRG / 128k CHR | H | 4 | MMC3 | |
Bucky O' Hare (J) | 128k PRG / 128k CHR | H | 4 | MMC3 | |
Bucky O' Hare (PAL) | 128k PRG / 128k CHR | H | 4 | MMC3 | |
Buggy Popper | 32k PRG / 32k CHR | V | 3 | CNROM | |
Bugs Bunny's Crazy Castle | 64k PRG / 32k CHR | H | 1 | MMC1 | |
Bugs Bunny's Birthday Blowout | 128k PRG / 128k CHR | H | 4 | MMC3 | |
Bump N' Jump | 32k PRG / 32k CHR | H | 3 | CNROM | |
Burai Fighter | 32k PRG / 32k CHR | H | 4 | MMC3 | |
Burgertime (J) | 16k PRG / 8k CHR | H | 0 | NROM |
Title | Size | Mirroring | Mapper | Common Designation | Notes |
Cabal | 128k PRG / 0k CHR | H | 7 | AOROM |
Cadillac | 32k PRG / 32k CHR | H | 3 | CNROM |
Caesar's Palace | 256k PRG / 0k CHR | H | 7 | AOROM |
California Games | 128k PRG / 0k CHR | V | 2 | UNROM |
Capcom Barcelona '92 | 128k PRG / 128k CHR | H | 4 | MMC3 |
Captain America and the Avengers | 128k PRG / 128k CHR | H | 4 | MMC3 |
Captain Ed | 256k PRG / 0k CHR | V | 1 | MMC1 |
Captain Planet | 128k PRG / 128k CHR | H | 4 | MMC3 |
Captain Silver | 128k PRG / 128k CHR | H | 1 | MMC1 |
Captain Skyhawk | 128k PRG / 0k CHR | H | 7 | AOROM |
Captain Tsubasa | 128k PRG / 128k CHR | V | 1 | MMC1 |
Captain Tsubasa 2 | 256k PRG / 128k CHR | V | 4 | MMC3 |
Casino Kid | 128k PRG / 0k CHR | H | 2 | UNROM |
Castelian | 128k PRG / 0k CHR | V | 2 | UNROM |
Castelian (PAL) | 128k PRG / 0k CHR | V | 2 | UNROM |
Castle Excellent | 32k PRG / 32k CHR | H | 3 | CNROM |
Castle of Deceit | 64k PRG / 64k CHR | H | 11 | Colour Dreams |
Castle of Dragon | 128k PRG / 0k CHR | V | 2 | UNROM |
Castlequest (J) | 128k PRG / 128k CHR | H | 4 | MMC3 |
Castlevania | 128k PRG / 0k CHR | V | 2 | UNROM |
Castlevania 2 | 128k PRG / 128k CHR | H | 1 | MMC1 |
Castlevania 2 (PAL) | 128k PRG / 128k CHR | H | 1 | MMC1 |
Castlevania 3 | 256k PRG / 128k CHR | V | 5 | MMC5 |
Catts Nintouden Teyandey | 128k PRG / 128k CHR | V | 4 | MMC3 |
Caveman Games | 128k PRG / 128k CHR | H | 1 | MMC1 |
Caveman Ninja | 128k PRG / 128k CHR | H | 4 | MMC3 |
Chack N' Pop | 16k PRG / 8k CHR | H | 0 | NROM |
Challenger | 32k PRG / 8k CHR | V | 0 | NROM |
Champion-ship Bowling (J) | 32k PRG / 32k CHR | H | 3 | CNROM |
Champion-ship Lode Runner | 16k PRG / 8k CHR | V | 0 | NROM |
Champion-ship Pool | 128k PRG / 0k CHR | V | 2 | UNROM |
Chaos World | 256k PRG / 128k CHR | H | 1 | MMC1 |
Chase HQ | 128k PRG / 128k CHR | H | 4 | MMC3 |
Chester Field | 128k PRG / 0k CHR | V | 2 | UNROM |
Chibi Marukochan Uki Uki Shopping | 128k PRG / 128k CHR | H | 4 | MMC3 |
Chiller | 32k PRG / 32k CHR | V | 1 | MMC1 |
Chip N' Dale - Rescue Rangers | 128k PRG / 128k CHR | H | 1 | MMC1 |
Chip N' Dale - Rescue Rangers 2 | 128k PRG / 128k CHR | H | 1 | MMC1 |
Chip to Dale no Daisakusen | 128k PRG / 128k CHR | H | 1 | MMC1 |
Chip to Dale no Daisakusen 2 | 128k PRG / 128k CHR | H | 1 | MMC1 |
Chiyo no Fuji | 128k PRG / 128k CHR | H | 4 | MMC3 |
Choplifter | 32k PRG / 16k CHR | V | 3 | CNROM |
Choujin Sentai Jetman | 128k PRG / 128k CHR | H | 1 | MMC1 |
Choujin Ultra Baseball | 128k PRG / 128k CHR | V | 1 | MMC1 |
Chubby Cherub | 32k PRG / 16k CHR | H | 3 | CNROM |
Chugoku Jyansi Story Tonpuu | 128k PRG / 128k CHR | H | 1 | MMC1 |
Chugoku Sensei Jyuutu | 128k PRG / 0k CHR | H | 2 | UNROM |
Chuka Taisen | 128k PRG / 128k CHR | V | 1 | MMC1 |
Circus Caper | 128k PRG / 128k CHR | V | 1 | MMC1 |
Circus Charlie | 16k PRG / 8k CHR | V | 3 | CNROM |
City Connection | 32k PRG / 32k CHR | V | 3 | CNROM |
City Connection (J) | 16k PRG / 16k CHR | V | 3 | CNROM |
Clash at Demonhead | 128k PRG / 128k CHR | H | 1 | MMC1 |
Cliffhanger | 128k PRG / 128k CHR | H | 4 | MMC3 |
Clu Clu Land | 16k PRG / 16k CHR | H | 3 | CNROM |
Clu Clu Land disk-to-nes conv. | 32k PRG / 8k CHR | H | 0 | NROM | [Uses .sav file to load] |
Cobra Command | 128k PRG / 128k CHR | H | 1 | MMC1 |
Cobra Command (J) | 128k PRG / 128k CHR | H | 1 | MMC1 |
Cobra Triangle | 128k PRG / 0k CHR | H | 7 | AOROM |
Cobra Triangle (PAL) | 128k PRG / 0k CHR | H | 7 | AOROM |
Cocoron | 256k PRG / 0k CHR | V | 1 | MMC1 | |
Code Name Viper | 128k PRG / 128k CHR | H | 4 | MMC3 | |
Columbus Ougon no Yoake | 128k PRG / 128k CHR | V | 4 | MMC3 | |
Commando | 256k PRG / 0k CHR | H | 7 | AOROM | |
Conan | 128k PRG / 0k CHR | H | 2 | UNROM | |
Conflict | 128k PRG / 128k CHR | H | 1 | MMC1 | Bad dump |
Conquest of the Crystal Palace | 128k PRG / 128k CHR | H | 4 | MMC3 | |
Contra | 128k PRG / 0k CHR | V | 2 | NROM | |
Contra (J) | 128k PRG / 128k CHR | H | 23 | VRC2b | |
Contra Force | 128k PRG / 128k CHR | V | 4 | MMC3 | |
Cool World | 128k PRG / 128k CHR | H | 1 | MMC1 | |
Cosmic Epsilon | 128k PRG / 256k CHR | H | 4 | MMC3 | |
Cosmic Wars | 128k PRG / 128k CHR | H | 1 | MMC1 | |
Cosmo Genesis | 32k PRG / 32k CHR | H | 3 | CNROM | |
Cosmo Police Galivan | 128k PRG / 128k CHR | H | 1 | MMC1 | |
Crackout | 128k PRG / 0k CHR | H | 2 | UNROM | |
Crash N' The Boys | 128k PRG / 128k CHR | H | 4 | MMC3 | |
Crazy Climber | 256k PRG / 0k CHR | H | 97 | Irem 74161/32 | |
Crazy Climber [Hacked] | 256k PRG / 0k CHR | H | 15 | 100-in-1 Contra Function 16 | |
Crisis Force [Hacked] | 128k PRG / 128k CHR | H | 4 | MMC3 | |
Crossfire | 128k PRG / 128k CHR | H | 4 | MMC3 | |
Crystal Mines 2 | 64k PRG / 16k CHR | V | 11 | Colour Dreams | |
Crystalis | 256k PRG / 128k CHR | H | 4 | MMC3 | |
Cyberball | 128k PRG / 128k CHR | H | 4 | MMC3 | |
Cybernoid | 32k PRG / 32k CHR | V | 3 | CNROM |
Title | Size | Mirroring | Mapper | Common Designation | Notes |
Dai Meiro | 128k PRG / 128k CHR | H | 1 | MMC1 |
Dai Senryaku | 128k PRG / 32k CHR | V | 1 | MMC1 |
Daikaijyuu Deburas | 128k PRG / 256k CHR | V | 4 | MMC3 |
Daiku no Gensan | 128k PRG / 128k CHR | H | 4 | MMC3 |
Daiku no Gensan 2 | 128k PRG / 128k CHR | H | 65 | Irem H3001 |
Daiva | 128k PRG / 0k CHR | V | 2 | UNROM |
Dance Aerobics | 64k PRG / 32k CHR | H | 1 | MMC1 |
Danny Sullivan's Indy Heat | 128k PRG / 0k CHR | H | 7 | AOROM |
Dark Lord | 256k PRG / 128k CHR | V | 4 | MMC3 |
Darkman | 128k PRG / 128k CHR | H | 1 | MMC1 |
Darkwing Duck | 128k PRG / 128k CHR | V | 1 | MMC1 |
Dash Galaxy in the Alien Asylum | 32k PRG / 32k CHR | H | 3 | CNROM |
Dash Yarou | 128k PRG / 0k CHR | V | 2 | UNROM |
Days of Thunder | 128k PRG / 256k CHR | H | 4 | MMC3 |
Datach Dragonball Z | 256k PRG / 0k CHR | H | 16 | Bandai |
Datsugoku | 128k PRG / 128k CHR | H | 1 | MMC1 |
Day Dreamin' Davey | 256k PRG / 128k CHR | H | 1 | MMC1 |
Deadly Towers | 128k PRG / 0k CHR | H | 34 | Nina-1 |
Deblock | 32k PRG / 32k CHR | V | 3 | CNROM |
Deep Dungeon 3 | 256k PRG / 0k CHR | V | 1 | MMC1 |
Deep Dungeon 4 | 256k PRG / 0k CHR | V | 1 | MMC1 |
Defender 2 | 16k PRG / 8k CHR | V | 0 | NROM |
Defender of the Crown | 256k PRG / 0k CHR | V | 1 | MMC1 |
Defenders of Dynatron City | 128k PRG / 128k CHR | H | 4 | MMC3 |
Deja Vu | 128k PRG / 256k CHR | H | 4 | MMC3 |
Demon Sword | 128k PRG / 128k CHR | H | 1 | MMC1 |
Dengeki Big Bang | 128k PRG / 128k CHR | H | 1 | MMC1 |
Densetsu no Kisi Elrond | 128k PRG / 0k CHR | V | 7 | AOROM |
Derby Stallion | 128k PRG / 128k CHR | V | 1 | MMC1 |
Derby Stallion Zenkokuban | 128k PRG / 128k CHR | H | 1 | MMC1 |
Desert Commander | 128k PRG / 128k CHR | V | 1 | MMC1 |
Destiny of an Emperor | 256k PRG / 0k CHR | V | 1 | MMC1 |
Devil World | 16k PRG / 8k CHR | H | 0 | NROM |
Dezaemon | 128k PRG / 0k CHR | H | 1 | MMC1 |
Dick Tracy | 128k PRG / 0k CHR | V | 2 | UNROM |
Die Hard (J) | 128k PRG / 128k CHR | H | 1 | MMC1 |
Dig Dug | 16k PRG / 8k CHR | H | 0 | NROM |
Dig Dug 2 (J) | 32k PRG / 8k CHR | V | 0 | NROM |
Digger T. Rock | 128k PRG / 0k CHR | H | 7 | AOROM |
Dirty Harry | 256k PRG / 128k CHR | H | 4 | MMC3 |
Dizzy The Adventurer | 128k PRG / 0k CHR | V | 71 | Camerica |
Dodge Danpei 2 | 256k PRG / 256k CHR | H | 69 | Sunsoft 5 |
Donkey Kong | 16k PRG / 8k CHR | V | 0 | NROM |
Donkey Kong 3 | 16k PRG / 8k CHR | V | 0 | NROM |
Donkey Kong Classics | 32k PRG / 32k CHR | V | 3 | CNROM |
Donkey Kong Jr. | 16k PRG / 8k CHR | V | 0 | NROM |
Donkey Kong Jr. Math | 16k PRG / 8k CHR | V | 0 | NROM |
Donkey Kong Jr. Sansuu Asobi | 16k PRG / 8k CHR | V | 0 | NROM |
Doki Doki Yuenchi | 128k PRG / 128k | H | 4 | MMC3 |
Dokugan Masamune [Hacked] | 256k PRG / 0k CHR | V | 6 | FFE F4xxx |
Don Doko Don | 128k PRG / 256k CHR | H | 33 | TC0190 / TC0350 |
Don Doko Don 2 | 128k PRG / 256k CHR | V | 33 | TC0190 / TC0350 |
Donald Duck | 128k PRG / 128k CHR | H | 1 | MMC1 |
Donald Land | 128k PRG / 128k CHR | H | 1 | MMC1 |
Door Door | 16k PRG / 8k CHR | V | 0 | NROM |
Doraemon Gigzombi no Gyakusyuu | 256k PRG / 0k CHR | H | 1 | MMC1 |
Doraemon Kaitakuhen [Hacked] | 128k PRG / 32k CHR | V | 8 | FFE F3xxx |
Double Dare | 256k PRG / 0k CHR | H | 7 | AOROM |
Double Dragon | 128k PRG / 128k CHR | H | 1 | MMC1 |
Double Dragon (J) | 128k PRG / 128k CHR | H | 1 | MMC1 |
Double Dragon (PAL) | 128k PRG / 128k CHR | H | 1 | MMC1 |
Double Dragon 2 | 128k PRG / 128k CHR | H | 4 | MMC3 |
Double Dragon 2 (J) | 128k PRG / 128k CHR | V | 4 | MMC3 |
Double Dragon 3 | 128k PRG / 128k CHR | H | 4 | MMC3 |
Double Dragon 3 (J) | 128k PRG / 128k CHR | V | 4 | MMC3 |
Double Dragon 3 (PAL) | 128k PRG / 128k CHR | H | 4 | MMC3 |
Double Dribble | 128k PRG / 0k CHR | V | 2 | UNROM |
Double Strike | 32k PRG / 32k CHR | H | 79 | AVE |
Doublemoon Densetsu | 512k PRG / 0k CHR | H | 4 | MMC3 |
Dough Boy | 32k PRG / 8k CHR | V | 0 | NROM |
Downtown Nekketsu Jidaigekida-yo | 128k PRG / 128k CHR | H | 4 | MMC3 |
Downtown Nekketsu Kousinkyo-ko | 128k PRG / 128k CHR | H | 4 | MMC3 |
Downtown Nekketsu Monogatari | 128k PRG / 128k CHR | V | 4 | MMC3 |
Dr. Chaos | 128k PRG / 0k CHR | V | 2 | UNROM |
Dr. Jekyll and Mr. Hyde | 128k PRG / 32k CHR | H | 1 | MMC1 |
Dr. Mario | 32k PRG / 32k CHR | H | 1 | MMC1 |
Dr. Mario (PAL) | 32k PRG / 32k CHR | H | 1 | MMC1 |
Dracula | 128k PRG / 128k CHR | H | 4 | MMC3 |
Dracula (PAL) | 128k PRG / 128k CHR | H | 4 | MMC3 |
Dragon Buster | 128k PRG / 32k CHR | H | 95 | Namco 1xx |
Dragon Buster [Hacked] | 128k PRG / 32k CHR | V | 4 | MMC3 |
Dragon Buster 2 | 128k PRG / 64k CHR | V | 4 | MMC3 |
Dragon Fighter | 128k PRG / 128k CHR | H | 1 | MMC1 |
Dragon Power | 128k PRG / 32k CHR | H | 66 | 74161/32 |
Dragon Quest | 32k PRG / 32k CHR | V | 3 | CNROM |
Dragon Quest 2 | 128k PRG / 0k CHR | V | 2 | UNROM |
Dragon Quest 3 | 256k PRG / 0k CHR | V | 2 | UNROM |
Dragon Quest 4 | 1024k PRG / 0k CHR | V | 1 | MMC1 |
Dragon Scroll [Hacked] | 256k PRG / 0k CHR | V | 6 | FFE F4xxx |
Dragon Slayer 4 | 128k PRG / 64k CHR | V | 4 | MMC3 |
Dragon Spirit | 128k PRG / 128k CHR | H | 4 | MMC3 |
Dragon Spirit (J) | 128k PRG / 128k CHR | H | 88 | Namco 118 |
Dragon Strike | 256k PRG / 256k CHR | H | 4 | MMC3 |
Dragon Unit | 128k PRG / 0k CHR | V | 2 | UNROM |
Dragon Warrior | 64k PRG / 16k CHR | H | 1 | MMC1 |
Dragon Warrior 2 | 256k PRG / 0k CHR | V | 1 | MMC1 |
Dragon Warrior 3 | 512k PRG / 0k CHR | H | 1 | MMC1 |
Dragon Warrior 4 | 1024k PRG / 0k CHR | H | 1 | MMC1 |
Dragon Wars | 256k PRG / 128k CHR | V | 4 | MMC3 |
Dragon's Lair | 128k PRG / 0k CHR | V | 2 | UNROM |
Dragonball | 128k PRG / 32k CHR | V | 66 | 34161/32 |
Dragonball [Hacked] | 128k PRG / 32k CHR | V | 34 | Nina-1 |
Dragonball 2 | 128k PRG / 128k CHR | H | 16 | Bandai |
Dragonball 3 | 128k PRG / 256k CHR | H | 16 | Bandai |
Dragonball Z | 256k PRG / 256k CHR | H | 16 | Bandai |
Dragonball Z 2 | 256k PRG / 256k CHR | V | 16 | Bandai |
Dragonball Z 2 [Hacked] | 256k PRG / 256k CHR | V | 17 | FFE F8xxx |
Dragonball Z 3 | 256k PRG / 256k CHR | V | 16 | Bandai |
Dragonball Z 3 [Hacked] | 256k PRG / 256k CHR | V | 17 | FFE F8xxx |
Dragonball Z Gaiden | 256k PRG / 256k CHR | H | 16 | Bandai |
Dragons of Flame | 128k PRG / 128k CHR | H | 1 | MMC1 |
Dream Master | 256k PRG / 256k CHR | H | 19 | Namcot 106 |
Drop Zone | 32k PRG / 32k CHR | V | 3 | CNROM |
Duck | 32k PRG / 8k CHR | H | 0 | NROM |
Duck Hunt | 16k PRG / 8k CHR | V | 0 | NROM |
Ducktales | 128k PRG / 0k CHR | V |
2 | UNROM |
Ducktales 2 | 128k PRG / 0k CHR | V | 2 | UNROM |
Dudes With Attitudes | 32k PRG / 32k CHR | V | 79 | AVE |
Dungeon and Magic | 128k PRG / 128k CHR | V | 1 | MMC1 |
Dungeon Kid | 128k PRG / 0k CHR | H | 1 | MMC1 |
Dungeon Magic | 128k PRG / 128k CHR | V | 1 | MMC1 |
Dusty Diamond All-Star Softball | 128k PRG / 128k CHR | H | 1 | MMC1 |
Dynablaster | 128k PRG / 0k CHR | H | 1 | MMC1 |
Dynamite Batman 2 | 128k PRG / 256k CHR | H | 69 | Sunsoft 5 |
Dynamite Batman 2 [Hacked] | 128k PRG / 256k CHR | H | 17 | FFE F8xxx |
Dynamite Bowl | 32k PRG / 32k CHR | V | 3 | CNROM |
Dynowarz | 128k PRG / 128k CHR | H | 1 | MMC1 |
Title | Size | Mirroring | Mapper | Common Designation | Notes |
Earthbound | 256k PRG / 256k CHR | V | 4 | MMC3 |
Eggerland | 128k PRG / 32k CHR | V | 1 | MMC1 |
Egypt | 32k PRG / 32k CHR | H | 3 | CNROM |
Elevator Action |
32k PRG / 8k CHR |
H | 0 | NROM |
Eliminator Boat Duel | 128k PRG / 128k CHR | V | 1 | MMC1 |
Elite | 128k PRG / 0k CHR | H | 1 | MMC1 |
Elysion | 128k PRG / 128k CHR | H | 1 | MMC1 |
Emo Yan no 10 Bai Pro Yakyuu | 128k PRG / 128k CHR | V | 1 | MMC1 |
Empire Strikes Back, The | 256k PRG / 256k CHR | H | 4 | MMC3 |
Erika to Satoru no Yume Bouken | 128k PRG / 128k CHR | H | 4 | MMC3 |
Erunaaku no Zaihou | 128k PRG / 0k CHR | V | 2 | UNROM |
Esupa Boukentai | 256k PRG / 0k CHR | V | 2 | UNROM |
Excitebike | 16k PRG / 8k CHR | V | 0 | NROM |
Excitebike (PAL) | 16k PRG / 8k CHR | V | 0 | NROM |
Exciting Rally | 128k PRG / 128k CHR | H | 1 | MMC1 |
Exed Exes | 32k PRG / 8k CHR | H | 0 | NROM |
Exerion | 16k PRG / 8k CHR | H | 0 | NROM | |
Exodus | 128k PRG / 128k CHR | V | 11 | Colour Dreams |
Title | Size | Mirroring | Mapper | Common Designation | Notes |
F1 Built to Win | 128k PRG / 128k CHR | H | 1 | MMC1 |
F1 Circus | 256k PRG / 128k CHR | H | 4 | MMC3 |
F1 Hero | 128k PRG / 128k CHR | H | 4 | MMC3 |
F1 Hero 2 | 128k PRG / 128k CHR | H | 4 | MMC3 |
F1 Race | 16k PRG / 8k CHR | V | 0 | NROM |
F117A Stealth Fighter | 256k PRG / 256k CHR | H | 4 | MMC3 |
F15 City War | 32k PRG / 32k CHR | V | 79 | AVE |
Faibird | 128k PRG / 128k CHR | V | 4 | MMC3 |
Famicom Jump | 256k PRG / 128k CHR | H | 16 | Bandai |
Famicom Typing Tutor (Dr PC Jr) | 32k PRG / 0k CHR | H | 0 | NROM |
Famicom Typing Tutor 2 | 32k PRG / 0k CHR | H | 0 | NROM |
Famicom Wars | 128k PRG / 128k CHR | H | 10 | MMC4 |
Famicom Yakyuuban | 128k PRG / 128k CHR | V | 1 | MMC1 |
Family BASIC | 32k PRG / 16k CHR | V | 3 | CNROM |
Family Block | 128k PRG / 32k CHR | H | 66 | 74161/32 |
Family Boxing | 64k PRG / 64k CHR | V | 4 | MMC3 |
Family Circuit | 128k PRG / 32k CHR | V | 4 | MMC3 |
Family Circuit '91 | 512k PRG / 256k CHR | V | 19 | Namcot 106 |
Family Feud | 32k PRG / 128k CHR | H | 1 | MMC1 |
Family Jockey | 32k PRG / 32k CHR | H | 4 | MMC3 |
Family Majyan | 128k PRG / 64k CHR | H | 4 | MMC3 |
Family Majyan 2 | 128k PRG / 64k CHR | H | 4 | MMC3 |
Family Pinball | 128k PRG / 64k CHR | H | 4 | MMC3 |
Family Quiz | 128k PRG / 0k CHR | V | 2 | UNROM |
Family Stadium | 64k PRG / 32k CHR | V | 4 | MMC3 |
Family Stadium '87 | 64k PRG / 32k CHR | V | 4 | MMC3 |
Family Stadium '88 | 128k PRG / 64k CHR | V | 4 | MMC3 |
Family Stadium '89 | 128k PRG / 64k CHR | V | 4 | MMC3 |
Family Stadium '90 | 128k PRG / 128k CHR | H | 19 | Namcot 106 |
Family Stadium '91 | 128k PRG / 128k CHR | V | 4 | MMC3 |
Family Stadium '92 | 128k PRG / 128k CHR | V | 4 | MMC3 |
Family Stadium '93 | 128k PRG / 128k CHR | V | 4 | MMC3 |
Family Stadium '94 | 128k PRG / 128k CHR | V | 4 | MMC3 |
Family Tennis | 64k PRG / 64k CHR | V | 4 | MMC3 |
Family Trainer Running Stadium | 32k PRG / 32k CHR | H | 3 | CNROM |
Fantastic Adventures of Dizzy, The [Aladdin Vers.] | 256k PRG / 0k CHR | V | 71 | Camerica |
Fantasy Zone (J) | 128k PRG / 0k CHR | H | 2 | UNROM |
Faria | 128k PRG / 128k CHR | H | 1 | MMC1 |
Faria (J) | 128k PRG / 128k CHR | V | 1 | MMC1 |
Faxanadu | 256k PRG / 0k CHR | V | 1 | MMC1 |
Faxanadu (J) | 256k PRG / 0k CHR | H | 2 | UNROM |
FC Genjin | 256k PRG / 128k CHR | H | 4 | MMC3 |
Felix the Cat | 128k PRG / 128k CHR | V | 4 | MMC3 |
Fester's Quest | 128k PRG / 128k CHR | H | 1 | MMC1 |
Field Combat | 16k PRG / 8k CHR | V | 0 | NROM |
Fighting Golf | 128k PRG / 128k CHR | H | 1 | MMC1 |
Final Fantasy | 256k PRG / 0k CHR | V | 1 | MMC1 |
Final Fantasy (J) | 256k PRG / 0k CHR | V | 2 | UNROM |
Final Fantasy 2 | 256k PRG / 0k CHR | V | 2 | UNROM |
Final Fantasy 3 | 512k PRG / 0k CHR | V | 4 | MMC3 |
Final Fantasy I/II | 256k PRG / 0k CHR | H | 1 | MMC1 | Should be 512k |
Final Lap | 128k PRG / 128k CHR | V | 19 | Namcot 106 |
Final Mission | 128k PRG / 128k CHR | H | 1 | MMC1 |
Fire Emblem | 256k PRG / 128k CHR | H | 10 | MMC2 |
Fire Emblem [Hacked] | 256k PRG / 128k CHR | V | 4 | MMC3 |
Fire Emblem Gaiden [Hacked] | 256k PRG / 128k CHR | H | 4 | MMC3 |
Firehawk | 128k PRG / 0k CHR | H | 71 | Camerica |
Fist of the North Star | 128k PRG / 0k CHR | V | 2 | UNROM |
Flappy | 32k PRG / 8k CHR | V | 0 | NROM |
Fleet Commander | 32k PRG / 32k CHR | H | 3 | CNROM |
Flintstones, The | 128k PRG / 256k CHR | H | 3 | CNROM |
Flintstones, The (PAL) | 128k PRG / 256k CHR | H | 3 | CNROM |
Flipull | 32k PRG / 32k CHR | V | 3 | CNROM |
Flying Dragon | 128k PRG / 0k CHR | V | 2 | UNROM |
Flying Hero | 128k PRG / 0k CHR | V | 2 | UNROM |
Flying Warriors | 128k PRG / 128k CHR | H | 1 | MMC1 |
Formation Z | 16k PRG / 8k CHR | H | 0 | NROM |
Foton | 128k PRG / 0k CHR | H | 2 | UNROM |
Four Card Games | 32k PRG / 8k CHR | V | 0 | NROM |
Frankenstein | 128k PRG / 128k CHR | V | 1 | MMC1 |
Freedom Force | 128k PRG / 128k CHR | H | 1 | MMC1 |
Friday The 13th | 32k PRG / 32k CHR | V | 3 | CNROM |
Front Line | 16k PRG / 8k CHR | H | 0 | NROM |
Fusigi no Umi no Nadia | 128k PRG / 128k CHR | H | 4 | MMC3 |
Fuzzical Fighter | 128k PRG / 128k CHR | V | 4 | MMC3 |
Title | Size | Mirroring | Mapper | Common Designation | Notes |
Galaga (J) | 16k PRG / 8k CHR | H | 0 | NROM |
Galaxian | 16k PRG / 8k CHR | H | 0 | NROM |
Galaxy 5000 | 128k PRG / 128k CHR | V | 4 | MMC3 |
Galg | 32k PRG / 8k CHR | H | 0 | NROM |
Gambler Jikochusin Ha | 256k PRG / 0k CHR | H | 1 | MMC1 |
Gambler Jikochusin Ha 2 | 256k PRG / 0k CHR | V | 1 | MMC1 |
Game Genie | 16k PRG / 8k CHR | H | 0 | NROM |
Ganbare Goemon [Hacked] | 256k PRG / 0k CHR | V | 6 | FFE F4xxx |
Ganbare Goemon 2 [Hacked?] | 128k PRG / 128k CHR | V | 4 | MMC3 |
Ganbare Goemon Gaiden | 256k PRG / 256k CHR | V | 25 | VRC4 |
Ganbare Goemon Gaiden 2 | 256k PRG / 256k CHR | V | 21 | VRC4-2A |
Garfield | 128k PRG / 32k CHR | H | 1 | MMC1 |
Gargoyle's Quest 2 | 128k PRG / 128k CHR | H | 4 | MMC3 |
Garou Densetsu Special | 256k PRG / 256k CHR | H | 83 | PC-Cony |
Garou Densetsu Special [Hacked] | 256k PRG / 256k CHR | H | 4 | MMC3 |
Gauntlet | 128k PRG / 64k CHR | V | 4 | MMC3 |
Gauntlet 2 | 128k PRG / 128k CHR | H | 4 | MMC3 |
Gauntlet 2 (PAL) | 128k PRG / 128k CHR | H | 4 | MMC3 |
Gaurdian Legend, The | 128k PRG / 0k CHR | V | 2 | UNROM |
Gaurdic Gaiden | 128k PRG / 0k CHR | V | 2 | UNROM |
Gegege no Kitarou | 32k PRG / 32k CHR | V | 3 | CNROM |
Gegege no Kitarou 2 | 128k PRG / 128k CHR | H | 70 | 74161/32 |
Gegege no Kitarou 2 [Hacked] | 256k PRG / 0k CHR | V | 6 | FFE F4xxx |
Gekikame Ninjaden | 128k PRG / 128k CHR | H | 1 | MMC1 |
Gekitotu 4 Kubattle | 128k PRG / 0k CHR | H | 2 | UNROM |
Gekitou Pro Wrestling | 128k PRG / 128k CHR | V | 1 | MMC1 |
Gekitou Stadium | 128k PRG / 128k CHR | V | 1 | MMC1 |
Geimos | 32k PRG / 8k CHR | H | 0 | NROM |
Gemfire | 256k PRG / 256k CHR | H | 5 | MMC5 |
Genghis Khan | 256k PRG / 0k CHR | H | 1 | MMC1 |
Genghis Khan (J) | 256k PRG / 0k CHR | V | 1 | MMC1 |
Genpei Toumaden | 128k PRG / 64k CHR | H | 4 | MMC3 |
George Foreman's KO Boxing | 128k PRG / 256k CHR | H | 4 | MMC3 |
Getsufuu Maden | 128k PRG / 128k CHR | H | 23 | VRC2b |
Ghostbuste- rs |
32k PRG / 32k CHR | H | 3 | CNROM |
Ghostbuste- rs (J) |
32k PRG / 32k CHR | H | 3 | CNROM |
Ghostbuste- rs 2 |
128k PRG / 128k CHR | H | 1 | MMC1 |
Ghosts N' Goblins | 128k PRG / 0k CHR | V | 2 | UNROM |
Ghoul School | 128k PRG / 128k CHR | V | 1 | MMC1 |
GI Joe | 128k PRG / 256k CHR | H | 4 | MMC3 |
GI Joe - The Atlantis Factor | 128k PRG / 256k CHR | H | 4 | MMC3 |
Gilligan's Island | 128k PRG / 0k CHR | H | 2 | UNROM |
Gimmick! | 256k PRG / 128k CHR | V | 69 | Sunsoft 5 |
Ginga Eiyuu Densetsu | 128k PRG / 128k CHR | V | 1 | MMC1 |
Ginga no Sannin | 128k PRG / 0k CHR | V | 2 | UNROM |
Goal | 256k PRG / 128k CHR | H | 1 | MMC1 |
God Slayer | 256k PRG / 128k CHR | H | 4 | MMC3 |
Godzilla | 128k PRG / 128k CHR | H | 1 | MMC1 |
Godzilla (J) | 128k PRG / 128k CHR | V | 1 | MMC1 |
Godzilla 2 | 128k PRG / 128k CHR | H | 1 | MMC1 |
Gold Medal Challenge '92 | 128k PRG / 128k CHR | H | 4 | MMC3 |
Golf | 16k PRG / 8k CHR | V | 0 | NROM |
Golf '92, The | 128k PRG / 128k CHR | H | 1 | MMC1 |
Golf Grand Slam | 128k PRG / 128k CHR | H | 1 | MMC1 |
Golf Open | 128k PRG / 256k CHR | H | 33 | TC0190 / TC0350 |
Golgo 13 | 128k PRG / 128k CHR | H | 1 | MMC1 |
Golgo 13 (J) | 128k PRG / 128k CHR | H | 1 | MMC1 |
Golgo 13 - The Mafat Conspiracy | 128k PRG / 128k CHR | H | 4 | MMC3 |
Golgo 13 - The Riddle of Icarus | 128k PRG / 128k CHR | H | 4 | MMC3 |
Gomoku Narabe | 16k PRG / 8k CHR | V | 0 | NROM |
Goonies, The | 32k PRG / 16k CHR | V | 3 | CNROM |
Goonies 2, The | 128k PRG / 0k CHR | V | 2 | UNROM |
Goonies 2, The (J) | 128k PRG / 0k CHR | V | 2 | UNROM |
Gorby no Pipeline Daisakusen | 32k PRG / 32k CHR | H | 3 | CNROM |
Gotcha | 32k PRG / 32k CHR | V | 3 | CNROM |
Gozonji Yajikita Tindouchu | 256k PRG / 128k CHR | H | 1 | MMC1 |
Gradius (J) | 32k PRG / 32k CHR | V | 3 | CNROM |
Gradius 2 | 128k PRG / 128k CHR | V | 25 | VRC4 |
Grand Master | 256k PRG / 128k CHR | H | 1 | MMC1 |
Great Deal | 128k PRG / 0k CHR | V | 1 | MMC1 |
Great Tank | 128k PRG / 128k CHR | V | 1 | MMC1 |
Gremlins 2 | 128k PRG / 256k CHR | H | 4 | MMC3 |
Guerilla War | 128k PRG / 128k CHR | H | 1 | MMC1 |
Gumshoe | 128k PRG / 32k CHR | H | 66 | 74161/32 |
Gunhed | 128k PRG / 128k CHR | V | 1 | MMC1 |
Gunnac | 128k PRG / 128k CHR | V | 4 | MMC3 |
Gunnac (J) | 128k PRG / 128k CHR | V | 4 | MMC3 |
Gunsight | 128k PRG / 128k CHR | H | 5 | MMC5 |
Gunsmoke | 128k PRG / 0k CHR | H | 2 | UNROM |
Gunsmoke (PAL) | 128k PRG / 0k CHR | H | 2 | UNROM |
Gyrodine | 32k PRG / 8k CHR | V | 0 | NROM |
Gyruss | 32k PRG / 32k CHR | V | 3 | CNROM |
Title | Size | Mirroring | Mapper | Common Designation | Notes |
Haja no Fuuin | 128k PRG / 128k CHR | V | 1 | MMC1 |
Hana no Star Kaidou | 128k PRG / 0k CHR | V | 2 | UNROM |
Hanjuku Hero | 128k PRG / 0k CHR | H | 2 | UNROM |
Harlem Globetrotters | 128k PRG / 128k CHR | H | 1 | MMC1 |
Hatris | 128k PRG / 0k CHR | H | 1 | MMC1 |
Hatris (J) | 128k PRG / 0k CHR | V | 2 | UNROM |
Heavy Barrel | 128k PRG / 128k CHR | H | 4 | MMC3 |
Heavy Shreddin' | 128k PRG / 128k CHR | V | 1 | MMC1 |
Hebereke | 128k PRG / 128k CHR | V | 69 | Sunsoft 5 |
Hector '87 | 128k PRG / 0k CHR | V | 2 | UNROM |
Hello Kitty no Ohana Batake | 32k PRG / 32k CHR | V | 3 | CNROM |
Hello Kitty World | 128k PRG / 0k CHR | V | 2 | UNROM |
Hercules no Eikou | 128k PRG / 0k CHR | V | 2 | UNROM |
Hercules no Eikou 2 | 256k PRG / 0k CHR | V | 1 | MMC1 |
Heroes of the Lance | 128k PRG / 128k CHR | H | 1 | MMC1 |
Heroes of the Lance (J) | 128k PRG / 128k CHR | H | 1 | MMC1 |
Hi no Tori | 128k PRG / 0k CHR | V | 2 | UNROM |
Higemaru Makaijima | 128k PRG / 0k CHR | V | 2 | UNROM |
High Speed | 128k PRG / 64k CHR | H | 119 | TQROM |
High Speed (PAL) | 128k PRG / 64k CHR | H | 119 | TQROM |
Highway Star | 128k PRG / 0k CHR | V | 2 | UNROM |
Hillsfar (J) | 256k PRG / 0k CHR | H | 1 | MMC1 |
Hirake Ponkikki | 32k PRG / 32k CHR | V | 1 | MMC1 |
Hiryuu no Ken | 128k PRG / 0k CHR | V | 2 | UNROM |
Hiryuu no Ken 2 | 128k PRG / 128k CHR | H | 1 | MMC1 |
Hiryuu no Ken 3 | 128k PRG / 128k CHR | V | 4 | MMC3 |
Hiryuu no Ken SP Fighting Wars | 128k PRG / 128k CHR | V | 1 | MMC1 |
Hissatu Dojo Yaburi | 256k PRG / 0k CHR | H | 1 | MMC1 |
Hissatu Sigotonin | 256k PRG / 128k CHR | H | 4 | MMC3 |
Hittra no Fukkatu | 256k PRG / 0k CHR | H | 1 | MMC1 |
Hogan's Alley | 16k PRG / 8k CHR | H | 0 | NROM |
Hokuto no Ken | 32k PRG / 32k CHR | V | 3 | CNROM |
Hokuto no Ken 2 | 128k PRG / 0k CHR | V | 2 | UNROM |
Hokuto no Ken 3 | 256k PRG / 0k CHR | H | 1 | MMC1 |
Hokuto no Ken 4 | 256k PRG / 0k CHR | V | 1 | MMC1 |
Hollywood Squares | 256k PRG / 0k CHR | H | 7 | AOROM |
Holy Diver | 128k PRG / 128k CHR | H | 78 | 74161/32 |
Home Alone | 128k PRG / 104k CHR | H | 4 | MMC3 | Probably a bad dump. |
Home Alone 2 | 128k PRG / 128k CHR | H | 4 | MMC3 |
Home Run Nighter | 128k PRG / 128k CHR | V | 1 | MMC1 |
Home Run Nighter '90 | 128k PRG / 128k CHR | V | 4 | MMC3 |
Hook | 128k PRG / 128k CHR | H | 1 | MMC1 |
Hook (J) | 128k PRG / 128k CHR | H | 1 | MMC1 |
Hoops | 128k PRG / 128k CHR | V | 1 | MMC1 |
Hosi no Kirby | 512k PRG / 256k CHR | H | 4 | MMC3 |
Hosi wo Miruhito | 128k PRG / 0k CHR | V | 2 | UNROM |
Hostages | 128k PRG / 128k CHR | V | 1 | MMC1 |
Hot Slots | 32k PRG / 64k CHR | H | 3 | CNROM |
Hototogisu | 256k PRG / 0k CHR | V | 1 | MMC1 |
Hottaman no Titeitanken | 32k PRG / 32k CHR | V | 3 | CNROM |
Houmaga Toki | 128k PRG / 0k CHR | V | 2 | UNROM |
Hudson Hawk | 128k PRG / 128k CHR | V | 1 | MMC1 |
Hunt For Red October, The | 128k PRG / 128k CHR | H | 4 | MMC3 |
Hyaku no Sekai no Monogatari | 128k PRG / 128k CHR | V | 1 | MMC1 |
Hyauti Super Igo | 32k PRG / 32k CHR | V | 3 | CNROM |
Hydlide | 32k PRG / 8k CHR | H | 0 | NROM |
Hydlide (J) | 32k PRG / 8k CHR | H | 0 | NROM |
Hydlide 3 | 256k PRG / 128k CHR | H | 19 | Namcot 106 |
Hyokkori Hyoutan Jima | 128k PRG / 128k CHR | H | 1 | MMC1 |
Hyper Olympic | 16k PRG / 8k CHR | V | 0 | NROM |
Hyper Olympic - Tonosoma Edition | 32k PRG / 8k CHR | V | 0 | NROM |
Hyper Sports | 16k PRG / 8k CHR | V | 0 | NROM |
Title | Size | Mirroring | Mapper | Common Designation | Notes |
I Love Softball | 128k PRG / 128k CHR | V | 1 | MMC1 |
Ice Climber | 16k PRG / 8k CHR | H | 0 | NROM |
Ice Climber (Disk Conversion) | 32k PRG / 0k CHR | H | 0 | NROM | Uses .sav file to load |
Ice Hockey | 32k PRG / 8k CHR | V | 0 | NROM |
Ice Hockey (Disk Conversion) | 32k PRG / 8k CHR | V | 0 | NROM | Uses .sav file to load |
Idol Hakkenden | 128k PRG / 128k CHR | H | 1 | MMC1 |
Idol Shisen Mahjongg | 32k PRG / 64k CHR | V | 3 | CNROM |
Igo Sinan | 32k PRG / 8k CHR | H | 0 | NROM |
Igo Sinan '91 | 128k PRG / 32k CHR | H | 1 | MMC1 |
Igo Sinan '93 | 128k PRG / 32k CHR | H | 1 | MMC1 |
Ikari Warriors | 128k PRG / 0k CHR | H | 2 | UNROM |
Ikari Warriors (J) | 128k PRG / 0k CHR | H | 2 | UNROM |
Ikari Warriors 2 | 256k PRG / 0k CHR | V | 1 | MMC1 |
Ikari Warriors 2 (J) | 256k PRG / 0k CHR | H | 2 | UNROM |
Ikari Warriors 3 | 128k PRG / 128k CHR | H | 1 | MMC1 |
Ikari Warriors 3 (J) |
128k PRG / 128k CHR | H | 1 | MMC1 |
Ike Ike Nekketsu Hockey | 128k PRG / 128k CHR | H | 4 | MMC3 |
Ikinari Musician | 32k PRG / 16k CHR | V | 3 | CNROM |
Ikki | 16k PRG / 8k CHR | V | 0 | NROM |
Image Fight | 128k PRG / 128k CHR | H | 4 | MMC3 |
Image Fight (J) | 128k PRG / 128k CHR | H | 32 | Irem G101 |
Immortal, The | 128k PRG / 256k CHR | H | 4 | MMC3 |
Impossible Mission 2 | 64k PRG / 64k CHR | H | 34 | Nina-1 |
Incredible Crash Dummies, The | 128k PRG / 256k CHR | H | 4 | MMC3 |
Indiana Jones / Last Crusade | 256k PRG / 0k CHR | V | 1 | MMC1 |
Indiana Jones / Temple of Doom | 128k PRG / 128k CHR | V | 4 | MMC3 |
Indra no Hikari | 128k PRG / 0k CHR | H | 2 | UNROM |
Infiltrator | 128k PRG / 128k CHR | H | 4 | MMC3 |
Insector X | 128k PRG / 128k CHR | V | 33 | TC0190 / TC0350 |
International Cricket | 128k PRG / 128k CHR | H | 1 | MMC1 |
Iron Tank | 128k PRG / 128k CHR | H | 1 | MMC1 |
Isolated Warrior | 128k PRG / 128k CHR | H | 4 | MMC3 |
Itadaki Street | 128k PRG / 128k CHR | H | 1 | MMC1 |
Title | Size | Mirroring | Mapper | Common Designation | Notes |
J League - King of Ace Strikers | 128k PRG / 128k CHR | H | 4 | MMC3 |
Jack Nicklaus Golf | 128k PRG / 0k CHR | V | 2 | UNROM |
Jackal | 128k PRG / 0k CHR | V | 2 | UNROM |
Jackie Chan | 128k PRG / 128k CHR | V | 4 | MMC3 |
Jackie Chan's Action Kung-Fu | 128k PRG / 128k CHR | H | 4 | MMC3 |
Jajamaru no Daibouken | 32k PRG / 32k CHR | V | 3 | CNROM |
Jajamaru no Gekimaden | 128k PRG / 128k CHR | H | 18 | SS8806 |
Jajamaru no Ginga Daisakusen | 128k PRG / 128k CHR | H | 18 | SS8806 |
James Bond Jr. | 128k PRG / 128k CHR | H | 4 | MMC3 |
James Bond Jr. (PAL) | 128k PRG / 128k CHR | H | 4 | MMC3 |
Jarinko Chie | 128k PRG / 256k CHR | H | 23 | VRC2b |
Jarvas | 128k PRG / 128k CHR | V | 4 | MMC3 |
Jaws | 32k PRG / 32k CHR | H | 3 | CNROM |
Jeopardy | 128k PRG / 0k CHR | V | 7 | AOROM |
Jeopardy 25th Anniversary Ed. | 128k PRG / 0k CHR | H | 7 | AOROM |
Jeopardy Jr. | 128k PRG / 0k CHR | H | 7 | AOROM |
Jesus | 256k PRG / 0k CHR | V | 2 | UNROM |
Jetsons, The | 128k PRG / 256k CHR | H | 4 | MMC3 |
Jewelry | 16k PRG / 8k CHR | V | 0 | NROM |
Jikuuyuuden Debias | 128k PRG / 64k CHR | V | 4 | MMC3 |
Jimmy Connors Tennis | 128k PRG / 0k CHR | V | 2 | UNROM |
Jimmy Connors Tennis (PAL) | 128k PRG / 0k CHR | V | 2 | UNROM |
Joe and Mac | 128k PRG / 128k CHR | H | 4 | MMC3 |
John Elway's Quarterback | 32k PRG / 32k CHR | V | 3 | CNROM |
Jongbou | 128k PRG / 0k CHR | V | 2 | UNROM |
Jordan vs Bird | 128k PRG / 0k CHR | V | 2 | UNROM |
Journey to Silius | 128k PRG / 128k CHR | H | 1 | MMC1 |
Joust | 16k PRG / 8k CHR | V | 0 | NROM |
Jovei Quest | 256k PRG / 256k CHR | H | 19 | Namcot 106 |
Joy Mecha Fight | 256k PRG / 256k CHR | V | 4 | MMC3 |
Jumpin' Kid | 128k PRG / 128k CHR | H | 4 | MMC3 |
Jungle Book, The | 128k PRG / 128k CHR | H | 4 | MMC3 |
Jurassic Park | 128k PRG / 128k CHR | H | 4 | MMC3 |
Just Breed | 512k PRG / 256k CHR | V | 5 | MMC5 |
Jyanbou Ozaki no Hole-in-One | 128k PRG / 32k CHR | V | 1 | MMC1 |
Title | Size | Mirroring | Mapper | Common Designation | Notes |
Kabuki Quantum Fighter | 128k PRG / 128k CHR | V | 4 | MMC3 |
Kabusiki Doujyou | 256k PRG / 0k CHR | V | 1 | MMC1 |
Kage | 128k PRG / 128k CHR | H | 4 | MMC3 |
Kagerou Densetsu | 128k PRG / 128k CHR | V | 4 | MMC3 |
Kaguya Hime Densetsu | 256k PRG / 0k CHR | H | 2 | UNROM |
Kaijyu Monogatari [Hacked] | 128k PRG / 128k CHR | H | 4 | MMC3 |
Kaiketsu Yanchamaru Karakuri Land 2 [Hacked] | 128k PRG / 128k CHR | V | 17 | FFE F8xxx |
Kaiketsu Yanchamaru Karakuri Land 3 | 128k PRG / 128k CHR | H | 65 | Irem H3001 |
Kakefu-kun no Jump Tengoku | 128k PRG / 0k CHR | V | 2 | UNROM |
Kame no Ongaesi | 128k PRG / 128k CHR | H | 1 | MMC1 |
Kamen no Ninja Akakage | 128k PRG / 0k CHR | V | 2 | UNROM |
Kamen no Ninja Hanamaru | 128k PRG / 128k CHR | H | 1 | MMC1 |
Kamen Rider Club | 128k PRG / 128k CHR | H | 70 | 74161/32 |
Kamen Rider SD | 128k PRG / 128k CHR | V | 4 | MMC3 |
Karate Champ | 32k PRG / 32k CHR | H | 3 | CNROM |
Karate Kid, The | 32k PRG / 32k CHR | V | 3 | CNROM |
Karateka | 16k PRG / 8k CHR | V | 0 | NROM |
Karnov | 128k PRG / 128k CHR | H | 4 | MMC3 |
Karnov (J) | 128k PRG / 64k CHR | H | 4 | MMC3 |
Kart Fighter | 128k PRG / 256k CHR | H | 4 | MMC3 |
Katteni Sirokuma | 128k PRG / 128k CHR | H | 1 | MMC1 |
Kawa no Nushi Tsuri | 128k PRG / 128k CHR | H | 4 | MMC3 |
Keiba Honmei | 128k PRG / 128k CHR | H | 4 | MMC3 |
Keisan Game Sansuu 2 | 32k PRG / 32k CHR | V | 3 | CNROM |
Keisan Game Sansuu 3 | 32k PRG / 16k CHR | V | 3 | CNROM |
Keisan Game Sansuu 4 | 32k PRG / 32k CHR | V | 3 | CNROM |
Keisan Game Sansuu 5/6 Nen | 32k PRG / 32k CHR | V | 3 | CNROM |
Kero Kero Keroppi | 32k PRG / 32k CHR | H | 3 | CNROM |
Kero Kero Keroppi 2 | 128k PRG / 128k CHR | H | 1 | MMC1 |
Keru Naguru | 128k PRG / 128k CHR | V | 4 | MMC3 |
Kick Master | 128k PRG / 128k CHR | H | 4 | MMC3 |
Kick Off | 128k PRG / 0k CHR | V | 2 | UNROM |
Kickle Cubicle | 128k PRG / 128k CHR | H | 4 | MMC3 |
Kid Icarus | 128k PRG / 0k CHR | V | 1 | MMC1 |
Kid Klown | 128k PRG / 128k CHR | H | 4 | MMC3 |
Kid Kool | 128k PRG / 0k CHR | V | 2 | UNROM |
Kid Niki | 256k PRG / 0k CHR | H | 1 | MMC1 |
King Kong 2 | 128k PRG / 128k CHR | V | 4 | MMC3 |
King of Kings | 128k PRG / 128k CHR | V | 11 | Colour Dreams |
King of Kings (J - diff. game) | 128k PRG / 128k CHR | H | 4 | MMC3 |
King's Knight | 32k PRG / 32k CHR | H | 3 | CNROM |
King's Knight (J) | 32k PRG / 32k CHR | H | 3 | CNROM |
King's Quest 5 | 256k PRG / 256k CHR | V | 4 | MMC3 |
Kings of the Beach | 32k PRG / 32k CHR | H | 3 | CNROM |
Kinniku Man | 16k PRG / 8k CHR | V | 0 | NROM |
Kirby's Adventure | 512k PRG / 256k CHR | H | 4 | MMC3 |
Kiri no London Satsujin Jiken | 256k PRG / 0k CHR | H | 1 | MMC1 |
Kiteretsu Daihyakka | 128k PRG / 128k CHR | H | 1 | MMC1 |
Kiwi Kraze | 128k PRG / 128k CHR | H | 4 | MMC3 |
Klash Ball | 128k PRG / 0k CHR | H | 2 | UNROM |
Klax | 64k PRG / 64k CHR | H | 64 | Rambo-1 |
Klax (J) | 128k PRG / 64k CHR | H | 4 | MMC3 |
Knight Rider | 64k PRG / 128k CHR | H | 1 | MMC1 |
Konami Sport in Soul | 128k PRG / 128k CHR | V | 4 | MMC3 |
Koushien | 128k PRG / 128k CHR | V | 1 | MMC1 |
Krazy Kreatures | 32k PRG / 32k CHR | V | 79 | AVE |
Krion Conquest, The | 128k PRG / 128k CHR | H | 4 | MMC3 |
Krusty's Fun House | 256k PRG / 128k CHR | H | 4 | MMC3 |
Krusty's Fun House (PAL) | 256k PRG / 128k CHR | H | 4 | MMC3 |
Kuja Kuou | 256k PRG / 0k CHR | V | 1 | MMC1 |
Kuja Kuou 2 | 128k PRG / 128k CHR | H | 1 | MMC1 |
Kung-Fu | 32k PRG / 8k CHR | V | 0 | NROM |
Kung-Fu Heroes | 32k PRG / 32k CHR | H | 3 | CNROM |
Kureyon Shinchan | 128k PRG / 128k CHR | H | 16 | Bandai |
Kurogane Hirosi no Keiba Densetu | 128k PRG / 128k CHR | H | 4 | MMC3 |
Kyoro-chan Land | 128k PRG / 0k CHR | H | 2 | UNROM |
Kyoto Hana no Missutu Satsujin Jiken | 128k PRG / 128k CHR | V | 4 | MMC3 |
Kyoto Sesupensu Misa Yamamura Satsujin Jiken | 128k PRG / 128k CHR | V | 4 | MMC3 |
Kyuukyoku Stadium | 128k PRG / 128k CHR | H | 82 | Taito X117 |
Kyuukyoko Harikiri Stadium | 128k PRG / 256k CHR | H | 82 | Taito X117 |
Kyuukyoku Harikiri Stadium 3 | 128k PRG / 256k CHR | H | 82 | Taito X117 |
Kyuukyoku Tiger | 128k PRG / 128k CHR | V | 1 | MMC1 |
Title | Size | Mirroring | Mapper | Common Designation | Notes |
L'Emperuer | 256k PRG / 128k CHR | H | 5 | MMC5 |
Labyrinth | 128k PRG / 0k CHR | V | 2 | UNROM |
Lagrange Point | 512k PRG / 0k CHR | H | 85 | VRC7 |
Laser Invasion | 128k PRG / 128k CHR | H | 5 | MMC5 |
Last Armageddon | 512k PRG / 0k CHR | V | 4 | MMC3 |
Last Ninja, The | 128k PRG / 128k CHR | H | 4 | MMC3 |
Last Starfighter, The | 32k PRG / 32k CHR | H | 3 | CNROM |
Law of the West | 128k PRG / 0k CHR | H | 2 | UNROM |
Layla | 128k PRG / 0k CHR | V | 2 | UNROM |
Lee Trevino's Fighting Golf | 128k PRG / 128k CHR | H | 1 | MMC1 |
Legacy of the Wizard | 128k PRG / 64k CHR | H | 4 | MMC3 |
Legend of Kage, The (J) | 32k PRG / 16k CHR | H | 3 | CNROM |
Legend of the Ghost Lion, The | 128k PRG / 128k CHR | H | 1 | MMC1 |
Legend of Zelda, The | 128k PRG / 0k CHR | H | 1 | MMC1 |
Legend of Zelda (-1 PRG Rev.) | 128k PRG / 0k CHR | H | 1 | MMC1 |
Legendary Wings | 128k PRG / 0k CHR | V | 2 | UNROM |
Legends of the Diamond | 128k PRG / 256k CHR | H | 4 | MMC3 |
Lemmings | 128k PRG / 128k CHR | H | 1 | MMC1 |
Life Force | 128k PRG / 0k CHR | V | 2 | UNROM |
Linus Spacehead | 256k PRG / 0k CHR | V | 71 | Camerica |
Linus Spacehead [Aladdin Ver.] | 256k PRG / 0k CHR | V | 71 | Camerica |
Lion King, The | 256k PRG / 0k CHR | H | 7 | AOROM |
Lipple Island | 128k PRG / 0k CHR | V | 2 | UNROM |
Little League Baseball | 128k PRG / 128k CHR | H | 1 | MMC1 |
Little Mermaid, The | 128k PRG / 0k CHR | V | 2 | UNROM |
Little Mermaid, The (J) | 128k PRG / 0k CHR | V | 2 | UNROM |
Little Nemo The Dream Master | 128k PRG / 128k CHR | H | 4 | MMC3 |
Little Ninja Brothers | 128k PRG / 128k CHR | H | 4 | MMC3 |
Lode Runner (J) | 16k PRG / 8k CHR | V | 0 | NROM |
Lone Ranger, The | 256k PRG / 128k CHR | H | 4 | MMC3 |
Loopz | 128k PRG / 0k CHR | H | 2 | UNROM |
Lord of King, The | 128k PRG / 128k CHR | H | 18 | SS8806 |
Lost Word of Jenny, The | 128k PRG / 0k CHR | V | 2 | UNROM |
Lot Lot | 32k PRG / 8k CHR | H | 0 | NROM |
Low G Man | 128k PRG / 128k CHR | H | 4 | MMC3 |
Lunar Ball | 16k PRG / 8k CHR | V | 0 | NROM |
Lupin 3rd Pandra Nolsan | 128k PRG / 64k CHR | V | 4 | MMC3 |
Title | Size | Mirroring | Mapper | Common Designation | Notes |
Mach Rider | 32k PRG / 8k CHR | H | 0 | NROM |
Macross | 16k PRG / 8k CHR | V | 0 | NROM |
Mad City | 128k PRG / 128k CHR | H | 1 | MMC1 |
Mad Max | 128k PRG / 96k CHR | H | 4 | MMC3 | Probably a dump. |
Mag Max | 32k PRG / 32k CHR | V | 3 | CNROM |
Mag Max (J) | 32k PRG / 8k CHR | H | 0 | NROM |
Magic Darts | 128k PRG / 128k CHR | H | 1 | MMC1 |
Magic John | 128k PRG / 128k CHR | H | 18 | SS8806 |
Magic Johnson's Fast Break | 128k PRG / 128k CHR | H | 1 | MMC1 |
Magic of Scherezade, The | 128k PRG / 128k CHR | V | 1 | MMC1 |
Magical Doropie | 128k PRG / 128k CHR | V | 4 | MMC3 |
Magical Taruruto-Kun | 128k PRG / 128k CHR | H | 16 | Bandai |
Magical Taruruto-Kun 2 | 128k PRG / 128k CHR | H | 16 | Bandai |
Magician | 128k PRG / 128k CHR | H | 4 | MMC3 |
Magunamu Kikiipatu | 128k PRG / 0k CHR | V | 2 | UNROM |
Maharaja | 128k PRG / 128k CHR | H | 68 | Sunsoft 4 |
Mahou no Princess Minky Momo | 128k PRG / 128k CHR | V | 1 | MMC1 |
Maijin Eiyuuden Wataru Gaiden | 256k PRG / 0k CHR | H | 1 | MMC1 |
Maison Ikkoku | 256k PRG / 0k CHR | H | 2 | UNROM |
Majaventure | 128k PRG / 128k CHR | H | 1 | MMC1 |
Major League | 128k PRG / 128k CHR | V | 33 | TC0190 / TC0350 |
Major League Baseball | 32k PRG / 32k CHR | V | 3 | CNROM |
Majyan RPG Dora Dora Dora | 128k PRG / 128k CHR | H | 1 | MMC1 |
Majyou Densetsu 2 | 128k PRG / 0k CHR | V | 2 | UNROM |
Makaimura | 128k PRG / 0k CHR | H | 2 | UNROM |
Maniac Mansion | 256k PRG / 0k CHR | V | 1 | MMC1 |
Maniac Mansion (J) | 256k PRG / 0k CHR | V | 2 | UNROM |
Maniac Mansion (PAL) | 256k PRG / 0k CHR | H | 1 | MMC1 |
Mappy | 16k PRG / 8k CHR | V | 0 | NROM |
Mappy Kids | 128k PRG / 128k CHR | H | 19 | Namcot 106 |
Mappy Land | 128k PRG / 32k CHR | H | 4 | MMC3 |
Mappy Land (J) | 128k PRG / 32k CHR | V | 4 | MMC3 |
Marble Madness | 128k PRG / 0k CHR | V | 7 | AOROM |
Marble Madness (PAL) | 128k PRG / 0k CHR | H | 7 | AOROM |
Mario Bros | 16k PRG / 8k CHR | V | 0 | NROM |
Mario China | 32k PRG / 32k CHR | V | 3 | CNROM |
Mario is Missing | 128k PRG / 128k CHR | H | 4 | MMC3 |
Mario Open Golf | 256k PRG / 0k CHR | H | 1 | MMC1 |
Mario's Time Machine | 128k PRG / 128k CHR | H | 4 | MMC3 |
Marusa no Onna | 128k PRG / 128k CHR | H | 1 | MMC1 |
Master Chu and the Drunkard Hu | 32k PRG / 32k CHR | H | 11 | Colour Dreams |
Masuzoe Youiti no Asamade | 512k PRG / 0k CHR | H | 4 | MMC3 |
Masyou | 128k PRG / 0k CHR | H | 34 | Nina-1 |
Maten Douji | 128k PRG / 128k CHR | V | 4 | MMC3 |
Matsumoto Tooru no Kabusiki Hissyougaku | 256k PRG / 0k CHR | V | 2 | UNROM |
Matsumoto Tooru no Kabusiki Hissyougaku 2 | 256k PRG / 0k CHR | V | 1 | MMC1 |
Max Warrior | 128k PRG / 128k CHR | V | 4 | MMC3 |
McKids | 128k PRG / 128k CHR | H | 4 | MMC3 |
Mechanized Attack | 64k PRG / 128k CHR | H | 1 | MMC1 |
Mega Man | 128k PRG / 0k CHR | V | 2 | UNROM |
Mega Man 2 | 256k PRG / 0k CHR | V | 1 | MMC1 |
Mega Man 3 | 256k PRG / 128k CHR | H | 4 | MMC3 |
Mega Man 4 | 512k PRG / 0k CHR | H | 4 | MMC3 |
Mega Man 4 (PAL) | 512k PRG / 0k CHR | H | 4 | MMC3 |
Mega Man 5 | 256k PRG / 256k CHR | H | 4 | MMC3 |
Mega Man 6 | 512k PRG / 0k CHR | H | 4 | MMC3 |
Megami Tensei | 128k PRG / 128k CHR | V | 4 | MMC3 |
Megami Tensei 2 | 256k PRG / 256k CHR | V | 19 | Namcot 106 |
Meiji Ishin | 256k PRG / 0k CHR | H | 1 | MMC1 |
Meikyu Jima | 128k PRG / 128k CHR | H | 32 | Irem G101 |
Meikyu Kumikyoko | 32k PRG / 32k CHR | V | 3 | CNROM |
Meimom Takonishi Ouendan | 128k PRG / 128k CHR | H | 4 | MMC3 |
Meitantei Holmes | 256k PRG / 0k CHR | H | 1 | MMC1 |
Meitantei Holmes Kori no London Satsujin Jiken | 256k PRG / 0k CHR | H | 2 | UNROM |
Melville's Flame | 128k PRG / 128k CHR | V | 1 | MMC1 |
Mendel Palace | 128k PRG / 128k CHR | V | 4 | MMC3 |
Metal Fighter | 32k PRG / 32k CHR | H | 11 | Colour Dreams |
Metal Flame Psybuster | 128k PRG / 128k CHR | V | 1 | MMC1 |
Metal Gear | 128k PRG / 0k CHR | V | 2 | UNROM |
Metal Gear (J) | 128k PRG / 0k CHR | H | 2 | UNROM |
Metal Max | 256k PRG / 256k CHR | H | 4 | MMC3 |
Metal Mech | 128k PRG / 128k CHR | V | 1 | MMC1 |
Metal Slader Glory | 512k PRG / 512k CHR | V | 5 | MMC5 |
Metal Storm | 128k PRG / 256k CHR | H | 4 | MMC3 |
Metal Storm (J) | 128k PRG / 256k CHR | V | 4 | MMC3 |
Metro Cross | 32k PRG / 32k CHR | V | 4 | MMC3 |
Metroid | 128k PRG / 0k CHR | V | 1 | MMC1 |
Mezase Top Pro | 256k PRG / 128k CHR | H | 18 | SS8806 |
Mickey Mouse | 32k PRG / 32k CHR | V | 3 | CNROM |
Mickey Mousecap- |
32k PRG / 32k CHR | V | 3 | CNROM |
Micro Machines | 256k PRG / 0k CHR | V | 71 | Camerica |
Micro Machines [Aladdin Ver.] | 256k PRG / 0k CHR | V | 71 | Camerica |
Might and Magic | 256k PRG / 256k CHR | H | 4 | MMC3 |
Might and Magic (J) | 256k PRG / 256k CHR | H | 4 | MMC3 |
Mighty Bomb Jack (J) | 32k PRG / 8k CHR | H | 0 | NROM |
Mighty Final Fight | 128k PRG / 128k CHR | H | 4 | MMC3 |
Mighty Final Fight (J) | 128k PRG / 128k CHR | H | 4 | MMC3 |
Mike Tyson's Punch-Out | 128k PRG / 128k CHR | V | 9 | MMC2 |
Millipede | 16k PRG / 8k CHR | H | 0 | NROM |
Milon's Secret Castle | 32k PRG / 32k CHR | V | 3 | CNROM |
Mindseeker | 128k PRG / 144k CHR | H | 19 | Namcot 106 | Bad dump? |
Minelvation Saga | 128k PRG / 128k CHR | H | 4 | MMC3 |
Mini-Putt | 128k PRG / 128k CHR | H | 1 | MMC1 |
Minnie no Talabou Nakayosi Daisakusen | 32k PRG / 32k CHR | H | 3 | CNROM |
Miracle Piano System | 256k PRG / 64k CHR | H | 1 | MMC1 |
Miracle Ropit's Adventure in 2100 | 128k PRG / 0k CHR | V | 2 | UNROM |
Mirai Sensei Lios | 256k PRG / 0k CHR | V | 1 | MMC1 |
Mission Cobra | 32k PRG / 16k CHR | V | 11 | Colour Dreams |
Mission Impossible | 128k PRG / 128k CHR | H | 4 | MMC3 |
Mission Impossible (PAL) | 128k PRG / 128k CHR | H | 4 | MMC3 |
Mitsume ga Tooru | 128k PRG / 128k CHR | V | 4 | MMC3 |
Mizusima Senji no Dai Koushien | 256k PRG / 0k CHR | V | 1 | MMC1 |
Moai Kun | 32k PRG / 32k CHR | V | 3 | CNROM |
Mobile Suit Gundam Z (Hacked) | 256k PRG / 0k CHR | H | 15 | 100-in-1 Contra Function 16 | Multicart |
Moeru Oniisan | 128k PRG / 128k CHR | V | 1 | MMC1 |
Moeru Pro Baseball '90 | 256k PRG / 128k CHR | H | 18 | SS8806 |
Momotarou Densetsu | 256k PRG / 0k CHR | H | 1 | MMC1 |
Momotarou Densetsu Gaiden | 512k PRG / 0k CHR | H | 4 | MMC3 |
Momotarou Dentetsu | 256k PRG / 0k CHR | V | 2 | UNROM |
Money Game, The [Hacked] | 256k PRG / 0k CHR | H | 6 | FFE F4xxx |
Money Game 2, The | 128k PRG / 128k CHR | H | 1 | MMC1 |
Monopoly | 128k PRG / 128k CHR | H | 1 | MMC1 |
Monopoly (J) | 256k PRG / 0k CHR | H | 1 | MMC1 |
Monster In My Pocket | 128k PRG / 128k CHR | H | 4 | MMC3 |
Monster In My Pocket (PAL) | 128k PRG / 128k CHR | H | 4 | MMC3 |
Monster Maker | 256k PRG / 0k CHR | H | 1 | MMC1 |
Monster Party | 128k PRG / 128k CHR | H | 1 | MMC1 |
Moon Crystal | 256k PRG / 256k CHR | H | 4 | MMC3 |
Morita no Shogi | 128k PRG / 8k CHR | H | 1 | MMC1 |
Mortal Kombat 3 | 128k PRG / 512k CHR | V | 90 | PCJY?? |
Mother | 256k PRG / 128k CHR | H | 4 | MMC3 |
Motocross Champion | 128k PRG / 128k CHR | H | 1 | MMC1 |
Motor City Patrol | 128k PRG / 128k CHR | H | 1 | MMC1 |
Mottono Abunai Deka | 128k PRG / 0k CHR | H | 2 | UNROM |
Mouryou Senki Madara | 256k PRG / 256k CHR | V | 26 | VRC6v |
Ms. Pac-Man | 32k PRG / 8k CHR | H | 0 | NROM |
Mule | 128k PRG / 0k CHR | V | 1 | MMC1 |
Muppets Adventure | 128k PRG / 0k CHR | V | 1 | MMC1 |
Murder Club | 128k PRG / 128k CHR | V | 4 | MMC3 |
Musashi no Bouken | 128k PRG / 128k CHR | V | 1 | MMC1 |
Musashi no Ken | 32k PRG / 32k CHR | V | 3 | CNROM |
MUSCLE | 16k PRG / 32k CHR | V | 3 | CNROM |
My Life, My Love | 256k PRG / 256k CHR | H | 4 | MMC3 |
Mystery Quest | 32k PRG / 32k CHR | V | 3 | CNROM |
Title | Size | Mirroring | Mapper | Common Designation | Notes |
Nagagutu wo Haita Neko | 32k PRG / 32k CHR | V | 3 | CNROM |
Naitou 9 Dan Shogi Hiden | 16k PRG / 8k CHR | H | 0 | NROM |
Namco Classic | 256k PRG / 256k CHR | H | 19 | Namcot 106 |
Nangoku Seirei Spy vs Spy | 128k PRG / 0k CHR | V | 2 | UNROM |
Nantteta Baseball | 128k PRG / 128k CHR | H | 68 | Sunsoft 4 |
NARC | 128k PRG / 0k CHR | H | 7 | AOROM |
Navy Blue | 128k PRG / 0k CHR | H | 1 | MMC1 |
Nekketsu Kakutou Densetsu | 128k PRG / 128k CHR | V | 4 | MMC3 |
Nekketsu Kouha Kunio Kun | 128k PRG / 0k CHR | V | 2 | UNROM |
Nekketsu Koukou Dodgeball | 128k PRG / 128k CHR | H | 1 | MMC1 |
Nekketsu Koukou Soccer | 128k PRG / 128k CHR | V | 4 | MMC3 |
NES Open Tournament Golf | 256k PRG / 0k CHR | H | 1 | MMC1 |
NES Play Action Football | 128k PRG / 128k CHR | H | 4 | MMC3 |
New Zealand Story, The | 128k PRG / 128k CHR | H | 4 | MMC3 |
NFL Football | 128k PRG / 0k CHR | V | 2 | UNROM |
Nightmare on Elm Street, A | 128k PRG / 0k CHR | H | 7 | AOROM |
Nightshade | 256k PRG / 256k CHR | H | 4 | MMC3 |
Niji no Silkroad | 256k PRG / 128k CHR | V | 4 | MMC3 |
Ningen Heiki Dead Fox | 128k PRG / 128k CHR | V | 4 | MMC3 |
Ninja Cop Saizou | 128k PRG / 128k CHR | H | 1 | MMC1 |
Ninja Gaiden | 128k PRG / 128k CHR | H | 1 | MMC1 |
Ninja Gaiden 2 | 128k PRG / 128k CHR | H | 4 | MMC3 |
Ninja Gaiden 3 | 128k PRG / 128k CHR | H | 4 | MMC3 |
Ninja Jajamaru Kun | 32k PRG / 16k CHR | V | 3 | CNROM |
Ninja Kid | 32k PRG / 32k CHR | V | 3 | CNROM |
Ninja Kun | 16k PRG / 8k CHR | V | 0 | NROM |
Ninja Kun Asyura no Saiyou | 128k PRG / 0k CHR | V | 2 | UNROM |
Ninja Rahoi | 512k PRG / 0k CHR | V | 1 | MMC1 |
Ninja Ryukenden | 128k PRG / 128k CHR | V | 1 | MMC1 |
Ninja Ryukenden 2 | 128k PRG / 128k CHR | V | 4 | MMC3 |
Ninja Ryukenden 3 | 128k PRG / 128k CHR | H | 4 | MMC3 |
Nintendo World Cup | 128k PRG / 128k CHR | H | 4 | MMC3 |
Nintendo World Cup (PAL) | 128k PRG / 128k CHR | H | 4 | MMC3 |
Noah's Ark | 128k PRG / 128k CHR | H | 4 | MMC3 |
Nobunaga no Yabou Zenkokuban | 256k PRG / 0k CHR | V | 1 | MMC1 |
Nobunaga's Ambition | 256k PRG / 0k CHR | H | 1 | MMC1 |
Nobunaga's Ambition 2 | 256k PRG / 128k CHR | H | 5 | MMC5 |
North and South | 128k PRG / 128k CHR | H | 4 | MMC3 |
Nuts and Milk | 16k PRG / 8k CHR | H | 0 | NROM |
Nyankies | 128k PRG / 128k CHR | H | 4 | MMC3 |
Title | Size | Mirroring | Mapper | Common Designation | Notes |
Obake no Qtarou | 32k PRG / 8k CHR | V | 0 | NROM |
Obochama Kun | 128k PRG / 128k CHR | H | 1 | MMC1 |
Ohotuku Ni Kiyu | 256k PRG / 0k CHR | V | 1 | MMC1 |
Oishinbo | 128k PRG / 128k CHR | V | 1 | MMC1 |
Olympus no Tatakai | 128k PRG / 0k CHR | V | 2 | UNROM |
Onyanko Town | 32k PRG / 8k CHR | V | 0 | NROM |
Operation Wolf | 128k PRG / 128k CHR | V | 1 | MMC1 |
Orb 3D | 64k PRG / 128k CHR | V | 1 | MMC1 |
Oryu San | 32k PRG / 32k CHR | H | 3 | CNROM |
Osomatsu Kun | 128k PRG / 128k CHR | V | 1 | MMC1 |
Otaku no Seiza | 256k PRG / 128k CHR | H | 4 | MMC3 |
Othello (J) | 32k PRG / 8k CHR | V | 0 | NROM |
Othello (Disk Conversion) | 32k PRG / 8k CHR | H | 0 | NROM | Loads using .sav file |
Outlanders | 128k PRG / 0k CHR | V | 2 | UNROM |
Over Horizon | 128k PRG / 128k CHR | H | 4 | MMC3 |
Overlord | 256k PRG / 0k CHR | H | 1 | MMC1 |
Title | Size | Mirroring | Mapper | Common Designation | Notes |
Pac-Land | 32k PRG / 8k CHR | V | 0 | NROM |
Pac-Man | 16k PRG / 8k CHR | H | 0 | NROM |
Pac-Man (Unlicensed Version) | 16k PRG / 8k CHR | J | 0 | NROM |
Pac-Man (J) | 16k PRG / 8k CHR | H | 0 | NROM |
Pachi Slot Adventure 2 | 128k PRG / 128k CHR | V | 4 | MMC3 |
Pachi Slot Adventure 3 | 128k PRG / 128k CHR | H | 4 | MMC3 |
Pachicom | 32k PRG / 8k CHR | H | 0 | NROM |
Pachinko Daisakusen | 128k PRG / 128k CHR | V | 1 | MMC1 |
Pachinko Daisakusen 2 | 128k PRG / 128k CHR | H | 1 | MMC1 |
Pachio Kun 2 | 256k PRG / 0k CHR | V | 1 | MMC1 |
Pachio Kun 3 | 256k PRG / 128k CHR | H | 4 | MMC3 |
Pachio Kun 4 | 512k PRG / 0k CHR | H | 4 | MMC3 |
Pachio Kun 5 (Pachio Kun Jr) | 256k PRG / 128k CHR | H | 4 | MMC3 |
Palamedes (J) | 32k PRG / 32k CHR | H | 1 | MMC1 |
Palamedes 2 | 32k PRG / 32k CHR | V | 1 | MMC1 |
Panic Restaurant | 128k PRG / 128k CHR | H | 4 | MMC3 |
Paperboy | 32k PRG / 32k CHR | H | 3 | CNROM |
Paperboy 2 | 256k PRG / 0k CHR | H | 2 | UNROM |
Parallel World | 128k PRG / 128k CHR | H | 4 | MMC3 |
Parasol Henbei | 128k PRG / 128k CHR | H | 4 | MMC3 |
Paris Dakar Rally [Hacked] | 128k PRG / 32k CHR | V | 8 | FFE F3xxx |
Parman | 128k PRG / 128k CHR | H | 32 | Irem G101 |
Parodius [Hacked] | 128k PRG / 128k CHR | H | 17 | FFE F8xxx |
Parodius (PAL) | 128k PRG / 128k CHR | H | 4 | MMC3 |
Parutena no Kagami | 128k PRG / 0k CHR | V | 1 | MMC1 |
Peepar Time | 32k PRG / 16k CHR | H | 3 | CNROM |
Penguin Kun Wars | 32k PRG / 8k CHR | V | 0 | NROM |
Perfect Bowl | 128k PRG / 32k CHR | H | 1 | MMC1 |
Pestermina- tor |
64k PRG / 64k CHR | V | 11 | Colour Dreams |
Peter Pan and the Pirates |
128k PRG / 128k CHR | H | 1 | MMC1 |
Phantom Fighter | 256k PRG / 0k CHR | V | 1 | MMC1 |
Pictionary | 128k PRG / 128k CHR | V | 1 | MMC1 |
Pinball | 16k PRG / 8k CHR | H | 0 | NROM |
Pinball Quest | 128k PRG / 128k CHR | H | 1 | MMC1 |
Pinbot | 128k PRG / 56k CHR | V | 119 | TQROM | Bad dump |
Pinbot (PAL) | 128k PRG / 64k CHR | H | 119 | TQROM |
Pipe Dream | 32k PRG / 32k CHR | V | 3 | CNROM |
Pirates | 128k PRG / 128k CHR | H | 1 | MMC1 |
Pizza Pop | 128k PRG / 128k CHR | H | 18 | SS8806 |
Platoon | 128k PRG / 128k CHR | H | 1 | MMC1 |
Plazma Ball | 128k PRG / 128k CHR | H | 18 | SS8806 |
Pole to Finish | 128k PRG / 128k CHR | V | 1 | MMC1 |
Poo-Yan | 16k PRG / 8k CHR | V | 0 | NROM |
Pool of Radiance | 512k PRG / 128k CHR | V | 4 | MMC3 |
Pool of Radiance (J) | 512k PRG / 128k CHR | V | 4 | MMC3 |
Popeye | 16k PRG / 8K CHR | V | 0 | NROM |
Popeye Eigo Asobi | 16k PRG / 8K CHR | V | 0 | NROM |
Portpia Renzoku Satsujin Jiken | 32k PRG / 8k CHR | V | 0 | NROM |
POW | 128k PRG / 128k CHR | H | 1 | MMC1 |
Power Blade | 128k PRG / 128k CHR | H | 4 | MMC3 |
Power Blade 2 | 128k PRG / 128k CHR | H | 4 | MMC3 | |
Power Punch 2 | 128k PRG / 256k CHR | H | 4 | MMC3 |
Predator | 128k PRG / 128k CHR | V | 1 | MMC1 |
President no Sentaku | 256k PRG / 0k CHR | H | 1 | MMC1 |
Prince of Persia | 128k PRG / 0k CHR | V | 2 | UNROM |
Prince Valiant | 128k PRG / 128k CHR | H | 1 | MMC1 |
Princess Tomato in Salad Kingdom | 256k PRG / 0k CHR | H | 1 | MMC1 |
Pro Wrestling | 128k PRG / 0k CHR | V | 2 | UNROM |
Pro Yakyuu Satsujin Jiken | 256k PRG / 0k CHR | V | 2 | UNROM |
Probotector | 128k PRG / 0k CHR | V | 2 | UNROM |
Probotector 2 | 128k PRG / 128k CHR | H | 4 | MMC3 |
Project Q | 256k PRG / 0k CHR | V | 4 | MMC3 |
Punch-Out | 128k PRG / 128k CHR | V | 9 | MMC2 |
Punch-Out Shohinban | 128k PRG / 128k CHR | H | 9 | MMC2 |
Punisher, The | 128k PRG / 128k CHR | H | 4 | MMC3 |
Puss N' Boots | 128k PRG / 0k CHR | V | 2 | UNROM |
Puznic | 32k PRG / 32k CHR | V | 3 | CNROM |
Puzslot | 128k PRG / 128k CHR | H | 1 | MMC1 |
Puzzle | 32k PRG / 32k CHR | H | 3 | CNROM |
Pyramid | 32k PRG / 8k CHR | V | 0 | NROM |
Title | Size | Mirroring | Mapper | Common Designation | Notes |
Q-Bert | 32k PRG / 32k CHR | H | 3 | CNROM |
Quarth | 32k PRG / 32k CHR | H | 3 | CNROM |
Quattro Adventure | 256k PRG / 0k CHR | V | 71 | Camerica |
Quattro Sports | 256k PRG / 0k CHR | V | 71 | Camerica |
Quest of Kai, The | 128k PRG / 64k CHR | V | 4 | MMC3 |
Quinty | 128k PRG / 128k CHR | H | 4 | MMC3 |
Title | Size | Mirroring | Mapper | Common Designation | Notes |
Racket Attack | 256k PRG / 128k CHR | H | 1 | MMC1 |
Race America | 128k PRG / 128k CHR | H | 1 | MMC1 |
Rad Racer | 128k PRG / 0k CHR | H | 1 | MMC1 |
Rad Racer (PAL) | 128k PRG / 0k CHR | H | 1 | MMC1 |
Rad Racer 2 | 64k PRG / 64k CHR | H | 4 | MMC3 |
Radia Senki | 256k PRG / 128k CHR | V | 4 | MMC3 |
Raf World | 128k PRG / 128k CHR | V | 1 | MMC1 |
Raid 2020 | 64k PRG / 32k CHR | V | 11 | Colour Dreams |
Raid on Bungling Bay | 16k PRG / 8k CHR | V | 0 | NROM |
Raid on Bungling Bay (J) | 16k PRG / 8k CHR | V | 0 | NROM |
Rainbow Island | 128k PRG / 0k CHR | H | 2 | UNROM |
Rambo | 128k PRG / 0k CHR | V | 2 | UNROM |
Rambo (J) | 128k PRG / 0k CHR | V | 2 | UNROM |
Rampage | 128k PRG / 64k CHR | H | 4 | MMC3 |
Rampart | 128k PRG / 128k CHR | H | 4 | MMC3 |
Rampart (J) | 128k PRG / 0k CHR | H | 2 | UNROM |
Rasarulsii no Child's Quest | 128k PRG / 64k CHR | V | 4 | MMC3 |
RBI Baseball | 64k PRG / 128k CHR | V | 4 | MMC3 |
RBI Baseball 2 | 128k PRG / 128k CHR | V | 4 | MMC3 |
RBI Baseball 3 | 128k PRG / 64k CHR | H | 4 | MMC3 |
RC Pro-Am | 32k PRG / 32k CHR | H | 1 | MMC1 |
RC Pro-Am (PAL) | 32k PRG / 32k CHR | H | 1 | MMC1 |
RC Pro-Am 2 | 256k PRG / 0k CHR | H | 7 | AOROM |
Recca: Summer Carnival '92 | 128k PRG / 128k CHR | H | 4 | MMC3 |
Redalerma 2 | 128k PRG / 128k CHR | V | 4 | MMC3 |
Reigen Dousi | 256k PRG / 0k CHR | V | 1 | MMC1 |
Remote Control | 128k PRG / 128k CHR | V | 1 | MMC1 |
Ren and Stimpy: Buckaroo$ | 128k PRG / 128k CHR | H | 4 | MMC3 |
Renegade | 128k PRG / 0k CHR | V | 2 | UNROM |
Rescue: The Embassy Mission | 128k PRG / 128k CHR | H | 1 | MMC1 |
Ring King | 64k PRG / 128k CHR | V | 4 | MMC3 |
River City Ransom | 128k PRG / 128k CHR | H | 4 | MMC3 |
Road Fighter | 16k PRG / 8k CHR | H | 0 | NROM |
Road Man | 128k PRG / 128k CHR | V | 1 | MMC1 |
Road Runner | 64k PRG / 128k CHR | H | 4 | MMC3 |
Roadblaste- rs |
128k PRG / 128k CHR | H | 1 | MMC1 |
Robin Hood | 256k PRG / 0k CHR | H | 1 | MMC1 |
Robocco Wars | 256k PRG / 128k CHR | H | 4 | MMC3 |
Robocop | 128k PRG / 128k CHR | H | 4 | MMC3 |
Robocop 2 | 128k PRG / 128k CHR | V | 1 | MMC1 |
Robocop 3 | 128k PRG / 128k CHR | V | 1 | MMC1 |
Robocop Vs Terminator | 128k PRG / 128k CHR | H | 4 | MMC3 |
Robot Block (Stack-Up) | 32k PRG / 8k CHR | H | 0 | NROM |
Robot Gyro (Gyromite) | 32k PRG / 8k CHR | V | 0 | NROM |
Robowarrior | 128k PRG / 0k CHR | H | 2 | UNROM |
Rock N' Ball | 128k PRG / 64k CHR | H | 4 | MMC3 |
Rocket Ranger | 256k PRG / 0k CHR | H | 1 | MMC1 |
Rocketeer, The | 256k PRG / 0k CHR | V | 1 | MMC1 |
Rockin' Kats | 128k PRG / 128k CHR | H | 4 | MMC3 |
Rockman | 128k PRG / 0k CHR | V | 2 | UNROM |
Rockman 2 | 256k PRG / 0k CHR | V | 1 | MMC1 |
Rockman 3 | 256k PRG / 128k CHR | V | 4 | MMC3 |
Rockman 4 | 512k PRG / 0k CHR | V | 4 | MMC3 |
Rockman 5 | 256k PRG / 256k CHR | H | 4 | MMC3 |
Rockman 6 | 512k PRG / 0k CHR | V | 4 | MMC3 |
Roger Clemens MVP Baseball | 128k PRG / 256k CHR | H | 4 | MMC3 |
Rollerball | 128k PRG / 128k CHR | H | 1 | MMC1 |
Rollergames | 128k PRG / 128k CHR | H | 4 | MMC3 |
Rolling Thunder | 128k PRG / 128k CHR | H | 4 | MMC3 |
Rolling Thunder (J) | 128k PRG / 256k CHR | H | 19 | Namcot 106 |
Romance of the Three Kingdoms | 256k PRG / 0k CHR | V | 1 | MMC1 |
Romance of the Three Kingdoms 2 | 256k PRG / 256k CHR | H | 5 | MMC5 |
Romancia | 128k PRG / 0k CHR | V | 1 | MMC1 |
Roundball | 128k PRG / 128k CHR | H | 4 | MMC3 |
Route 16 Turbo | 32k PRG / 8k CHR | H | 0 | NROM |
RPG Life Game | 256k PRG / 128k CHR | H | 4 | MMC3 |
Rush N' Attack | 128k PRG / 0k CHR | V | 2 | UNROM |
Rush N' Attack (PAL) | 128k PRG / 0k CHR | V | 2 | UNROM |
Rygar | 128k PRG / 0k CHR | V | 2 | UNROM |
Title | Size | Mirroring | Mapper | Common Designation | Notes |
Sabaku no Kitune | 128k PRG / 128k CHR | V | 1 | MMC1 |
Saint Seiya [Hacked] | 256k PRG / 0k CHR | V | 6 | FFE F4xxx |
Saint Seiya 2 [Hacked?] | 128k PRG / 128k CHR | H | 1 | MMC1 |
Saiyuuki World | 128k PRG / 0k CHR | V | 2 | UNROM |
Saiyuuki World 2 [Hacked] | 128k PRG / 128k CHR | V | 17 | FFE F8xxx |
Sakigake Otoko Jyuku | 128k PRG / 128k CHR | H | 16 | Bandai |
Salamander | 128k PRG / 0k CHR | V | 2 | UNROM |
Sanada Jyuuyuusi | 128k PRG / 128k CHR | H | 1 | MMC1 |
Sangokusi | 256k PRG / 0k CHR | V | 1 | MMC1 |
Sangokusi Chugen no Hasya | 128k PRG / 128k CHR | V | 19 | Namcot 106 |
Sangokusi Chugen no Hasya 2 [Hacked] | 256k PRG / 256k CHR | H | 48 | TC190V |
Sanma no Meitantei | 128k PRG / 64k CHR | H | 4 | MMC3 |
Sanrio Carnival | 32k PRG / 32k CHR | V | 3 | CNROM |
Sanrio Cup Ponpon Bare | 32k PRG / 32k CHR | V | 3 | CNROM |
Sansa-Rana-Ga | 256k PRG / 128k CHR | V | 4 | MMC3 |
Sarada no Kuni no Tomato Hime | 256k PRG / 0k CHR | V | 1 | MMC1 |
Satomi Hakkenden | 128k PRG / 128k CHR | V | 1 | MMC1 |
SCAT | 128k PRG / 128k CHR | H | 1 | MMC1 |
SD Gundam Gachapon Senshi 2 | 128k PRG / 128k CHR | V | 4 | MMC3 |
SD Gundam Gachapon Senshi 3 | 128k PRG / 128k CHR | H | 4 | MMC3 |
SD Gundam Gachapon Senshi 4 | 256k PRG / 256k CHR | V | 4 | MMC3 |
SD Gundam Gachapon Senshi 5 | 128k PRG / 128k CHR | V | 4 | MMC3 |
SD Gundam Knight Story | 256k PRG / 128k CHR | H | 16 | Bandai |
SD Gundam Knight Story 2 | 256k PRG / 256k CHR | H | 16 | Bandai |
SD Gundam Knight Story 3 | 256k PRG / 256k CHR | V | 16 | Bandai |
SD Hatori Daisakusen | 128k PRG / 128k CHR | H | 4 | MMC3 |
SD Hero Soukessen | 128k PRG / 128k CHR | H | 4 | MMC3 |
SD Keiji Blader | 128k PRG / 128k CHR | H | 82 | Taito X117 |
SD Sengoku Busyou Retsuden | 128k PRG / 128k CHR | H | 4 | MMC3 |
Section Z | 128k PRG / 0k CHR | V | 2 | UNROM |
Seicross | 32k PRG / 8k CHR | V | 0 | NROM |
Seicross (J) | 32k PRG / 8k CHR | V | 0 | NROM |
Seikima 2 | 32k PRG / 32k CHR | H | 3 | CNROM |
Seirei Densetsu Lickle | 256k PRG / 128k CHR | H | 4 | MMC3 |
Seirei Gari | 256k PRG / 0k CHR | V | 2 | UNROM |
Sekiryuu Ou | 128k PRG / 128k CHR | H | 1 | MMC1 |
Senjou no Ookami | 128k PRG / 0k CHR | H | 2 | UNROM |
Sesame Street 123/ABC | 128k PRG / 128k CHR | H | 1 | MMC1 |
Sesame Street ABC | 32k PRG / 32k CHR | H | 1 | MMC1 |
Shadow Brain | 128k PRG / 256k CHR | V | 4 | MMC3 |
Shadow of the Ninja | 128k PRG / 128k CHR | H | 4 | MMC3 |
Shadow Warrior | 128k PRG / 128k CHR | H | 1 | MMC1 |
Shadowgate | 128k PRG / 128k CHR | H | 4 | MMC3 |
Shadowgate (J) | 128k PRG / 128k CHR | H | 4 | MMC3 |
Shadowgate (Swedish) | 128k PRG / 128k CHR | H | 4 | MMC3 |
Shaffle Fight | 256k PRG / 0k CHR | H | 4 | MMC3 |
Shancara | 128k PRG / 128k CHR | V | 4 | MMC3 |
Shanghai | 128k PRG / 0k CHR | H | 2 | UNROM |
Shanghai 2 | 128k PRG / 0k CHR | V | 2 | UNROM |
Shatterhand | 128k PRG / 128k CHR | H | 4 | MMC3 |
Sherlock Holmes | 128k PRG / 0k CHR | H | 2 | UNROM |
Shikin Jyou | 128k PRG / 0k CHR | H | 1 | MMC1 |
Shin Satomi Hakkenden | 256k PRG / 0k CHR | H | 1 | MMC1 |
Shingen The Ruler | 256k PRG / 0k CHR | H | 1 | MMC1 |
Shinobi | 128k PRG / 128k CHR | H | 64 | Rambo-1 |
Shinsenden | 256k PRG / 0k CHR | V | 1 | MMC1 |
Shisen Mahjong Seifukuhen | 32k PRG / 64k CHR | H | 3 | CNROM |
Shogun | 128k PRG / 0k CHR | H | 1 | MMC1 |
Shonen Ashibe | 128k PRG / 128k CHR | V | 4 | MMC3 |
Shufflepuck Cafe | 128k PRG / 0k CHR | H | 2 | UNROM |
Side Pocket | 128k PRG / 0k CHR | H | 2 | UNROM |
Side Pocket (J) | 128k PRG / 32k CHR | H | 4 | MMC3 |
Sijyou Saidai Quiz ou Ketteisen | 128k PRG / 0k CHR | V | 1 | MMC1 |
Silent Assault | 64k PRG / 64k CHR | H | 11 | Colour Dreams |
Silent Service | 128k PRG / 0k CHR | V | 2 | UNROM |
Silent Service (PAL) | 128k PRG / 0k CHR | V | 2 | UNROM |
Silkworm | 128k PRG / 128k CHR | V | 1 | MMC1 |
Silva Saga | 256k PRG / 256k CHR | H | 4 | MMC3 |
Silver Surfer | 128k PRG / 256k CHR | H | 4 | MMC3 |
Sinjinrui | 32k PRG / 32k CHR | V | 3 | CNROM |
Skate or Die | 128k PRG / 0k CHR | V | 2 | UNROM |
Skate or Die 2 | 256k PRG / 128k CHR | V | 1 | MMC1 |
Ski or Die | 128k PRG / 128k CHR | H | 1 | MMC1 |
Sky Destroyer | 16k PRG / 8k CHR | H | 0 | NROM |
Sky Kid | 32k PRG / 64k CHR | H | 1 | MMC1 |
Sky Kid (J) | 32k PRG / 32k CHR | V | 4 | MMC3 |
Sky Shark | 64k PRG / 128k CHR | H | 1 | MMC1 |
Slalom | 32k PRG / 8k CHR | H | 0 | NROM |
Slalom (PAL) | 32k PRG / 8k CHR | H | 0 | NROM |
Smash Ping Pong (Disk Conv.) | 32k PRG / 16k CHR | H | 3 | CNROM | Uses .sav file to load |
Smash TV | 128k PRG / 112k CHR | H | 4 | MMC3 | Probably an incomplete dump |
SMB / Duck Hunt / WC Track Meet | 128k PRG / 64k CHR | H | 1 | MMC1 |
SMB / Tetris / Nint. World Cup | 64k PRG / 128k CHR | H | 4 | MMC3 |
Snake Rattle N' Roll | 32k PRG / 32k CHR | H | 1 | MMC1 |
Snake Rattle N' Roll (PAL) | 32k PRG / 32k CHR | H | 1 | MMC1 |
Snake's Revenge | 128k PRG / 128k CHR | H | 1 | MMC1 |
Snoopy's Magic Show | 128k PRG / 128k CHR | V | 1 | MMC1 |
Snow Bros | 128k PRG / 128k CHR | H | 1 | MMC1 |
Soap Panic | 32k PRG / 32k CHR | V | 3 | CNROM |
Soccer | 32k PRG / 8k CHR | H | 0 | NROM |
Soccer (Disk Conversion) | 32k PRG / 8k CHR | H | 0 | NROM | Uses a .sav to load |
Softball Tengoku | 128k PRG / 128k CHR | H | 1 | MMC1 |
Solar Jetman | 256k PRG / 0k CHR | H | 7 | AOROM |
Solar Jetman (PAL) | 256k PRG / 0k CHR | H | 7 | AOROM |
Solomon no Kagi | 32k PRG / 32k CHR | H | 3 | CNROM |
Solomon no Kagi 2 | 128k PRG / 128k CHR | V | 4 | MMC3 |
Solomon's Key | 32k PRG / 32k CHR | H | 3 | CNROM |
Solstice | 128k PRG / 0k CHR | H | 7 | AOROM |
Solstice (J) | 128k PRG / 0k CHR | H | 7 | AOROM |
SoMari | 256k PRG / 256k CHR | H | 4 | MMC3 |
Son Son | 32k PRG / 8k CHR | H | 0 | NROM |
Space Harrier | 128k PRG / 0k CHR | V | 2 | UNROM |
Space Hunter | 32k PRG / 32k CHR | H | 3 | CNROM |
Space Invaders | 16k PRG / 8k CHR | V | 0 | NROM |
Space Shuttle Project | 256k PRG / 0k CHR | V | 1 | MMC1 |
Spartan X | 32k PRG / 8k CHR | V | 0 | NROM |
Spartan X2 [Hacked] | 128k PRG / 128k CHR | V | 17 | FFE F8xxx |
Spelunker (J) | 32k PRG / 8k CHR | V | 0 | NROM |
Spelunker 2 | 128k PRG / 0k CHR | V | 2 | UNROM |
Spider-Man | 128k PRG / 208k CHR | H | 4 | MMC3 | Probable bad dump |
Spiritual Warfare | 128k PRG / 128k CHR | V | 11 | Colour Dreams |
Splatterho- use |
128k PRG / 128k CHR | H | 19 | Namcot 106 |
Spot | 128k PRG / 0k CHR | V | 1 | MMC1 |
Spy Hunter | 32k PRG / 32k CHR | V | 3 | CNROM |
Spy Vs. Spy (J) | 32k PRG / 8k CHR | V | 0 | NROM |
Sqoon | 32k PRG / 16k CHR | V | 3 | CNROM |
Sqoon (J) | 32k PRG / 8k CHR | V | 0 | NROM |
Square no Tom Sawyer | 256k PRG / 0k CHR | H | 1 | MMC1 |
Stanley | 128k PRG / 128k CHR | H | 4 | MMC3 |
Star Force | 32k PRG / 32k CHR | V | 3 | CNROM |
Star Force (J) | 16k PRG / 8k CHR | V | 0 | NROM |
Star Gate | 16k PRG / 8k CHR | V | 0 | NROM |
Star Luster | 32k PRG / 8k CHR | H | 0 | NROM |
Star Soldier (J) | 32k PRG / 16k CHR | V | 3 | CNROM |
Star Trek | 256k PRG / 256k CHR | H | 4 | MMC3 |
Star Trek - The Next Generation | 128k PRG / 0k CHR | H | 2 | UNROM |
Star Voyager | 32k PRG / 32k CHR | H | 3 | CNROM |
Star Wars | 128k PRG / 128k CHR | H | 4 | MMC3 |
Star Wars (J - Namco Version) | 128k PRG / 128k CHR | H | 4 | MMC3 |
Star Wars (PAL) | 128k PRG / 128k CHR | H | 4 | MMC3 |
Starship Hector | 128k PRG / 0k CHR | V | 2 | UNROM |
Startropics | 256k PRG / 256k CHR | V | 4 | MMC3 | Proper chip (MMC6) unsupported |
Startropics 2 | 256k PRG / 256k CHR | H | 4 | MMC3 | Proper chip (MMC6) unsupported |
Stealth ATF | 128k PRG / 128k CHR | H | 1 | MMC1 |
Stealth ATF (PAL) | 128k PRG / 128k CHR | H | 1 | MMC1 |
Sted Iseki Wakusei no Yabou | 128k PRG / 128k CHR | H | 1 | MMC1 |
Stick Hunter | 128k PRG / 0k CHR | V | 2 | UNROM |
Stinger | 128k PRG / 0k CHR | V | 2 | UNROM |
Street Cop | 128k PRG / 128k CHR | H | 1 | MMC1 |
Street Fighter 2010 | 128k PRG / 128k CHR | H | 4 | MMC3 |
Street Fighter 3 | 128k PRG / 512k CHR | V | 91 | HK-SF3 |
Strider | 256k PRG / 0k CHR | V | 1 | MMC1 |
Sugoro Quest | 128k PRG / 128k CHR | V | 4 | MMC3 |
Sukeban Deka 3 | 128k PRG / 0k CHR | H | 2 | UNROM |
Super Arabian | 16k PRG / 8k CHR | H | 0 | NROM |
Super Black Onyx | 256k PRG / 0k CHR | V | 1 | MMC1 |
Super Chinese Land | 32k PRG / 16k CHR | H | 4 | MMC3 |
Super Chinese Land 2 | 128k PRG / 128k CHR | H | 4 | MMC3 |
Super Chinese Land 3 | 128k PRG / 128k CHR | H | 1 | MMC1 |
Super C | 128k PRG / 120k CHR | H | 4 | MMC3 | Missing another 8k CHR page |
Super Cars | 128k PRG / 0k CHR | H | 2 | UNROM |
Super Contra | 128k PRG / 128k CHR | V | 4 | MMC3 |
Super Dodge Ball | 128k PRG / 128k CHR | H | 1 | MMC1 |
Super Donkey Kong 2 | 128k PRG / 256k CHR | V | 4 | MMC3 |
Super Dynamix Badminton | 32k PRG / 8k CHR | V | 0 | NROM |
Super Express Satsujin Jiken | 128k PRG / 128k CHR | V | 4 | MMC3 |
Super Glove Ball | 128k PRG / 0k CHR | V | 2 | UNROM |
Super Mario Bros | 32k PRG / 8k CHR | V | 0 | NROM |
Super Mario Bros (PAL) | 32k PRG / 8k CHR | V | 0 | NROM |
Super Mario Bros (Disk Conv.) | 32k PRG / 8k CHR | H | 0 | NROM | Loads using a .sav |
Super Mario Bros / Duck Hunt | 64k PRG / 16K CHR | H | 66 | 74161/32 |
Super Mario Bros 2 | 128k PRG / 128k CHR | H | 4 | MMC3 |
Super Mario Bros 2 (-1 PRG Rev.) | 128k PRG / 128k CHR | H | 4 | MMC3 |
Super Mario Bros 3 | 256k PRG / 128k CHR | H | 4 | MMC3 |
Super Mario Bros 3 (-1 PRG Rev.) | 256k PRG / 128k CHR | H | 4 | MMC3 |
Super Mario Bros 3 (J) | 256k PRG / 128k CHR | H | 4 | MMC3 |
Super Mario Bros 3 (PAL) | 256k PRG / 128k CHR | H | 4 | MMC3 |
Super Mario USA | 128k PRG / 128k CHR | V | 4 | MMC3 |
Super Momotarou Densetsu | 256k PRG / 0k CHR | H | 1 | MMC1 |
Super Monkey Daibouken | 32k PRG / 32k CHR | V | 3 | CNROM |
Super Off Road | 128k PRG / 0k CHR | V | 7 | AOROM |
Super Pinball | 128k PRG / 0k CHR | H | 2 | UNROM |
Super Pitfall | 128k PRG / 0k CHR | V | 2 | UNROM |
Super Pitfall (J) | 128k PRG / 0k CHR | V | 2 | UNROM |
Super Real Baseball | 128k PRG / 128k CHR | H | 1 | MMC1 |
Super Robot Taisen 2 | 256k PRG / 256k CHR | H | 4 | MMC3 |
Super Spike V'Ball | 128k PRG / 128k CHR | H | 4 | MMC3 |
Super Spike V'Ball / Nintendo World Cup | 128k PRG / 128k CHR | H | 4 | MMC3 | Missing about 256k? |
Super Sprint | 128k PRG / 128k CHR | V | 4 | MMC3 |
Super Spy Hunter | 128k PRG / 128k CHR | H | 4 | MMC3 |
Super Star Force | 128k PRG / 0k CHR | V | 2 | UNROM |
Super Team Games | 32k PRG / 32k CHR | H | 3 | CNROM |
Super Turrican (PAL) | 128k PRG / 128k CHR | H | 4 | MMC3 |
Super Xevious | 128k PRG / 32k CHR | H | 4 | MMC3 |
Superman | 128k PRG / 128k CHR | V | 1 | MMC1 |
Superman (J) | 128k PRG / 128k CHR | H | 1 | MMC1 |
Swamp Thing | 128k PRG / 128k CHR | H | 1 | MMC1 |
Swat | 128k PRG / 0k CHR | V | 2 | UNROM |
Sweet Home | 256k PRG / 0k CHR | H | 1 | MMC1 |
Sword Master | 128k PRG / 128k CHR | H | 4 | MMC3 |
Sword Master (J) | 128k PRG / 128k CHR | H | 4 | MMC3 |
Swords and Serpents | 128k PRG / 0k CHR | V | 2 | UNROM |
Syoukousi Sedy | 256k PRG / 0k CHR | V | 1 | MMC1 |
Title | Size | Mirroring | Mapper | Common Designation | Notes |
T&C Surf Design | 32k PRG / 32k CHR | V | 3 | CNROM |
T&C Surf Design 2 | 128k PRG / 128k CHR | H | 4 | MMC3 |
Taboo | 32k PRG / 32k CHR | H | 1 | MMC1 |
Tag Team Pro Wrestling | 32k PRG / 8k CHR | H | 0 | NROM |
Tag Team Wrestling | 32k PRG / 8k CHR | H | 0 | NROM |
Tagin' Dragon | 32k PRG / 16k CHR | V | 11 | Colour Dreams |
Taito Grand Prix | 128k PRG / 128k CHR | H | 80 | Taito X005 |
Taiyou no Sinden | 256k PRG / 0k CHR | V | 1 | MMC1 |
Takahasi Meijin no Boukenjima | 32k PRG / 32k CHR | V | 3 | CNROM |
Takahasi Meijin no Boukenjima 2 | 128k PRG / 128k CHR | H | 4 | MMC3 |
Takahasi Meijin no Boukenjima 3 | 128k PRG / 128k CHR | H | 4 | MMC3 |
Takahasi Meijin no Boukenjima 4 | 256k PRG / 128k CHR | H | 4 | MMC3 |
Takahasi Meijin no Bug Hunny | 128k PRG / 32k CHR | H | 34 | Nina-1 | Probably a mapper hack |
Takeda Shingen | 128k PRG / 0k CHR | V | 2 | UNROM |
Takeda Shingen 2 | 256k PRG / 0k CHR | V | 1 | MMC1 |
Takeshi no Chousen Jyou | 128k PRG / 0k CHR | V | 2 | UNROM |
Takeshi no Sengoku Fuunji | 128k PRG / 128k CHR | H | 4 | MMC3 |
Tale Spin | 128k PRG / 128k CHR | H | 1 | MMC1 |
Tanikawa Kouji no Shogi Sinan 3 | 128k PRG / 0k CHR | H | 1 | MMC1 |
Tantei Jingujii Saburou Tokino Sugiyuku- mamani |
128k PRG / 0k CHR | H | 2 | UNROM |
Tao | 128k PRG / 128k CHR | V | 1 |
Target Renegade | 128k PRG / 128k CHR | V | 1 | MMC1 |
Tashiro Musasi no Princess Galppai | 128k PRG / 128k CHR | V | 1 | MMC1 |
Tatakae Ramen Man | 128k PRG / 128k CHR | V | 1 | MMC1 |
Tatakai no Banka | 128k PRG / 0k CHR | V | 2 | UNROM |
Tecmo Baseball | 128k PRG / 0k CHR | V | 1 | MMC1 |
Tecmo Bowl | 128k PRG / 128k CHR | V | 1 | MMC1 |
Tecmo Cup Soccer | 128k PRG / 128k CHR | H | 1 | MMC1 |
Tecmo NBA Basketball | 128k PRG / 256k CHR | H | 4 | MMC3 |
Tecmo Super Bowl | 256k PRG / 128k CHR | H | 4 | MMC3 |
Tecmo World Wrestling | 128k PRG / 128k CHR | H | 1 | MMC1 |
Tecmo World Wrestling (PAL) | 128k PRG / 128k CHR | H | 1 | MMC1 |
Teenage Mutant Hero Turtles | 128k PRG / 128k CHR | H | 1 | MMC1 |
Teenage Mutant Ninja Turtles | 128k PRG / 128k CHR | H | 1 | MMC1 |
Teenage Mutant Ninja Turtles (PAL) | 128k PRG / 128k CHR | H | 1 | MMC1 |
Teenage Mutant Ninja Turtles 2 | 256k PRG / 256k CHR | H | 4 | MMC3 |
Teenage Mutant Ninja Turtles 3 | 256k PRG / 256k CHR | H | 4 | MMC3 |
Tekken 2 | 128k PRG / 512k CHR | V | 90 | PCJY?? |
Tenchi wo Kurau | 256k PRG / 0k CHR | V | 1 | MMC1 |
Tenchi wo Kurau 2 | 512k PRG / 0k CHR | V | 4 | MMC3 |
Tennis | 16k PRG / 8k CHR | V | 0 | NROM |
Terminator, The | 128k PRG / 128k CHR | H | 4 | MMC3 |
Terminator 2 | 128k PRG / 128k CHR | H | 4 | MMC3 |
Terminator 2 (Beta Version) | 128k PRG / 128k CHR | H | 4 | MMC3 |
Terminator 2 (J) | 128k PRG / 128k CHR | H | 4 | MMC3 |
Terra Cresta (J) | 128k PRG / 0k CHR | H | 2 | UNROM |
Tetrastar | 256k PRG / 256k CHR | V | 4 | MMC3 |
Tetris (Tengen) | 32k PRG / 128k CHR | V | 1 | MMC1 |
Tetris (Tengen) | 32k PRG / 16K CHR | V | 3 | CNROM |
Tetris (J) | 32k PRG / 32k CHR | V | 3 | CNROM |
Tetris 2 | 128k PRG / 104k CHR | H | 4 | MMC3 | Missing 24k |
Tetris 2 (PAL) | 128k PRG / 128k CHR | H | 4 | MMC3 |
Tetris 2 + Bombliss | 128k PRG / 0k CHR | H | 1 | MMC1 |
Tetris Flash | 128k PRG / 128k CHR | H | 4 | MMC3 |
Tetsuwan Atom | 128k PRG / 128k CHR | H | 4 | MMC3 |
Tetudouou | 32k PRG / 32k CHR | V | 3 | CNROM |
Thexder | 32k PRG / 8k CHR | H | 0 | NROM |
Three Stooges, The | 128k PRG / 128k CHR | H | 1 | MMC1 |
Thunder and Lightning | 128k PRG / 128k CHR | V | 1 | MMC1 | Bad dump |
Thunderbi- rds |
128k PRG / 128k CHR | H | 1 | MMC1 |
Thunderbi- rds (J) |
128k PRG / 128k CHR | V | 1 | MMC1 |
Thunder- cade |
128k PRG / 0k CHR | H | 2 | UNROM |
Tiger-Heli (J) | 32k PRG / 32k CHR | H | 3 | CNROM |
Time Lord | 128k PRG / 0k CHR | H | 7 | AOROM |
Time Lord (PAL) | 128k PRG / 0k CHR | H | 7 | AOROM |
Time Stranger | 128k PRG / 0k CHR | V | 2 | UNROM |
Time Zone | 128k PRG / 128k CHR | H | 4 | MMC3 |
Times of Lore | 128k PRG / 0k CHR | V | 2 | UNROM |
Tiny Toon Adventures | 128k PRG / 128k CHR | H | 2 | UNROM |
Tiny Toon Adventures 2 | 128k PRG / 128k CHR | H | 2 | UNROM |
Tiny Toons Cartoon Workshop | 128k PRG / 128k CHR | H | 4 | MMC3 |
Titan | 128k PRG / 0k CHR | V | 1 | MMC1 |
Titei Senkuu Bazoruda | 128k PRG / 128k CHR | V | 4 | MMC3 |
TM Network Live At Power Bowl | 128k PRG / 128k CHR | H | 4 | MMC3 |
Tobidase Daisakusen 2 | 128k PRG / 0k CHR | V | 2 | UNROM |
Toki | 128k PRG / 256k CHR | H | 4 | MMC3 |
Tokorosan no Mamoru | 32k PRG / 32k CHR | V | 3 | CNROM |
Tokyukyuu Seirei Solbrain | 128k PRG / 128k CHR | H | 4 | MMC3 |
Tom and Jerry | 128k PRG / 128k CHR | H | 4 | MMC3 |
Tombs and Treasure | 256k PRG / 0k CHR | V | 1 | MMC1 |
Tonjan | 128k PRG / 128k CHR | H | 1 | MMC1 |
Toobin' | 128k PRG / 64k CHR | H | 4 | MMC3 |
Top Gun | 128k PRG / 0k CHR | H | 2 | UNROM |
Top Gun - The Second Mission | 128k PRG / 128k CHR | H | 4 | MMC3 |
Top Players Tennis | 128k PRG / 128k CHR | V | 1 | MMC1 |
Total Recall | 128k PRG / 0k CHR | V | 2 | UNROM |
Totally Rad | 128k PRG / 128k CHR | H | 4 | MMC3 |
Totsuzen Macyoman | 128k PRG / 0k CHR | V | 2 | UNROM |
Touch | 128k PRG / 0k CHR | V | 2 | UNROM |
Touchdown Fever | 128k PRG / 32k CHR | H | 1 | MMC1 |
Touchdown Fever (J) | 128k PRG / 32k CHR | H | 1 | MMC1 |
Touhou Kenbunroku | 128k PRG / 128k CHR | H | 1 | MMC1 |
Toukaidou 53 Tugi | 32k PRG / 32k CHR | V | 3 | CNROM |
Tower of Druaga, The | 32k PRG / 8k CHR | V | 0 | NROM |
Toxic Crusaders | 128k PRG / 128k CHR | H | 4 | MMC3 |
Track and Field 2 | 128k PRG / 128k CHR | H | 1 | MMC1 |
Track and Field 2 (PAL) | 128k PRG / 128k CHR | H | 1 | MMC1 |
Transform- ers Combo |
32k PRG / 32k CHR | V | 3 | CNROM |
Triathron, The | 128k PRG / 128k CHR | V | 1 | MMC1 |
Trog | 128k PRG / 0k CHR | V | 2 | UNROM |
Trojan | 128k PRG / 0k CHR | V | 2 | UNROM |
Trojan (PAL) | 128k PRG / 0k CHR | V | 2 | UNROM |
Trolls on Treasure Island | 32k PRG / 32k CHR | V | 79 | AVE |
Tsuppari Oozomou | 32k PRG / 32k CHR | V | 3 | CNROM |
Tsuppari Wars | 128k PRG / 128k CHR | H | 1 | MMC1 |
Turbo Racing | 128k PRG / 128k CHR | H | 1 | MMC1 |
Turikiti Sanpei Blue | 128k PRG / 0k CHR | V | 2 | UNROM |
Turupika Higemaru | 128k PRG / 128k CHR | H | 18 | SS8806 |
Twin Cobra | 128k PRG / 128k CHR | H | 4 | MMC3 |
Twinbee | 32k PRG / 16k CHR | H | 3 | CNROM |
Twinbee (Disk Conversion) | 32k PRG / 0k CHR | H | 0 | NROM | Loads using .sav file |
Twinbee 3 | 128k PRG / 128k CHR | H | 22 | VRC4-1B |
Title | Size | Mirroring | Mapper | Common Designation | Notes |
Uddy Poko | 128k PRG / 0k CHR | V | 2 | UNROM |
Ultima - Exodus | 256k PRG / 0k CHR | V | 1 | MMC1 |
Ultima - Exodus (J) | 256k PRG / 0k CHR | H | 1 | MMC1 |
Ultima - Quest of the Avatar | 256k PRG / 0k CHR | V | 1 | MMC1 |
Ultima - Quest of the Avatar (J) | 256k PRG / 0k CHR | H | 1 | MMC1 |
Ultima - Warriors of Destiny | 256k PRG / 0k CHR | H | 1 | MMC1 |
Ultimate Air Combat | 256k PRG / 256k CHR | H | 4 | MMC3 |
Ultimate Basketball | 128k PRG / 128k CHR | H | 4 | MMC3 |
Ultimate League Soccer | 32k PRG / 64k CHR | H | 79 | AVE |
Ultimate Stuntman | 256k PRG / 0k CHR | V | 71 | Camerica |
Ultraman Club 2 | 128k PRG / 128k CHR | H | 4 | MMC3 |
Ultraman Club 3 | 256k PRG / 128k CHR | H | 4 | MMC3 |
Uncharted Waters | 512k PRG / 128k CHR | H | 5 | MMC5 |
Uninvited | 128k PRG / 128k CHR | H | 4 | MMC3 |
Untouchabl- es, The |
128k PRG / 128k CHR | H | 1 | MMC1 |
Urban Champion | 16k PRG / 8k CHR | V | 0 | NROM |
Urusei Yatsura | 32k PRG / 32k CHR | V | 3 | CNROM |
US Champion- ship V'Ball |
128k PRG / 128k CHR | V | 4 | MMC3 |
Uturun Desu | 128k PRG / 128k CHR | V | 4 | MMC3 |
Title | Size | Mirroring | Mapper | Common Designation | Notes |
Valis | 128k PRG / 0k CHR | V | 2 | UNROM |
Valkyure no Bouken | 32k PRG / 32k CHR | H | 4 | MMC3 |
Vegas Connection | 256k PRG / 0k CHR | V | 1 | MMC1 |
Vegas Dream | 128k PRG / 128k CHR | H | 1 | MMC1 |
Venice Beach Volleyball | 32k PRG / 32k CHR | V | 79 | AVE |
Venus Wars, The | 128k PRG / 128k CHR | V | 1 | MMC1 |
Vice - Project Doom | 128k PRG / 128k CHR | H | 4 | MMC3 |
Villgust Gaiden | 128k PRG / 256k CHR | V | 4 | MMC3 |
Vindicators | 64k PRG / 32k CHR | V | 4 | MMC3 |
Viva Las Vegas | 128k PRG / 128k CHR | V | 1 | MMC1 |
Volguard 2 | 32k PRG / 8k CHR | V | 0 | NROM |
Volleyball | 32k PRG / 16k CHR | V | 3 | CNROM |
Volleyball (Disk Conversion) | 32k PRG / 8k CHR | H | 0 | NROM | Loads with .sav |
Vs. Castlevania | 128k PRG / 0k CHR | V | 99 | Unisystem |
Vs. Ice Climber | 32k PRG / 16k CHR | V | 99 | Unisystem |
Vs. Super Mario Bros | 32k PRG / 16k CHR | V | 99 | Unisystem |
Title | Size | Mirroring | Mapper | Common Designation | Notes |
Wacky Races | 128k PRG / 128k CHR | H | 4 | MMC3 |
Wagyan Land | 128k PRG / 64k CHR | V | 4 | MMC3 |
Wagyan Land 2 | 256k PRG / 128k CHR | H | 19 | Namcot 106 |
Wagyan Land 3 | 256k PRG / 256k CHR | H | 19 | Namcot 106 |
Wai Wai World | 128k PRG / 128k CHR | H | 23 | VRC2b |
Wai Wai World (Hacked) | 128k PRG / 128k CHR | H | 17 | FFE F8xxx |
Wai Wai World 2 | 256k PRG / 128k CHR | H | 21 | VRC4-2a |
Wairi no Write Rockboard | 256k PRG / 0k CHR | H | 4 | MMC3 |
Wall Street Kid | 128k PRG / 0k CHR | H | 2 | UNROM |
Wanpaku Duck Yumebouk- en |
128k PRG / 0k CHR | V | 2 | UNROM |
Wanpaku Kokkun no Gurume World | 128k PRG / 128k CHR | H | 4 | MMC3 |
Wario no Mori | 256k PRG / 256k CHR | V | 4 | MMC3 |
Wario's Woods | 256k PRG / 256k CHR | H | 4 | MMC3 |
Warpman | 16k PRG / 8k CHR | H | 0 | NROM |
Warwolf | 128k PRG / 128k CHR | V | 4 | MMC3 |
Wayne Gretzky Hockey | 128k PRG / 0k CHR | V | 2 | UNROM |
Wayne's World | 128k PRG / 128k CHR | H | 4 | MMC3 |
WCW Champion- ship Wrestling |
128k PRG / 128k CHR | H | 4 | MMC3 |
Werewolf | 128k PRG / 128k CHR | H | 4 | MMC3 |
Western Kids | 256k PRG / 256k CHR | V | 4 | MMC3 |
Wheel of Fortune | 128k PRG / 0k CHR | H | 7 | AOROM |
Wheel of Fortune Family Edition | 128k PRG / 0k CHR | H | 7 | AOROM |
Wheel of Fortune W/ Vanna White | 128k PRG / 0k CHR | H | 7 | AOROM |
Where in Time is Carmen Sandiego | 128k PRG / 256k CHR | H | 4 | MMC3 |
Where's Waldo? | 128k PRG / 128k CHR | H | 4 | MMC3 |
White Lion Densetsu | 128k PRG / 128k CHR | V | 1 | MMC1 |
Who Framed Roger Rabbit? | 128k PRG / 0k CHR | H | 7 | AOROM |
Whomp 'Em | 128k PRG / 128k CHR | H | 4 | MMC3 |
Widget | 128k PRG / 128k CHR | H | 4 | MMC3 |
Wild Gunman | 16k PRG / 8k CHR | V | 0 | NROM |
Willow | 128k PRG / 128k CHR | H | 1 | MMC1 |
Willow (J) | 128k PRG / 128k CHR | H | 1 | MMC1 |
Win, Lose, or Draw | 128k PRG / 0k CHR | H | 1 | MMC1 |
Wing of Madoola, The | 32k PRG / 128k CHR | V | 3 | CNROM |
Winter Games | 128k PRG / 0k CHR | H | 2 | UNROM |
Wits | 128k PRG / 0k CHR | V | 2 | UNROM |
Wizardry - Knight of Diamonds | 128k PRG / 128k CHR | H | 4 | MMC3 |
Wizardry - Knight of Diamonds (J) | 128k PRG / 128k CHR | V | 4 | MMC3 |
Wizardry - Legacy of Lyllgamyn | 128k PRG / 128k CHR | H | 4 | MMC3 |
Wizardry - Proving Grounds | 128k PRG / 128k CHR | V | 1 | MMC1 |
Wizardry - Proving Grounds (J) | 128k PRG / 128k CHR | V | 1 | MMC1 |
Wizards and Warriors | 128k PRG / 0k CHR | H | 7 | AOROM |
Wizards and Warriors (PAL) | 128k PRG / 0k CHR | H | 7 | AOROM |
Wizards and Warriors 2 | 256k PRG / 0k CHR | H | 7 | AOROM |
Wizards and Warriors 3 | 256k PRG / 0k CHR | H | 7 | AOROM |
Wolverine | 128k PRG / 128k CHR | H | 4 | MMC3 |
World Boxing | 128k PRG / 128k CHR | H | 1 | MMC1 |
World Games | 128k PRG / 0k CHR | H | 7 | AOROM |
World Super Tennis | 128k PRG / 128k CHR | V | 1 | MMC1 |
Wrath of the Black Manta | 128k PRG / 128k CHR | V | 1 | MMC1 |
Wrecking Crew | 32k PRG / 8k CHR | H | 0 | NROM |
Wurm | 128k PRG / 128k CHR | H | 4 | MMC3 |
WWF King of the Ring | 128k PRG / 256k CHR | H | 4 | MMC3 |
WWF Steel Cage Challenge | 128k PRG / 256k CHR | H | 4 | MMC3 |
WWF Steel Cage Challenge (PAL) | 128k PRG / 256k CHR | H | 4 | MMC3 |
WWF Wrestle- mania |
128k PRG / 0k CHR | H | 7 | AOROM |
WWF Wrestle- mania Challenge |
256k PRG / 0k CHR | H | 7 | AOROM |
Title | Size | Mirroring | Mapper | Common Designation | Notes |
X-Men | 128k PRG / 0k CHR | H | 2 | UNROM |
Xenophobe | 128k PRG / 128k CHR | H | 0 | NROM |
Xevious (J) | 32k PRG / 8k CHR | H | 1 | MMC1 |
Xexyz | 128k PRG / 128k CHR | H | 1 | MMC1 |
Title | Size | Mirroring | Mapper | Common Designation | Notes |
Y's | 256k PRG / 0k CHR | H | 1 | MMC1 |
Y's 2 | 256k PRG / 128k CHR | V | 4 | MMC3 |
Y's 3 | 256k PRG / 128k CHR | H | 4 | MMC3 |
Yie-Ar Kung-Fu | 16k PRG / 8k CHR | V | 0 | NROM |
Yo Nin Uti Majyan | 16k PRG / 8k CHR | V | 0 | NROM |
Yo Noid | 128k PRG / 128k CHR | H | 1 | MMC1 |
Yokohama Renzoku Satsujin Jiken | 128k PRG / 128k CHR | V | 1 | MMC1 |
Yoshi | 128k PRG / 128k CHR | H | 1 | MMC1 |
Yoshi no Cookie | 128k PRG / 64k CHR | V | 4 | MMC3 |
Yoshi no Tamago | 128k PRG / 32k CHR | H | 1 | MMC1 |
Yoshi's Cookie | 128k PRG / 64k CHR | H | 4 | MMC3 |
Youkai Club | 128k PRG / 32k CHR | V | 66 | 74161/32 |
Youkai Douchuki | 128k PRG / 128k CHR | V | 19 | Namcot 106 |
Young Indiana Jones Chronicles | 128k PRG / 128k CHR | H | 4 | MMC3 |
Yousike Ide's Battle Mahjongg | 128k PRG / 0k CHR | V | 2 | UNROM |
Yousike Ide's Battle Mahjongg 2 | 256k PRG / 0k CHR | H | 1 | MMC1 |
Yume Penguin Monogatari (Hacked) | 128k PRG / 128k CHR | V | 4 | MMC3 |
Title | Size | Mirroring | Mapper | Common Designation | Notes |
Zaiteku Satsujin Jiken | 128k PRG / 128k CHR | H | 4 | MMC3 |
Zanac | 128k PRG / 0k CHR | H | 2 | UNROM |
Zelda no Densetsu | 128k PRG / 0k CHR | V | 1 | MMC1 |
Zelda 2 - The Adventure of Link | 128k PRG / 112k CHR | H | 1 | MMC1 | Missing 16k |
Zelda 2 (PAL) | 128k PRG / 128k CHR | H | 1 | MMC1 |
Zen - Intergalactic Ninja | 128k PRG / 128k CHR | H | 4 | MMC3 |
Zenbei Pro Basket | 128k PRG / 128k CHR | V | 1 | MMC1 |
Zippy Race | 16k PRG / 8k CHR | V | 0 | NROM |
Zoids | 128k PRG / 0k CHR | V | 2 | UNROM |
Zoids 2 | 256k PRG / 0k CHR | V | 1 | MMC1 |
Zoids 3 | 128k PRG / 128k CHR | H | 4 | MMC3 |
Zombie Hunter | 128k PRG / 32k CHR | V | 1 | MMC1 |
Zombie Nation | 128k PRG / 128k CHR | H | 4 | MMC3 |
These are just a few games that I have lying around that don't work because
they're either currently unsupported or just a regular bad dump. This section
is totally useless.
Title | Size | Mirroring | Mapper | Common Designation | Notes |
76-in-1 | 2048k PRG / 0k CHR | H | NONE ASSIGNED | NONE ASSIGNED |
110-in-1 | 2048k PRG / 1024k CHR | H | NONE ASSIGNED | NONE ASSIGNED |
Cheetahme- n 2 |
32k PRG / 8k CHR | V | NONE ASSIGNED | NONE ASSIGNED | Probably a bad dump, too |
Deathbots | 64k PRG / 64k CHR | H | 79 | AVE |
Galactic Crusader | 32k PRG / 32k CHR | H | 11 | Colour Dreams |
Saint Seiya | 64k PRG / 128k CHR | H | 70 | 74161/32 |
Skull and Crossbones | 128k PRG / 64k CHR | H | 64 | Rambo-1 |
Super Jeopardy | 128k PRG / 256k CHR | H | 1 | MMC1 |
Tiles of Fate | 32k PRG / 32k CHR | H | 79 | AVE |
Option 1: Piece of Cake
So, my goal is to generate a “password,” or a string of characters that will contain the progress of the game and restore it the next time the console starts. All I have to do is select the current game settings, such as the level number and the number of points.
Thus, if I finish the game at level 2 with 10 points, my password will look like a sequence of the following numbers: 2, 10.
Usually, I store all characters as an ASCII table, where the tile code of the letter “A” is 33:
Thus, in order to convert my password values to characters, I have to add 32 to each of the values:
2 + 32 = 34 or “B”
10 + 32 = 42 or “J”
So now I have the password “BJ”, which encodes the values of “level 2” and “10 points.”
Now it's the other way around. In order to convert symbols to values, just subtract 32 from each of them:
34 - 32 = 2
42 - 32 = 10
It’s almost too easy, but nonetheless my task is completed.
Option 2: The Whole Cake
Let's look at the passwords in the Bucky O’Hare game.
Each password of this game contains five slots. Each of these slots is included in the following set: [A..Z, 0..9, “!”, “?”, “★”, “bucky icon”, “↓”, “↑”].
The first password slot is used to store Bucky's energy level and can contain 8 different values.
Bucky’s Slot |
|
3 or 4 or J or K |
low energy level |
5 or I |
medium energy level |
6 or M |
max energy level |
The second password slot contains the state of the blue planet and the energy level of Jenny.
Jenny’s Slot |
|
7 or N |
blue planet not completed |
8 or P |
low energy level, blue planet completed |
9 or Q |
medium energy level, blue planet completed |
! or R |
max energy level, blue planet completed |
The third password slot contains the state of the red planet and the energy level of Dead Eye.
Dead Eye’s Slot |
|
J or T |
red planet not completed |
K or U |
low energy level, red planet completed |
L or W |
medium energy level, red planet completed |
M or X |
max energy level, red planet completed |
The fourth password slot contains the state of the green planet and Blinky's energy level.
Blinky’s Slot |
|
? or 3 or 7 or Y |
green planet not completed |
4 or 8 or Z or “★” |
low energy level, green planet completed |
1 or 5 or 9 or “bucky” or “↑” |
medium energy level, green planet completed |
! or 2 or 6 or “↓” |
max energy level, green planet completed |
And finally, the fifth slot: the yellow planet and Willy’s energy.
Willy’s Slot |
|
? or 3 or J or T |
yellow planet not completed |
4 or K or V or “★” |
low energy level, yellow planet completed |
5 or L or W or “bucky” or “↑” |
medium energy level, yellow planet completed |
6 or M or X or “↓” |
max energy level, yellow planet completed |
Now, when you have such knowledge, you can skip blue and red planet with a password 5RKYT, where
5 = medium Bucky’s energy
R = max Jenny’s energy
K = low Deadeye’s energy
Y = not completed green planet
T = not completed yellow planet
But that's not all. The last two slots are also responsible for storing 4 stages of the toad mother ship:
Stage 1: Cell
Slot 4 (Blinky’s energy) |
Slot 5 |
|
low |
8 or Z |
4 or 5 or 6 or K or L or M or “↑” |
medium |
1 or 9 or “↑” |
|
max |
! or 2 |
Stage 2: Salvage Chute
Slot 4 (Blinky’s energy) |
Slot 5 (Willy’s energy) |
|
low |
4 or “★” |
4 or K |
medium |
5 or “bucky” |
5 or L or “↑” |
max |
6 or “↓” |
6 or M |
Stage 3: Center of Magma Tanker
Slot 4 (Blinky’s energy) |
Slot 5 (Willy’s energy) |
|
low |
! or 8 or Z |
V or “★” |
medium |
1 or 9 or “↑” |
W or “bucky” |
max |
2 |
X or “↓” |
Stage 4: Escape
Slot 4 (Blinky’s energy) |
Slot 5 (Willy’s energy) |
|
low |
4 or “★” |
V or “★” |
medium |
5 or “bucky” |
W or “bucky” |
max |
6 or “↓” |
X or “↓” |
So, if you want to start the game immediately from the last level and with the maximum energy level of all characters, your password should look like this:
M (max Bucky’s energy)
! (max Jenny’s energy)
X (max Deadeye’s energy)
6 (max Blinky’s energy)
X (max Willy’s energy)
And all together: M!X6X
If any of the characters does not match any value from these tables, the password is considered incorrect. This makes “hacking” a password tedious, because if you don’t know the logic of these tables, you will have to sort through a lot of character combinations to find at least one correct password.
This is a good method, but there is one more.
Option 3: Checksum
Quite often, passwords in games include a checksum. This value is necessary in order to check the password for validity and to exclude brute force passwords.
Let's try to create a password system with a checksum. I used this method in earlier versions of The Meating.
So, my goal is to generate 8 symbols of password from the set of characters 0..9 and A..Z, which are located in the tileset starting from tile 0x80 as follows:
My password should contain the world number (0-5), level number (0-9), difficulty level (0-1 for easy and hard mode), the number of items (0-5), and a random value to make the password more varied.
So, the structure of my password fields will look like this:
1 |
Random encryption mask 1 |
unsigned char xorA |
2 |
Random encryption mask 2 |
unsigned char xorB |
3 |
Random encryption mask 3 |
unsigned char xorC |
4 |
World number 1 to 6 + difficulty bit |
unsigned char iWorld |
5 |
Level number 1 to 10 |
unsigned char iLevel |
6 |
Items count 1 to 6 |
unsigned char iItems |
7 |
Random value |
unsigned char rand1 |
8 |
Checksum |
unsigned char checkSum |
Password generation algorithm
1. Generate a random 8-bit value
xValue = rand8()
2. Mask the high bits to keep only the low 5 bits
xValue = xValue AND 0x1F
3.Set the high bit so that the value fits into the alphanumeric tiles range
xorA = xValue OR 0x80
4. Encrypt the world number
iWorld = iWorld XOR xValue
4.1 Add difficulty to this value.
iWorld = (iWorld SHL 1) OR Difficulty
5. Do the same for the level number
xValue = rand8()
xValue = xValue AND 0x1F
xorB = xValue OR 0x80
6. Encrypt the level number
iLevel = iLevel XOR xValue
7. The same for items
xValue = rand8()
xValue = xValue AND 0x1F
xorC = xValue OR 0x80
iItems = iItems XOR xValue
8. Add another random password character
xValue = rand8()
xValue = xValue AND 0x1F
rand1 = xValue OR 0x80
9. Checksum calculation
checkSum = xorA XOR xorB XOR xorC XOR iWorld XOR iLevel XOR iItems XOR rand1;
Password Decryption Algorithm
1. Read all the values from the password and calculate the checksum
xValue = xorA XOR xorB XOR xorC XOR iWorld XOR iLevel XOR iItems XOR rand1
if (xValue == checkSum)
“Password accepted”
else
“Wrong password”
2. Read the world number from the password and use its encryption mask
iWorld = iWorld XOR xorA
3. Discard unnecessary bits
iWorld = iWorld AND 0x0F
3.1. Separate the world number and difficulty
Difficulty = iWorld AND 0x01
3.2. Restore the world number
iWorld = iWorld SHR 1
4. Read the level number from the password and use its encryption mask
iLevel = iLevel XOR xorB
3. Discard unnecessary bits
iLevel = iLevel AND 0x0F
6. Read the items count from the password and use its encryption mask
iItems = iItems XOR xorC
5. Discard unnecessary bits
iItems = iItems AND 0x0F
Well, let's find out how it works
It seems my goal has been achieved. I have encrypted several values in a password with checksum verification using the simplest method based on binary logic.
Of course, this method is not without some drawbacks, but this is quite enough for simple games and small values that you want to encrypt.
There are many games and many other ways to save game progress to a password. You can see these at work in games like Castlevania 3, Prince of Persia, and more. The type of password a game uses will depend on the individual goals of the developers and what they come up with when they are working on a game.
And now, before your mommy will bring back your power supply, try to do some homework: improve my checksum method for your own game. I'm sure you can do it!
]]>
Streamers combine gaming skills with personality and humor, potentially earning thousands from sponsors. Even the smallest cat can find fame and fortune by playing some of their favorite titles for generous fans.
In recent years, Twitch has rapidly become one of the most popular games streaming sites. With countless viewers, streamers are spending thousands of hours creating and sharing content on the platform.
With the new release of DOOM Eternal coming and the recent Wolfenstein game, there’s been an uptick of gamers exploring older titles.
One such user is Twitch streamer Joana, who has gained over 70 thousand followers playing a mix of World of Warcraft and old school Castlevania. RyuQuezacotl logged 120,321 viewer hours with Diablo 2 speedruns. Strange to think that after 15 years, even Diablo is already considered retro. Specifics on how much these users earn are just guesses, but their success is proof that Retro Game Streaming is alive and growing.
Now hold on to your bits, while getting set up can be a walk in the park or a bit more involved (depending on your tech-savvy), getting paid is a guide for another post. For now, let’s discuss how to get set up for a shot at some money.
Source : (TheDailyDot)
First things first, you’ll need to create an account on a streaming platform. Twitch is one of the most popular, but Facebook, Mixer, and Youtube are all in on the game. When choosing a username, it’s equally important to be memorable and unique. You might want to avoid profanity or identifying information just in case you gain popularity.
Once you’ve created your profile, it’s time to choose a game. Modern consoles tend to be plug-n-play, with Xbox and PS4 coming with integrated streaming services out of the box. PC and older consoles will require broadcasting software. While Streamlabs and Xsplit both offer great features, you’ll be hard-pressed to find a better option than OBS.
Not just free, OBS (Open Broadcaster Software) is a powerful open-source software that has the perfect flexibility for streaming both current and retro games. It has plug-ins to optimize your video quality, which will come in handy with the lower frame rates of yesteryears titles.
Once downloaded: you’ll need to open settings, select ‘Stream,’ and choose your service. OBS will then prompt you for your streaming key. If you are streaming on Twitch, you will find it within your user dashboard.
If you are running the game off a PC, you’re ready to go. But older consoles, like the N64, Genesis, or NES, will need some extra gear and/or modding before you show the world your skills.
Some in the gaming community would bypass the following steps and just run games through an emulator. If you are a purist, you’ll need to get yourself a CRT television, a video capture card, and adapters to convert old ports to HDMI. Consoles like the SNES have branded s-video outputs for your system, but NES will require splitter cables and some modification. Experienced retro streamers recommend getting an RCA Switch box, so you don’t need to switch the systems out repeatedly.
Once you have all of the wires and doo-dads connected, you’ll want to adjust your video resolution settings. While OBS has many plug-ins to help with that, some streamers experience delays. Enter AmarecTv, a direct video capture recording tool. You can use Amarec to boost quality so that your capture hits 60 frames per second without lag affecting gameplay or stream quality.
There is definitely a learning curve since the latest version of Amarec is in Japanese, but makes capture card configuration a breeze. After clicking settings, you should come across two “Graph” tabs. Neither the tutorial I used or I have any idea why they are called that, but this is where you’ll adjust your capture settings. Open “Graph 1” and make sure to select your card for both video and audio. By messing with the resolution, frame rate, and color space, we can maximize the stream quality.
Most cards will read the low definition signal of older consoles as 720x480. Counterintuitively, we don’t want to set it at 59.97 fps but at 29.97fps. You’ll want to set the color space to YUY2 16bit for composite or s-video output.
In “Graph 2”, we’ll fix the resolution. By selecting a 4:3 ratio, Amarec will condense the signal to 640x480, separate the alternating lines of footage into full frames and run them consecutively, giving us smooth, interlace-free footage running at 60fps. Once finished: you are ready to open OBS, select your window capture source, and game your way to fame.
When it comes to populating and engaging with your channel, checking out other popular streams can give you insight into how their channels are run. Streamers often list their gaming set up components on their bios, so check them out to get inspiration. Don’t forget to interact with your viewers and of course, add a donate button.
If you are using Twitch, be sure to play under Retro as your game. List the actual game name in the stream title to maximize your viewership. The Retro community on Twitch has over 600k followers and is a friendly group open to a variety of streams and new streamers.
A huge thanks to TheBigCheese, FuriousPaul, and The Art of MMO War for compiling the tutorials that made this guide possible.
Sources:
http://www.artofmmowar.com/2015/11/guide-to-streaming-retro-consoles-on.html
https://obsproject.com/forum/resources/capturing-streaming-your-retro-consoles-the-right-way.289/
https://www.furiouspaul.com/articles/twitch-tv-setup.ht
Want more retro hardware advice? Join our Discord!
]]>Before you rush to disassemble your cartridges and discover for yourself, rest assured that they are all quite different inside. It all depends on the game's mapper.
But first, let's figure out what a mapper is, and how it affects what is possible in the game it holds. To do that, we'll have to look at some engineering decisions from the early days of home consoles and computers.
ZX Spectrum. I like this computer. But there are several different models of this computer. The simplest configuration is the ZX Spectrum 48. And although this model had only 48 kilobytes of RAM onboard, this turned out to be enough for thousands of wonderful games to be created for it.
But progress did not stand still, and the next model was released very soon: the ZX Spectrum 128. It is easy to guess that this model had 128 kilobytes of RAM. This model also had its fair share of games.
However, there was a problem. Users who had an old model computer could not start games for a new one, or they could run them in a very limited way - without music or additional graphics. Therefore, they were forced to upgrade their computer on their own or buy a new one.
But Japanese engineers chose a different way. They designed the console so that the game code and all game data was stored on the cartridge. The console does not contain any memory at all. That's why I love NES.
The first carts were very simple. This is what Super Mario looks like from the inside:
As we can see, the console allows you to address 32k PRG-ROM (ROM, where you store the code: two green banks of 16 kilobytes each) and 8k CHR-ROM (the blue bank, where the game’s graphics are stored).
I think we will be able to call this a “basic configuration”, and a lot of great games were created for it, such as Super Mario, Galaxians, Dig-Dug, Ice Climber, and more. Such a mapper is commonly called NROM.
However, these are not very large numbers for a serious game - 8 kilobytes of graphics are not enough. In order to diversify the game world as much as possible, the developers began to add additional chips to the cartridge for storing code and graphics.
The logic that allowed these additional banks to be “mapped” to the main address space was called “mapper”.
Each mapper is unique. I think any NES fan knows a game like The Adventures of Dino Riki - three unique colorful levels, a nice soundtrack, and great physics. Let's see what it takes to have these additions:
This is the CNROM mapper, and it is a classic configuration: the same 32 kilobytes of code, but with 32 kilobytes of graphics instead of 8. It is clear that this game has become better and stronger compared to its ancestors from the Mariozoic era.
Theoretically, you can add up to 256 banks of 8 kilobytes to this board. Yes, this is possible, and it will also be CNROM, but with two megabytes of graphics on board!
This mapper deserves special attention. Unlike previous mappers, this cartridge stores PRG-ROM graphics, and uses CHR-RAM instead of CHR-ROM to fill banks with graphics on the fly, with any tiles we want, creating unique tilesets for a unique scene of our game. The standard configuration is UNROM 128 (like the Spectrum!) Or 256 kilobytes of PRG-ROM. But technically this mapper supports up to 4 megabytes of PRG-ROM.
A lot of cool games will be done for UNROM: Contra, Castlevania, Duck Tales, Gun Smoke, Jackal, and so on.
But of course, the leader of all the mappers is MMC3. This mapper allows you to have a PRG-ROM capacity of up to 512 kilobytes and a CHR-ROM of up to 256 kilobytes. In addition, the mapper made it possible to split the PPU window into pages of 2 and 1 kilobytes in size, which allowed programmers to study the technique of animating the background of the game.
Also, the mapper allowed to "catch" the beam of a CRT tube, which was used to create all kinds of raster effects:
Some of the coolest games for NES that you remember were coded for this mapper. Remember this whenever you play Darkwing Duck or TMNT 3.
However, this is only the beginning of the many types of mappers that can be talked about. We will discuss more in future installments of this series, but if you are just starting out, try choosing a simple mapper. Even with the simplest NROM, you can still create many great games.
After all, it's not just about the tools, but how you use them!
Eager to learn and talk more about retro consoles, retro/modern dev, and more? Come join our Discord! We don't bite, and your hands will turn into paws in no time.
]]>
Released for the arcade in Japan in 1988 and eventually on the Sega Genesis in the United States, Splatterhouse is one of the forerunners of retro horror. The influences in this game are quite apparent as you don a Jason-esque hockey mask while fighting Deadite looking creatures in a side-scrolling beat ‘em up fashion.
The game was so unsettling at the time it even came with its warning: "The horrifying theme of this game may be inappropriate for young children... and cowards." That warning didn’t stop many people, as it was re-released on the Wii in 2007 and saw a reboot in 2010.
Another 1980’s horror game, Sweet Home was a top-down RPG that has you splitting up your party to collect gear and solve puzzles. The origins of the game go back to the Japanese film of the same name and, while most video game adaptations of movies tend to flop, Sweet Home has been deemed something of a grandfather to the horror video game genre. It’s remained relevant enough to be one of the driving influences of the powerhouse known as Resident Evil.
Is there a more iconic horror duo in gaming than a Belmont and his whip? Released in Japan on Halloween of 1991 for the SNES, Super Castlevania IV took the supernatural horror platforming series into the 16bit era and added a multi-directional whip and some cool swinging mechanics.
Perhaps the oldest entry here, Haunted House is a classic early 1980s game. Is it scary? By today's standards, no, not really. However, given the constraints of their time, the developers tried their best. This sentiment is heightened by Digital Press calling it "the dinosaur of the SCARY genre," which I guess is a compliment, depending on how you look at it.
Remember before when I mentioned how video game adaptations of movies don’t usually hit it right? Well, a perfect example is right here. Released in 1989, Friday the 13th was pretty much bashed by everyone who played it, with GamePro listing it at the bottom of it’s “Top Ten Worst Games Based on movies. The NES game was smacked with the “one of the worst horror games of all time” label. Thankfully, Illfonic has since stepped in and has created a worthy Friday the 13th game.
The Meating takes influence from the retro horror games of the 20th century, with the only difference being that it’s being developed nearly 40 years later.
Solid platforming and an interesting story are what made some of the above truly wonderful in their own right, and it’s these inspirational and driving pieces that have been adopted by the team behind The Meating.
A great-grandchild to these gems (and coal piles), The Meating and it’s minotaur protagonist are looking to put the horror back into the retro genre, while only including what made the old greats, great.
]]>However, creating rich and elaborate characters in this way often comes at a cost to performance. The more sprites and tiles used for a single game character or object, the less there is to be used elsewhere on the screen. As such, layering sprites creates a new technical limitation for game design. Fortunately, there are other strategies available to improve the visual appeal of a game's art, without impacting precious tile and scanline limits.
Here we have an example of how an archer character was improved by making better use of its palette. The flesh tones were used throughout the character more to add detail, and the green was blended throughout the border to soften the character's edges.
In this case, we used the character's existing palette. However, depth and detail can also be increased through the use of additional palettes. Including a second palette is a great way to provide expanded color depth.
Be careful when using this technique, however, as the tiles you edit need to adhere to NES palette rules. Here you can see that the cannon is in its own two 8x8 tiles so that a different palette can be applied to it without cause for concern. Also, we used the first technique to improve the rest of the sprite.
Whenever you are editing a sprite-like this, always make sure that each tile only has a single palette inside of it, or else it will not work. The best way to handle this is to overlay an 8x8 grid over the image, like the image above. This way, you'll be able to see the individual tiles.
A warning before we go - using multiple palettes like this will not affect your NES game's performance, but it does require you to be more thoughtful in how you deploy your palettes. You may end up being forced to make all your enemies share a palette, for example. Remember that NES games are a dance of art, design, and planning, and you'll be fine.
Want more insider tips? Join the Mega Cat Discord!
]]>Generally, this demo mode is activated from the main screen of a game, if there is no input from the player. The arcade displays one of the game levels and controls the protagonist automatically. This demonstrates the fun the player might have if only the would part with a coin.
We’ve done the same thing here for the console. Pay your attention to the status of the joypad in the lower-left corner of the screen. I don’t push anything, everything is done by the console. This is the demo mode, and of course, you could control this character better than NES. So, have you looked at this? Still, want to spend a coin? Let's get started then!
There are several methods by which we can make a player move without our participation. The first method is loops and conditions. For example, our goal is to get the player to go to the middle of the screen, wait two seconds, then go back to the left, wait three seconds, and jump. To do this, we need to perform a sequence of loops. Something like this:
Too much code, right? However, we did not really do anything, just two moves. And even if we choose to do things this way, we would encounter a bunch of nasty things afterward. For example, such a “script” is very difficult to edit, and if you need to make a few small changes, this method will drive you crazy, be sure of that.
Let's try to record to a file the desired sequence of clicking your joypad controls, and use this dump to simulate button presses.
Here is the essence of this method: we will disable control for the player, and give our console the ability to read this dump byte by byte to perform the necessary actions.
For this, we will need:
First, prepare a dump of the joypad.
Select a menu item: File -> Movie -> Record Movie.
Then specify the filename to make your dump.
You can choose to record from "Start" (which will reset your game!) or "Now." Click the OK button and the emulator will start writing a file. Do not waste time, start playing your game the way you would like to show it in demo mode. To stop recording, use the “Stop Movie” menu item.
I did exactly the same, let's see:
Now find the file you recorded (usually a Movies subfolder in the emulator folder). Open this file with any text editor, and you will see the following:
At the beginning of this file there are several lines with service information, then two columns with the states of the first and second joypads. Look at these columns, the first 6 frames I didn’t click anything, then there are three frames with the Right button pressed, three frames with the Left button pressed, and so on. This is exactly what we need.
However, I don't really like how the data is stored. The average dump size for the demo mode is 1000-1500 frames. This will take up a lot of space on the cartridge, so I coded up a small utility that converts this entire dump into the format I need. You can do it yourself, or you can take the sources of my utility for use in Delphi 7.
So, I will store the joypad 1 state to one byte for each frame. I will also pack data on the fly in a format similar to RLE: the first byte will contain the number of frames, then the byte with the joystick state for these frames will follow. Just like this:
frames_count, joy_state, frames_count, joy_state, frames_count, joy_state, .. , #0xff
As you can see, with this simple tool I can convert such a dump into a data array for the C language, which I insert into my source. I also reduced the size of the array from 364 bytes to 19 bytes (nice!). This will help me save space on the cartridge.
However, this array by itself does nothing, so let's try to use it.
First, we need to slightly modify the Neslib library procedures we have been using. There are already subroutines for working with the joypads, but we need a subroutine that will set the joypad states with values from our array.
To do this, add the pad_set procedure to the neslib.s source code:
I also added the label “pad_emu” to the pad_poll function. Right after the @done label.
Do not forget to add the name of our function to the “export” section.
And to neslib.h
There! Now we're getting closer.
Now we should take the values from our array and use them as a parameter for our pad_set procedure. Let's write the code for C.
Now I will call up the playTutorial procedure instead of pad_poll in the game loop, and all the actions that I recorded in the emulator will be performed in the game.
So, now your character can perform any action without your participation. This can be useful not only for the attract mode but also for tutorial levels.
Record, play, make your game more diverse, and I'm sure there will certainly be retro lovers who will appreciate your efforts!
]]>
Andrew Marsh is one of the designers for The Meating. While Marsh tends to draw influence from classic games like the Super Mario titles, for this game he looked to recent titles.
“I decided to pull from more modern puzzle platformers for this game,” he said. “Games like Hollow Knight and Super Meat Boy were definitely big influences on me while I was coming up with ideas for the levels.”
There’s always an urge and desire to create original content. No matter how many sources you pull inspiration from, originality is key. According to Marsh, The Meating has a unique spin to its puzzle design with the use of the abilities you can unlock throughout the game.
Throughout the game, you’ll be given five spectral ghost powers to solve these puzzles with, aside from the basic jumping, levitating, and charging: telekinesis, thermokinesis, possession, projection, and incorporeality.
“The coolest one is definitely the possession ability that allows the player to take control of a nearby enemy to solve puzzles. There's something satisfying about seeing a platform that you can't reach and then possessing a spider to climb up to it,” he said.
In addition to controlling enemies, you’ll have the ability to pass through objects, control the temperature, and even phase from the spirit world into the physical.
Creating puzzles for The Meating was no simple task. One of the biggest and most unique challenges was working with the retro hardware, as opposed to modern digs.
“In modern game development, a designer is able to open up a level in the game engine, make adjustments, and then test it right there seamlessly. This process isn't as easy to do with retro development, so we have to try to think ahead about where the player might be able to break out of the intended path that we are setting for them,” Marsh said. “Generally, that starts out with drawing a sketch of the level, whether that be on paper, or digitally so that we can try to visualize what will and will not work. From there we use either a map creation tool or image editing software depending on the project and we start to build the level out.”
After the level is built, the game must be compiled to test it and see what works. Then it’s a matter of going back to the source, making adjustments, compiling again, rinse, repeat, until it’s perfect.
So, what makes a puzzle game perfect? To Marsh, the crown of all puzzle games goes to a classic, Tetris. However, there are other games he gives a hat-tip to.
“If we're looking at something in the puzzle platformer genre, then I feel like you can't get any better than the simple fast-paced fail and retry gameplay of something like VVVVVV. The key to making the perfect puzzle game is to make something difficult, but you want the difficulty to be on the player. If the player ever feels like their skills aren't what's at fault when they fail, then there is a problem.”
The feeling of trial and error and skill-based gameplay are reflected right in the gameplay of The Meating as you try, and occasionally fail, to use your ghostly powers to phase through each of its many puzzles.
Want more tips straight from the retro pros? Welcome to our Discord!
Get mad meat on The Meating page now!
]]>One of the best ways to debug your code is to use a debugger. Some of the FCEUX and Mesen emulators have a built-in debugger that can interrupt program execution at any time in order to check the code for operability.
It is worth saying that this way is more suitable for advanced programmers who use assembly language. But since we are newbies, we will use the C language (cc65). Of course, the compiler will play by its own rules, and it will be difficult for us to navigate the machine code compiled from the C language.
Suppose we need to watch for some variable or array. Add the following parameter to your linker option (ld65): -Ln labels.txt
When the project is compiled, you will find the file labels.txt in your project folder. Just open it with any text viewer and look for the name of the variable you need to watch.
(Note: if you declare a static variable, it will not be included in this list. Therefore use unsigned char playerX; instead of static unsigned char playerX)
Now we know the address of the required variable. Not bad. Let's find it in the debugger. Start your ROM with the FCEUX emulator. In the “Debug menu”, click on the “Hex Editor” item, in the window that opens, press ctrl + g, and enter the address of your variable:
Click OK and the cursor will be moved to the address where the variable is located. Let's look at this:
This can be useful to check if the array is filled correctly or to watch changes in specific variables. It also makes you feel a bit Big Brotherish, surveilling your code like this.
Be sure to check the FCEUX emulator Debug menu for other useful tools, like PPU Viewer, Name table Viewer, and much more.
What if you don’t want to run the debugger each time you check for a variable? An advanced method is to write a subroutine that will display any value on the screen. Let's try to use the score in the HUD to display the player's position on the Y-axis:
Works like a charm!
Doug Fraker, a retro coder and owner of the nesdoug blog, provides a similar method for using an on-screen visualization for debugging purposes. The following subroutine creates a grey line on the screen which visually indicates CPU usage:
You can copy-paste this to your source, or include the nesdoug.h library in your project. Call this subroutine after your game cycle has been completed, and you will see this gray bar on the screen.
It works, but I think I got another bug! I’ll get rid of it later. For now, let’s move on.
Macros can also be a useful tool for debugging. They can help you pinpoint the spot in your code that is fending off a bug infestation.
Let's create some macros that will give us some signals at the right time, like playing a sound or highlighting a zero palette with a necessary value. Here we have a few macros that change the zero palette to red, blue and random colors, and for playing a sound:
How does it work? Suppose your project is successfully compiled, you run the emulator with your game, click the Start button, and...
It seems there is nothing here except the white screen. In addition, some emulators will tell you in the status bar: CPU jam! What do we do now?
First of all, we have to localize the code where the error occurs. This is where my sound macro comes into play.
We know for sure that at least the main menu works, let's see what happens after it:
playMainMenu();
player.lives = 9;{
set_world(current_world);
debugSound;
playCurrentLevel();
}
I have a suspicion that the game crashes on the execution of the set_world subroutine. Let's check it out. I will simply write the name of the macro in the next line after the subroutine I want to check.
We start the project and ... I hear a sound! So, this subroutine completed successfully, and we need to check the next one: playCurrentLevel. Let’s move the debug macro below:
while(current_level<7 && player.lives>0)
{
set_world();
playCurrentLevel():
debugSound;
}
I run the project again and do not hear the sound. This means that my subroutine is not complete, and failure is occurring inside it.
In these cases, open the listing of the subroutine in question and continue using this method until you narrow the range of where the bug could be hiding.
Macros that change the palette can also be useful for checking conditions. For example, our code performs a complex check of several conditions:
if ( (getTile(objX, objY+16) || collide16() ) || (objsOX[i] && objY>objsOX[i]))
{
debugRed;
objsSTATE[i]=THWOMP_SMASH;
objY=objsY[i]-=4;
objsFRM[i]=0;
sfx_play(SFX_THWOMP_SLAM_DOWN,2);
}
If we switch the color of the palette here, we will see if our condition is fulfilled or not:
It seems that this chicken is fine. But if the flag does not work, then one of the conditions is not met. In this case, check each of them separately, and perhaps you will find another creepy bug.
Recently, I noticed that one of the ghosts exhibiting some suspicious behavior. Occasionally, they refused to attack the player.
Take a look at this bug-enslaved ghost - it attacks only when the character is close to the center of the screen:
No matter how much I looked at the code of this procedure, I could not understand where the bug was hidden, so I decided to take extreme measures and test the performance of this code in a modern development environment.
I took with me everything I needed: a map of the screen, an array with the attributes of metatiles, the code of the subroutine, and just pasted all this in Visual Studio 2017:
Here, on the PC, this code worked exactly the same way. As it turned out, the bug was hiding in a procedure that fills the cache to find the obstacles between the player and the enemy. My array was not filled correctly. I'm fairly certain there should be 0 instead of 0x80.
Well, I will try to debug the code step by step to find out why this is happening.
It's funny, but it seems like I performed the actions in the wrong sequence. Let's fix it and check the array again!
It seems that now the array is filled correctly. So, I have only to fix the cc65 code and compile the NES project once more.
So, modern development tools will be able to help debug your algorithms and get rid of bugs.
Bugs are frustrating, and debugging can be too. Just stay calm, stay in control, and use every tool at your disposal to find and destroy these filthy insects. Your code, and your peace of mind, will feel much better.
Want more tips straight from the retro pros? Welcome to our Discord!
Get mad meat on The Meating page now!
If you played platformers, then you probably noticed that almost every game of this genre has one thing in common: enemies. Enemies vary from game to game, but they all have the ability to attack us at the most inconvenient moment, creating additional gameplay difficulties.
Some enemies are pretty stupid, like these Contra soldiers. They only follow along with the platform in one direction, so the player must shoot them, or avoid colliding with them, so as not to lose precious life.
However, the logic of some enemies may be a bit more complicated. Complex enemies, with special patterns, abilities, or behavior present players with an added challenge, and forces them to use their knowledge of the player character and the game world. Case in point is the behavior, and weaknesses, of the Voracious Ghost from The Meating.
This hungry spectre patrols the platform, and if a player comes too close to them, they will smell the bovine meat and rush in to attack:
It works quite simply. If the distance is more than 64 pixels (4 metatiles of 16 pixels each), the ghost will continue to move. But if the distance between the player is reduced to four or fewer metatiles, the ghost will switch to attack mode. We could do it like this:
if (playerX > ghostX)
else
if (distance <= 64)
Ghost.status = GHOST_ATTACK;
But it seems we did not take into account something else.
To give our enemies more realism, we must endow it with vision. And if there is a block or platform between the player and the ghost, the ghost will not “see” the player and will not attack him. Take a look for yourself:
What should we add to our math to allow the player to hide behind the blocks?
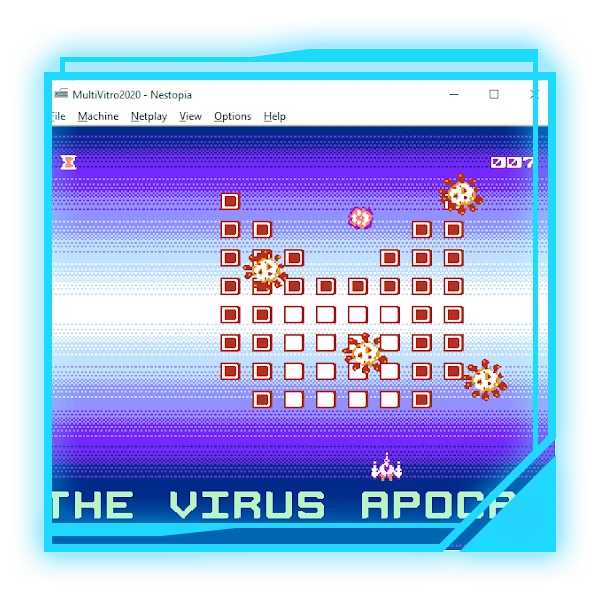
First, let's understand how the level map works.
Our game map is divided into metatiles. Look at this picture above: there are 16 columns and 15 rows that form 240 cells. In each of these cells, there is a metatile - a “piece of graphics” 16x16 pixels in size.
In turn, metatiles can be solid and not solid. Solid metatiles are platforms, walls, floors. In a word, those graphic elements that the player and other creatures of our game world are not allowed to pass through. I marked these metatiles with green rectangles.
The remaining metatiles are not solid and have no collision. These are just the elements of the background, wallpaper, and other elements of the interior through which the player and the monsters are allowed to pass.
Let's return to our ghost. Suppose the X coordinate of our minotaur is 96. The ghost is at position 160.
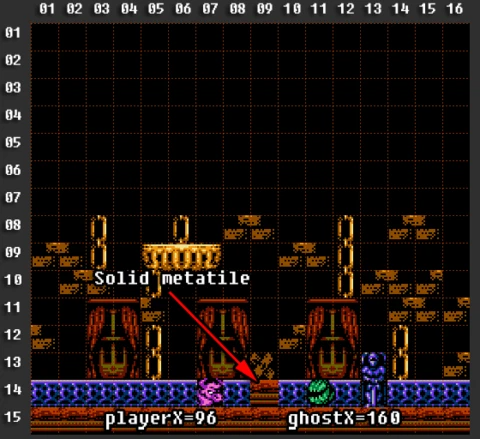
Let's calculate the distance between them:
distance = 160 - 96 = 64.
But among other things, we must consistently check every metatile between the ghost and the player. I highlighted these metatiles in the picture below.
And if at least one of the metatiles is solid, we must prohibit the ghost from attacking the player.
It might look like this:
// Reset playerDetected variable
playerDetected = 0;
distance = ghostX - playerX; // 160 - 96 = 64
So, the distance between the player and the ghost is 4 metatiles or 64 pixels. This is enough to start the attack, but we still haven’t checked the metatiles between the player and the ghost. Well, let's remedy that straight away.
if (distance <= 64)
{
}
}
if (playerDetected)
Ghost.status = GHOST_ATTACK;
As you can see, nothing complicated.
However, we did not think about how quickly such mathematics would work. Let's measure the speed of these calculations.
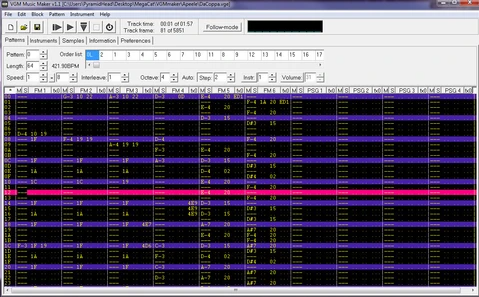
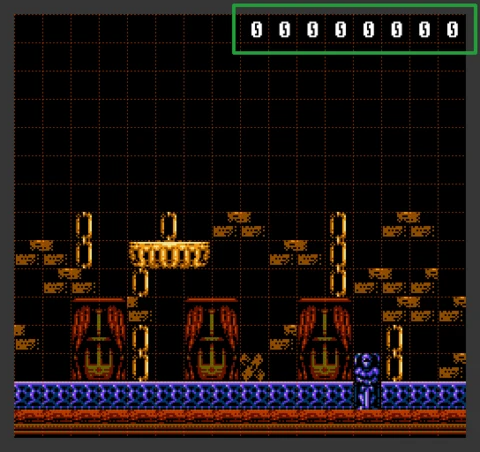
I added this gray debugging bar to see how many CPU cycles there are left in the current frame. The lower this bar is, the fewer processor cycles per frame we have left. We must not allow this bar to move beyond the bottom edge of the screen, otherwise, we will get a lag.
Notice that at the moment when an enemy spotted a player, this bar shifts down by ~30 pixels. This is the very load that the CPU receives during the calculation of the distance, taking into account the verification of solid metatiles. If there is not one enemy on the screen, but two, or three, such calculations will give even more load on the processor.
Can we speed up these calculations? Yes, we can!
First of all, we have to get rid of the use of loops and check just two bytes instead of three, four, five, etc (depending on the distance). We also need a cache of 30 bytes.
unsigned char cacheMap[30];
One byte contains 8 bits, so let's group 8 metatiles into one byte. If the metatile is solid, we set the corresponding bit to 1. If the metatile is not solid, we will leave 0 here.
The first 8 metatiles in our map are empty, so these are 8 zero bits in a row. If we convert it to a decimal format, we get 0. Let's store this byte to the cache:
cacheMap[0] = 0;
Let’s proceed to the next byte.
Here, 0, too, oddly enough, so
cacheMap[1] = 0;
The next 7 rows (or 14 bytes) will also be zero.
cacheMap[2] = 0;
cacheMap[3] = 0;
cacheMap[4] = 0;
cacheMap[5] = 0;
cacheMap[6] = 0;
cacheMap[7] = 0;
cacheMap[8] = 0;
cacheMap[9] = 0;
cacheMap[10] = 0;
cacheMap[11] = 0;
cacheMap[12] = 0;
cacheMap[13] = 0;
cacheMap[14] = 0;
cacheMap[15] = 0;
But in the eighth row of our map, there is a platform.
0000 1110 bin = 14 dec, so
cacheMap[16] = 14;
In the end, we will reach the bottom row:
1111 1111 bin = 255 dec.
cacheMap[28] = 255;
cacheMap[29] = 255;
It seems, our cache is ready.
We do not need to fill the cache manually, so we can write a subroutine for every situation.
unsigned char cacheMap[30];
const unsigned char cacheMask[8] = { 128, 64, 32, 16, 8, 4, 2, 1 };
void makeLevelCache (void)
{
cacheBit = cacheMask[i & 7];
}
}
Let's move on.
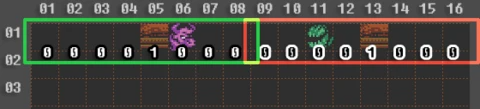
Suppose our character is in the sixth cell of the map, a ghost in the eleventh cell. And in the eighth and ninth cells are solid metatiles.
To check the presence of an obstacle, we need to work a little with the first byte of the cache, which is 1 (0000 0001 binary).
We need to maintain only those bits that are to the right of the player, and we will reset the remaining bits. Let's apply boolean algebra for this:
0000 0001 AND 0000 0011 = 0000 0001 (1)
For the second half of the screen, the rules will be slightly different, we will save the bits to the left of the ghost, and reset the remaining bits:
1000 0000 AND 1100 0000 = 1000 0000 (128)
As we can see, nothing has changed. Both the left and right cache bytes are not zero. So, there is an obstacle there.
Let's try to move the first solid metatile from the eighth cell to the fifth, and the second solid metatile from the ninth cell to the thirteenth, and see what happens.
0000 1000 AND 0000 0011 = 0000 0000 (0)
And second byte:
0000 1000 AND 1100 0000 = 0000 0000 (0)
It seems our theory works! As a result of these operations, we got zeros, which means that no bits are set to the right of the player and to the left of the ghost. So you have to run, otherwise, you are attacked by a ghost, because nothing prevents you from doing it - there are no solid metatiles.
Now, let’s try to write the code. This code will be fully functional only for the special case when the player and the enemy are in different halves of the screen. But this will be enough to discover how it works.
First, we will prepare masks for the left and right sides of the screen:
// leftMask - 0..127 array containing left side masks
// where x 0..15 mask = 0111 1111 = 127;
// where x 16..31 mask = 0011 1111 = 63;
// where x 32..47 mask = 0001 1111 = 31;
// where x 48..63 mask = 0000 1111 = 15;
// where x 64..79 mask = 0000 0111 = 7;
// where x 80..95 mask = 0000 0011 = 3;
// where x 96..111 mask = 0000 0001 = 1;
// where x 112..127 mask = 0000 0000 = 0;
const unsigned char cacheLeftMask[] = {
127,127,127,127,127,127,127,127,127,127,127,127,127,127,127,127,
63,63,63,63,63,63,63,63,63,63,63,63,63,63,63,63,
31,31,31,31,31,31,31, 31,31,31,31,31,31,31,31,31,
15,15,15,15,15,15,15,15,15,15,15,15,15,15,15,15,
7,7,7,7,7,7,7,7,7,7,7,7,7,7,7,7,
3,3,3,3,3,3,3,3,3,3,3,3,3,3,3,3,
1,1,1,1,1,1,1,1,1,1,1,1,1,1,1,1,
0,0,0,0,0,0,0,0,0,0,0,0,0,0,0,0
};
// rightMask - 0..127 array containing right side masks
// where x 0..15 mask = 0000 0000 = 0;
// where x 16..31 mask = 1000 0000 = 128;
// where x 32..47 mask = 1100 0000 = 192;
// where x 48..63 mask = 1110 0000 = 224;
// where x 64..79 mask = 1111 0000 = 240;
// where x 80..95 mask = 1111 1000 = 248;
// where x 96..111 mask = 1111 1100 = 252;
// where x 112..127 mask = 1111 1110 = 254;
const unsigned char cacheRightMask[] = {
0,0,0,0,0,0,0,0,0,0,0,0,0,0,0,0,
128,128,128,128,128,128,128,128,128,128,128,128,128,128,128,128,
192,192,192,192,192,192,192,192,192,192, 192,192,192,192,192,192,
224,224,224,224,224,224,224,224,224,224, 224,224,224,224,224,224,
240,240,240,240,240,240,240,240,240,240,240,240,240,240,240,240,
248,248,248,248,248,248,248,248,248,248,248,248,248,248,248,248,
252,252,252,252,252,252,252,252,252,252,252,252,252,252,252,252,
254,254,254,254,254,254,254,254,254,254,254,254,254,254,254,254
};
And now we will write a subroutine:
unsigned char checkDistance (unsigned char maxDist)
{
unsigned char distance, cachePos, playerResult, enemyResult;
const unsigned char* maskTable;
enemyResult = !(cacheMap[cachePos] & maskTable[enemyX & 0x7f]);
}
}
Still don't get it? It's ok, let's just recap:
Okay, let’s compile it.
Job is done! Now we have to perform the test once again.
Obviously, this method is much faster than to sort through each metatile between the enemy and the player. Of course, we have to spend 256 bytes to store these two tables in PRG-ROM. But you must admit, it's worth it. Our meat is packed to UoROM cart with 256KiB of ROM, so I can afford it. In addition, the size of these tables can be greatly reduced, but this will add some more calculations. I choose speed. Decide for yourself what your balance should be.
Now, we can add a few more enemies to the screen, cause we have enough CPU cycles for all the calculations.
No go forth and have a good retro coding session!
Want more tips straight from the retro pros? Welcome to our Discord!
Get mad meat on The Meating page now!
]]>This is a chicken. It is a creature lovingly and internally referred to as a Thwomp, like the enemy of the same name from the beloved Super Mario Bros. It will probably seem edible to some players, and I must admit it has made me rather hungry sometimes.
Most of the time, it just hangs in the air, and it will stay there as long as we can control our hunger-pangs.
But sometimes, this happens.
Oops, this can be dangerous. Let's see how these monsters work.
Let's start with the basics. We will make a list, which will consist of all possible actions of the chicken. Our chicken should be able to:
We have several sprites that animate the chicken. Let's output these sprites as a sequence:
spr=oam_meta_spr(chickenX, chickenY, spr, seqence_chicken_idle[frame]);
Now our chicken can hang in the air. Look at the first image again to see his delicious turkey jive.
Suppose our chicken has spotted prey. Now it needs to rush to the enemy and try to squash it. Perhaps it will also stain you with fat in your game. It all depends on your imagination.
All we need to do is change the animation and increase the position of the chicken along the Y-axis each frame. I think 4 pixels per frame will be ok, but you can experiment on your own.
chickenY+=4.
But something has to stop the chicken. Otherwise, it will fly through the entire screen like an asteroid in a looping way, and this will not make any sense, so you have to add a condition that will limit attack. This may be the presence of the enemy or the floor under the chicken.
Stopping it might look like this (I will use pseudocode):
if (chickenY < someObjectY)
chickenY+=4;
Then we have to get the chicken back. We will raise it by 1 pixel for each frame.
if (chickenY > basicPositionY)
--chickenY;
And now we will collect everything in one cycle:
while (gameLoop) {
switch (chickenStatus) {
CHICKEN_IDLE:
chickenStatus=CHICKEN_FALL;
break;
spr=oam_meta_spr(chickenX, chickenY, spr, seqence_chicken_back[frame])
break;
}
}
Let's consider another enemy. It’s a ghost. Our character cannot destroy this ghost on his own, but he can use his own supernatural thermokinesis ability to light a candle. This will destroy the specter.
Again, we need to provide states for this enemy - the ingredients of his behavior:
This same process can also be performed with bosses. Just describe how the boss should behave. It could be something like this:
Use telekinesis to throw the cleaver back!
Coding enemies and populating your game with dangerous, fun, and tasty creatures is possible if you skillfully use the state and parameters of objects. Try it yourself!
]]>Working within these mathematical constraints can be difficult, but it will also make you a more creative programmer. All you need is the right techniques, like a butcher and his blade. Let’s examine how we can create movement mechanics within retro limitations.
The limited mathematical capabilities of retro processors are often good enough for simple tasks, like the movement of a character. It is quite simple: we should add 1 to the current value of the X coordinate or subtract one from it:
In C language, it could look like this:
unsigned char x; // one byte for x
while (1) {
x=x+1;
}
I defined the variable x as a byte. Since we are talking about the NES/Famicom, this will be enough for us, because the width of our screen is 256 pixels, which is equal to the maximum value of a byte: 255 (0 is also a value). Next, I increment each frame x by 1. Let's see what the x values look like for the first five frames:
Frame 1: x = 0
Frame 2: x = 1
Frame 3: x = 2
Frame 4: x = 3
Frame 5: x = 4
Our console’s frame refresh rate is 60 frames per second (NTSC), which means that Bill can be moved by 60 pixels per second forward or backward.
But this may not be enough. What if we need to add not one pixel per frame, but half or one-tenth of a pixel?
Here, the speed of movement of the fighter depends on how long you held the right or left button. The longer you hold it, the faster the fighter flies. Sometimes the speed of flight may be much slower than one pixel per frame.
Obviously, for this, we must use real numbers. But, as we already know, our console is able to operate only with integer values. So we have to cheat a little.
Let's define two bytes for the x coordinate instead of one. This means that we do not have 256 values, but two times for 256 values.
We will use the high byte as the integer part of the coordinate, and the low byte as its fractional part.
unsigned int x; // two bytes for x
while (1) {
x=x+1;
}
What has changed? Absolutely nothing. The low part of our value is still increasing by 1. But what happens to the high one? All these five frames it is still zero. But something will happen if we repeat the addition 256 times?
Frame 1: x = x + 1; // x high = 0, x low = 1
Frame 2: x = x + 1; // x high = 0, x low = 2
Frame 3: x = x + 1; // x high = 0, x low = 3
Frame 4: x = x + 1; // x high = 0, x low = 4
Frame 5: x = x + 1; // x high = 0, x low = 5
...
Frame 255: x = x + 1; // x high = 0, x low = 255
Frame 256: x = x + 1; // x high = 1, x low = 0
What happened to our value at frame 256? It's easy, the low byte reached its maximum (or overflowed), then dropped to zero, and the high byte increased by 1. If we do this another 256 times, the same thing happens - the low part of the value will be reset to zero, and the high part will increase again. We will use only the high byte of our value as the x coordinate. That is our x coordinate increases by 1 every 256 frames. In other words, we divided the frame into 256 parts.
So, in order to move our character to the “half” pixel in a frame, we need to add not 1, but 128 (256/2 or half of frame):
unsigned int x; // two bytes for x
while (1) {
x=x+128;
}
Frame 0: x = 0; // x high = 0, x low = 0 => 0.0
Frame 1: x = x + 128; // x high = 0, x low = 128 => 0.128
Frame 2: x = x + 128; // x high = 1, x low = 0 => 1.0
Frame 3: x = x + 128; // x high = 1, x low = 128 => 1.128
Frame 4: x = x + 128; // x high = 2, x low = 0 => 2.0
Frame 5: x = x + 128; // x high = 2, x low = 128 => 2.128
Frame 6: x = x + 128; // x high = 3, x low = 0 => 3.0
Frame 7: x = x + 128; // x high = 3, x low = 128 => 3.128
To simplify understanding, I will show how this happens with a calculator.
As you can see, each click on the button (each frame) adds 128 to the current value (80 in hexadecimal). And each time the low byte overflows (every second frame), the high byte increments. We will use this byte as an integer to position our sprite. As for the low byte, we do not need it.
This means that we have reached the goal - our character moves at a speed of half a pixel per frame. No magic, just math.
So, if you want to change the value every 4 frames, just divide 256 by 4 and you will get the desired value for the increment: 64. Add 64 to your two-byte value 64 and use the high byte as the x coordinate. Now our character flies 4 times slower than 60 pixels per second.
Now, there is one thing, though. If you use assembly language, the solution looks a little different. For example, ZX Spectrum has 16-bit registers, so increasing the two-byte number is very simple:
ld bc, 0
loop: inc bc
jr loop
Every time the low 8-bit register C overflows, the ZX Spectrum increases the high register B automatically:
But NES does not have 16-bit registers, so you have to provide that yourself:
Hopefully, this simple math will make your work much easier. This method can be used wherever you need more accurate calculations, such as coloring intensity interpolation, simulating inertia, and building simple vector graphics (if your retro device can afford it). Happy carving.
Alex is the developer behind The Meating, our ghost-minotaur platformer. He is an avid carnivore and has no beef with beef.
]]>Many times, the artist will find themselves with a great piece of artwork that falls just short of meeting restrictions. The most common transgressions are against palette limitations or tile counts. This post is going to cover how to identify where your art stands in regard to both of those restrictions and how to successfully reduce them.
This post uses the following tools, and it might be helpful to download them and have them at the ready:
GIMP 2
The free version of Pyxel Edit
There are other options for tools to use for both of these processes, but these are the two that we generally employ due to their accuracy and ease of use.
Now that you're equipped, let's get started.
Oftentimes when creating retro pixel art, designers are simply unaware of the restrictions of golden era consoles. In such cases, the first rule they will break is using too many colors. Typically, 16-bit consoles work with 16-color palettes, where the first color of each palette is a shared color that represents transparency. Reducing the color count of an image can be a daunting task, and the automated process usually produces major losses in image quality.
GIMP 2 is a great open-source alternative to Photoshop, and it allows for user-friendly palette manipulation. It offers a range of functions and features to make the life of a retro pixel artist easier.
The first thing you will want to do is open your image in GIMP.
As you can see, this is a nice image, and in certain modes on the SNES, it will work fine. For the sake of this article though, let’s assume it needs to be 16 colors. It definitely has far too many for that to work.
After the image is open, you want to make sure that you have the colormap tab available to you. If it isn’t already available on the left pane, navigate to Windows>Dockable Dialogs>Colormap. If this opens in a new window, simply drag and drop it into the tabs on the left pane.
Now that your colormap tab is open, it is time to index the palette of your image. Go to the menu bar and click on Image>Mode>Indexed
When you click on Indexed, it will open a new window with options on how you want to index your image. You will want to click on “Generate optimum palette” and then set the maximum amount of colors to 255. (Note: You can set this to 16 to automatically reduce the colors down, but more often than not this ends up making the image look pretty bad since the automated process typically doesn’t make good judgements)
Doing this will extract all of the colors from the image and place them inside of your image map. As you can see in our example, it uses far too many colors, and it will have to be greatly reduced.
From here, the artist will be able to edit the colors in their palette freely by using the colormap. You can rearrange them to your liking and add colors. In order to reduce colors, you will want to look at two factors: What colors are extremely similar in value, and what colors aren’t being used very much.
Once you have identified a color you would like to remove, and what color you would like to replace it with, double click on the color that you are going to use to replace it. This will open up your color dialog.
When this window opens, select and copy the HTML notation for the color and then close it. Double click on the color that you are trying to replace, and paste the HTML notation in from the previous color. This will make the two colors have the exact same value.
Continue to do this until you have reduced your color count to your liking, or when you want to see your progress. In order to fully remove the color, go back to the menu and select Image>Mode>RGB to remove the index and then re-index the image.
Now that both colors have the same value they will only take up a single slot in your palette. If you are simply trying to see where color is being used, double click on the color in your colormap, and then change it to a high contrast value. Doing this will change that color in the image as well so that you can easily identify where it is being used.
For example, if I wanted to identify where this color is being used in the image, I could double click on it, and then change it to bright red.
When I do that it will change to bright red in the image so that I can see where it is being used. After that, I would simply undo the change to set it back to normal.
The important thing to keep in mind when doing color reductions is to always reduce the colors that will have the least amount of impact on the overall image. That is why using an automated process doesn’t work out very well - it will take color values into account, but it won’t be able to have their context in mind.
This process is most difficult when you are down to removing the last few colors. Once you are down that far, you will need to make some difficult judgement calls when it comes to what colors to remove, so make sure to try multiple options and make choices that will retain the most detail.
The other restriction that is commonly broken is the unique tile count. 16bit consoles load their tiles into VRAM just like 8-bit consoles do, but VRAM is also used to store other data. That makes it difficult to have a concrete maximum number of tiles to work off of which will lead to needing to reduce tile counts.
The first thing you will want to do is open your image in GIMP, and then go to View>Show Grid
This will overlay a grid on top of your image, but the default grid settings will not work for what we are doing. You will want to go to Image>Configure Grid to open up the grid settings.
In the window that pops up, you want to change the spacing settings to be 8x8 pixels.
The reason you are doing these steps is that you will be working from GIMP to reduce the tile count. In order to do that you need that 8x8 grid overlaid to represent the individual tiles that the image is going to be using. It’s also helpful to go to View>Snap to Grid to turn the grid snapping on.
Now that your canvas is set up, you will want to get your unique tile count. Classic consoles only store unique tiles, so having an automated way to break an image into tiles and then remove any duplicates is a must. This is where Pyxel Edit comes into play. Import your image into Pyxel Edit, and a window will pop up.
Set your tile size to 8x8 and then click on the checkbox next to Identify tiles and Transformations (Note: If you are working on an 8-bit console like the NES, chances are it won’t support transformations, so do not click that checkbox in that case). Then click Import.
This will open the image in two windows. You have your canvas on the left side and your tileset on the right side. We are simply interested in getting a tile count, so click on the very last tile in your tileset, and you should see a blue number appear on your canvas.
That blue number is the Tile ID for the final unique tile in your tileset, so in this case, it reads 1383. That means that the final tile in the set is the 1383rd unique tile in the image, which ultimately means there are 1383 unique tiles in the entire image. So if we ended up having a tile budget of around 900 tiles for a background, this image will need to be greatly reduced.
In order to reduce tiles, go back into GIMP. The only tool you should need for tile reduction is the Rectangle Select tool. Because you had turned on grid snapping earlier it is very easy to select one tile or a selection of tiles and then copy and paste them to different parts of the image.
The main way you are going to be reducing the tile count in your image is finding the areas with the most variance and then copying and pasting tiles so that there are more duplicate tiles in the image, thus reducing the number of unique tiles that appear. If you want to check your progress, you would simply save the image, and then import it into Pyxel Edit again.
In our example, a lot of the tiles that are being created are from where the stone ground is peeking out from the sand. This is a great area to reduce the tile count. While the shapes being created here are very similar, due to their placement it is creating a lot of unique tiles. If a single pixel is different between two similar objects, it will create unique tiles for all of them.
This is easily optimized by choosing one of the shapes as your base and creating the rest of them using your base shape’s tiles. That way all of the shapes are being created with the same art, and no new tiles are being made.
Optimizations are not about reducing the quality of art - far from it. They are used to make graphics not only properly formatted for console restrictions but also to be functional with the other elements of the game's design. Optimization is not so much about efficiency as it is about maximization - rendering the art in such a way that the overall quality of the game, and the player's experience, is improved.
]]>Let's start with the fact that even the simplest game for a modern computer often requires several megabytes on a hard disk. Let's make sure.
This is Exolon, a classic game for the ZX Spectrum, a personal 8-bit computer. Its size is only 43 kilobytes.
And this is a modern remake of the same game for the PC (from 2005), and it occupies 26 megabytes.
Can't you just feel the difference? The PC version is almost 600 times larger. And it is clear that the PC can afford to use high-resolution graphics.
We, however, do not have such luxuries with retro consoles.
Let's remember the differences between a modern PC, the ZX Spectrum, and classic consoles. A modern computer typically measures memory in gigabytes. The ZX Spectrum can address 64 kilobytes, 16 of which are reserved for the Spectrum’s ROM which contains a Basic language interpreter and some system subroutines. We'll subtract the screen size from here (16 kilobytes) and we will have an honest 32 kilobytes of RAM that we can use.
Our NES, unfortunately, has only two kilobytes of RAM. This means that we are forced to program our game and game elements in a way that is always mindful of this budget.
One challenge that requires such an approach is that of enemies that will automatically “resurrect.” Everyone has witnessed it. When we play some retro games, like Super Mario Bros 2 for example, we defeat an enemy, proceed to scroll to the next screen, double-back, and *poof*, the enemy has returned.
This is done in part because in order to track each of these enemies as “defeated,” we would have to spend some of our precious two kilobytes. But if we did that, we would not be able to show other, no less interesting features of the game, as the next screens in the level.
This is not necessarily a bad thing. Sometimes it is very useful for items and points farming, but there are also games where we would not like to meet these bad guys again.
Other games keep the state of enemies and many other things, and of course, programmers have spent some amount of RAM for this.
Even a relatively simple scenario like resurrecting enemies requires careful decision-making, as it can impact the rest of the game’s overall design choices.
Sometimes, our problems are more complex, and yet we are up against the same restrictions.
Let's look at this picture.
This is one of the levels for The Meating. Here are 233 ice blocks that can be destroyed by the player once, and each of these destroyed blocks should be stored in order not to show them again. And what if we had not 3 screens, but 6, like this?
How about 9 screens? What if the level designer decides to fill all the screens with ice blocks? I think some game designers could do that. In this case, we will need to store information about 2160 blocks (16x * 15y * 9 screens). We need to store three parameters of each block:
2160 * 3 = 6480 bytes total.
But we have only two kilobytes.
Fortunately, there are some clever tricks for overcoming this challenge.
Option 1. Packing to the Bits
Let's suppose the number of screens of the level is six.
Since the maximum screen index is five (zero is also a value), we need three bits (101 in binary format) to store this value.
We'll move on. The maximum value takes X: 16 in decimal (1111 in the binary).
Since the maximum values of X and Y are 1111 and 1110 respectively, we can try to pack them into one byte: 11111110.
So, to store X and Y, we will need 1 byte for both of them, since they are 4 bits each (1 byte = 8 bits). Plus screen number: 00000101 11111110 it’s two bytes for each ice block total. In sum, it is still quite a lot:
16 * 15 * 6 * 2 = 2880 bytes.
Well, let's remove the screen number, perhaps, we do not really need it. So now we need 1 byte for each ice block. This is 1440 bytes total.
Not bad. And if we programmed for the ZX Spectrum, we probably would have done so. But with NES we still cannot afford it, if we want a game with interesting mechanics and effects.
Option 2. Advanced Packing
Perhaps it is time to take a chance and try to pack one block to one bit.
The size of our map has 16x15 metatiles, so we can fit 16 blocks to one row. This is 16 bits (or two bytes) by one row or 30 bytes for one screen of ice blocks. Our level has six screens, which means that we will spend only 180 bytes to store info about 1440 blocks.
It's simple. An array of 180 bytes is divided into sections of 30 bytes for each screen. The first 30 bytes are screen 1 data, the next 30 bytes are screen 2 data, the next are screen 3 data, and so on. Therefore, to get access to the first row of screen 5, you need to calculate the offset by the formula: offset = (screen number-1) * 30 and we get 120. For the offset of the last, sixth screen: 150. If you add 30 here (data size for one screen), you get 150 + 30 = 180. End of the array.
Whole array map with offsets to desired screen data.
We will describe the state of the block by the value of one bit (1 or 0): 1 if the block was destroyed by the player, and 0 if the player did not interact with the block.
This compact way of organizing our data allows us to make the best use of our 2 kilobytes of RAM, and still achieve an effect that does not suffer from “resurrecting enemy syndrome.” Case in point, watch how our ice blocks behave now:
Got it? Now you're on the right path to mastering memory limitations through creativity and programming power!
Alex Tokmakov is a retro dev and meat enthusiast. He is the beefy programmer bringing this ghost minotaur game to life.
]]>As we’ve scaled and evolved as a team over the years, a near-limitless number of things has changed. Constant process improvements, internal discussions about what our company culture looks like, and refinements to our recruitment process have impacted every other facet of our company. One element that’s taken a surprise turn is how we describe ourselves since we cover such a wide scope of services, activations, and gaming initiatives.
I’m just going to get right into it: We are a creative first company.
At Mega Cat Studios, that means we put the total value of the project above the bottom line, whether it’s an internal R&D project or a client engagement. This isn’t just a pitch, it’s imbued to every part of our organization - who and how we hire, what types of projects we take, and what our strengths are. So much of this realization has come from post-mortems and client testimonials, where we get feedback on our strengths and weaknesses to move forward from. Having some creative anchors early on helped a great deal, and there’s no question that hiring a narrative designer has made our universe-building more cohesive, deeper, and easier for everyone to get excited about.
With Lethal Wedding, we wanted to do more than simply merge the best of classic games with new game design. Our goal was to do something truly innovative, to break new ground with integrated game systems and revitalize stale genres.
We started by taking a familiar genre: the top-down shooter. From retro hits like Zombies Ate My Neighbors to modern masterpieces like Nuclear Throne, this style of the game promises hair-trigger action. We mixed this blistering combat with another treasured species of game, the RPG. These two genres of games complemented each other, as the fast-pace of top-down shooters kept players engaged, while the story, multiple player characters, and progression of an RPG gripped them for the long-haul.
Genre-blending like this is a good starting point, but it’s not enough. We’ve found that smashing two types of games together will only get you so far - to truly create a following, your game needs to have some stand-out features.
Therefore, we amped up the replayability and player progression with persistent upgrades. Lethal Wedding rates the player’s performance based on several metrics (time to level completion, their dodge roll agility, kill count, and more) and rewards them with experience points which they can spend on a variety of upgrades, like Tactical Combat High Heels and extra damage against certain types of enemies.
However, upgrades in shooters have been done before. In fact, many games have implemented RPG-like features to promote some kind of player grind. To make Lethal Wedding special, we integrated a new method for earning upgrades - the Vow System.
Just as a couple about to take the blissful plunge into married life pledges their eternal vows to one another, Lethal Wedding presents players with a handful of risk-reward situations before every level. These can be anything from “Player health is reduced by 50%” to “All enemies can teleport”, and force the player to change their strategy or playstyle completely.
Vows are completely optional and provide a significant challenge. However, they also provide essential bonuses. Several high-power upgrades can only be unlocked through the Vow System, and the number of total upgrades a player can have equipped is also determined by the Vows.
This skill-based risk-reward system was exactly the special sauce Lethal Wedding needed. It took the game from a fun shooter with a funny story and satisfying combat to an innovative, genre-blending masterstroke of design and gameplay.
]]>If this isn't you, fear not! Read on to find out more about these elements, and how we worked through them to make the jumping of Kon, a ghost minotaur, feel great in our upcoming NES platformer, The Meating!
]]>Tight controls.
Since moving around platforms is such an integral part of the platformer experience, it is crucial that this feels good to the player. Getting controls to feel just right though is a balancing act between in-game physics, collision, and game design. It is a feat for the truly meaty at heart.
If this isn't you, fear not! Read on to find out more about these elements, and how we worked through them to make the jumping of Kon, a ghost minotaur, feel great in our upcoming NES platformer, The Meating!
Collisions are one of the most basic of game elements. They are necessary for the character to "feel the ground under his feet."
For example, if we stop handling collisions for Mario, he will not be able to break brick blocks, because he will move through them. He will not even be able to walk on the ground, because he will fall through it. If we do not handle the collisions of Bomber Man, he will walk through the walls, and if we take away the collisions from his enemies, Bomber Man will not be able to hide from them.
In most cases, it is enough to fit an ABCD Rectangle to the player character's sprite, as we did with Kon below:
This becomes the collision box for the character. Our challenge is to ensure that none of these four points would ever intersect with "solid" elements of the background: walls, ceiling, ground, etc.
AC and BD collisions prevent the player from passing through the left and right walls respectively. The collision AB does not allow the player to jump through solid blocks above, and the collision CD does not allow the player to fall through the ground.
However, there are problems.
Let's suppose a player needs to jump on the platform above, through this gap in the platform:
Since the width of the rectangle that describes the player's collision box has a size of 16 pixels, and the gap between the blocks is also 16 pixels, the player must set the character's sprite exactly - to the individual pixel - between these blocks before the jump.
Needless to say, this can become frustrating rather quickly. If the player is forced to repeat this aiming process, again and again, the game will quickly bore him or her. Fixing this problem is necessary for achieving tight controls and a good game feel.
How do we do it? One solution would be to reduce the width of our ABCD Rectangle by 5 pixels left and right:
Now we can safely jump. But there will be another problem:
As we can see, the player's sprite overlaps the background block by 5 pixels. To remedy this, we have to align the player's sprite into a 16x16 pixel grid during the jump.
This trick is used in many great platformers, like Super Mario Bros.:
In fact, it is used in many types of game, including action games like Bomber Man:
To do this, we again need to check for a collision of the right and left edges of the player's sprite with background elements:
If the AB side intersects with the solid background tile, we will move the character's sprite to the right by one pixel. If the CD side intersects with the solid background, then we will move the player to the left. We will repeat these steps until the sprite is completely aligned:
It seems to work! Now Kon, our ghost minotaur hero, can jump like the platforming greats. Test out the tight controls and smooth jumping yourself, as you play The Meating and help Kon recover his tragically-sourced meat!
Alex Tokmakov is a retro dev and meat enthusiast. He is the beefy programmer bringing this ghost minotaur game to life.
]]>Greetings everyone, Mitch, here again, an audio engineer at Mega Cat Studios. I'm going to give you a crash course for creating music for the Sega Genesis/Mega-Drive. Note that this guide is primarily for composers who are trying to get their music working on real Sega hardware.
The Yamaha 2612 sound chip came standard on Sega 16-bit consoles. This particular sound chip is based upon FM(frequency modulation) synthesis, and it is very capable and powerful.
VGM Music Maker by Shiru will be our tracker of choice. It's a windows application that emulates the Sega sound chip. The tracker includes 6 FM stereo channels and 4 PSG mono channels.
Let’s take a look at some of the different capabilities offered through the VGM Music Maker.
If you're unfamiliar with music trackers, this can look overwhelming, but I assure it is quite simple. Basically, you'll be inputting the note, octave, volume, and effects on the grid. The music scrolls vertically when played.
The instrument view is where you'll be designing all instruments for your music.
Here are what the notations on the knobs above mean:
Envelope shows you visually how the knobs are shaping the sound. Press the Z key while shaping the sound. Experiment and have fun! You can make an endless amount of instruments without taking up space.
I won't go into too much detail explaining how to create instruments, because that is for a different guide. But know that any instrument you create will convert fine to real Sega hardware, so get creative and check the VGM Music Maker’s help manual for more info!
You can also rip template instruments from Sega games of the past!
I've implemented a 16-bit tom and bass drum in this vgm file. Reducing total bank size will reduce the quality but will save space on the cartridge.
If you choose to use samples, you’ll want to limit the length of the track. I wouldn’t recommend using samples for your first project. The FM synth can make percussive elements easily, and it saves a bunch of space.
Make sure the uploaded audio samples are 16-bit mono and keep them as short as possible. Samples can only be implemented on channel 6 using the effect column. Use S00 for the first sample, S01 for the second, etc.
This tab allows you to modify the pattern page so that you can monitor changes or analyze your tracks. Above are the settings I use for the preference view.
Using these settings, your music should look something like this:
I don't usually use the PSG channels, I simply prefer the FM synth and feel like there are enough channels for polyphony.
Here is a handy guide to what each effect code is:
I like to have all the SFX be purely sampled based. It’s fun to design these 16-bit sounds for the Sega. I recommend getting a Field Recorder like the Tascam Dr-40 and hit everything on planet earth with a twig. Record everything! Birds, cats, footsteps, enemy deaths, coffee bags, epic one-liners, etc.
Once recorded, these sounds can be edited in a DAW like Ableton Live. The key component for designing sound on any DAW is layering. The size of WAV files is mostly determined by the length of said file, which means you really want each SFX to be as short as possible. Keeping them no longer than a second is effective. Once they have been mixed and layered, convert the WAVs into 16000 Hz Mono using Audacity.
The SFX files do not need to be implemented into vgm music maker. After they've been downsampled to 16-bit they're ready to be implemented in-game. For Mega Cat, I average designing roughly 30 SFX per Sega game. You'll run out of space quickly, so be mindful of length and try to think of ways that you can make one SFX used for multiple instances. For example, the same explosion sound can be used for a grenade, rocket launcher, destroying obstacles, etc. After your SFX and themes are complete, you'll be ready to test on real hardware!
A digital audio workstation (DAW) like Audacity can help you edit samples in various ways. For example, you can convert it to 16 bit PCM, convert to MONO, shorten, add effects, changing the volume, etc. It is a versatile and easy-to-use tool.
Drag and drop the sample of your choice into Audacity. HIt Shift+M to bring up sample menu, then click ‘split stereo to mono.’ On the bottom left is the project rate expressed in Hz. Select the option 16000 Hz (16-bit). Make your sample is short and don’t leave too long of a tail or unnecessary data, as this will take up useless space. Export sample as Wav signed 16-bit PCM
You should now be fully equipped to make authentic Sega Genesis/Mega-Drive music! The best thing you can do now is jump in and make some songs yourself! 16-bit masterpieces continue to resonate with fans and find new players because of their emotional appeal and satisfying game feel, provided in part by music and SFX. Go forth and start the next wave of retro titles with your own genuine Sega Genesis and Mega-Drive music!
Question, comment, or correction? Please feel free to email me: mitch.f@megacatstudios.com
http://www.mitchfostermusic.com/
]]>
There are many elements that make 16-bit video games so memorable. This console generation featured gorgeous new graphics styles that are still replicated today, so much so that 16-bit pixel art is synonymous with video games. The stories from these games, especially the era’s beloved RPGs, are still touching the hearts and minds of new fans, almost 30 years later.
For many, though, the most engaging thing about these games is the music.
Its Mitch again, here to give you a brief overview on using the SNES GSS music tracker. It is important to note that this guide is aimed at making music on original Super Nintendo hardware.
The Super Nintendo’s SPC700 sound-chip was an innovative initiative back in 1991, given that it is a purely sample-based sound-chip! It involves uploading self-picked 16-bit WAV files and using them as instruments in the music. I'll show you how to do this after we go over the interface of SNES GSS. Go ahead and download the links below and let's get started.
Make sure you have the most updated version of GSS on Shiru’s website, as improvements are being made fairly consistently. I was using an older version and was causing crazy static sound when we tested on real hardware. It took a while to figure out the problem and turns out, it was just the outdated GSS software.
The interface is separated into several tabs. Each tab will allow you to edit and organize your songs and instruments.
This is where you will actually compose songs and tracks. The sequences of letters, numbers, and other characters represent different information about each musical element, as described above.
Here’s the chromatic scale on the keyboard:
Although the interface looks a little bland, GSS is a very capable tracker, especially for SNES.
There are some other options for making SNES music, such as SNESmod using openMPT tracker, but GSS is my personal choice.
There's no scroll following the music. which is only mildly inconvenient, especially if you're used to using other trackers. Use the ‘play at cursor’ button, which will make it easier to navigate through the theme. You can also use a mouse-scroll to follow along manually.
Some helpful tips and quick keys:
When your GSS file is complete, export and save, and now you’re ready to test on real hardware!
This shows the songs and SFX you have composed. Click the Sound effect box if you’re designing an SFX (which will designate the track in the song list with an asterisk). If you forget to click the SFX box and export, GSS will think its a song, and it will not work as intended.
Notice in the list that entries 1-8 are themes, and 9-29 are all SFX. The number in parentheses represents how many bytes the song or SFX is taking up.
Here’s an example of an SFX:
The 3 lines on the last row (12) represent rests. Make sure to put rests at the end of each SFX you create. You’ll be designing SFX in a more midi-based fashion using the uploaded instruments.
Note: The “SP” column represents the speed/tempo of the track.
This tab allows you to edit your instruments even further, with envelope, EQ, and loop options. Hovering your mouse over these settings will give you more information on their effect.
A useful tool to save more space is the downsampling option in the center. For certain samples, I like to downsample to twice the amount. This basically just doubles the speed of the sample, so that it uses half as much space.
What I really love about the GSS tracker is the Info Tab. It displays the amount of memory the SPC700 can handle. As you can see, I used as much space as I possibly could, but also left a little bit to ensure the music actually plays as it's supposed to. GSS doesn’t like higher quality samples, so make sure you downsample in the 16 to 32-bit range. I've found that high fidelity SFX causes GSS and ROMs to crash, or to not play certain instruments. Also, take note that most of the audio space will be in the samples/instruments (the yellow bar) you import. The music data barely took up any space, even with 8 themes, so the length of a theme isn't really an issue - the number of different samples/instruments you have is more important.
A digital audio workstation (DAW) like Audacity can help you edit samples in various ways that GSS cannot. For example, you can convert it to 16 bit PCM, convert to MONO, shorten, add effects, changing the volume, etc. It is a versatile and easy-to-use tool.
Drag and drop the sample of your choice into Audacity. HIt Shift+M to bring up sample menu, then click ‘split stereo to mono.’ On the bottom left is the project rate expressed in Hz. Select the option 16000 Hz (16-bit). Make your sample is short and don’t leave too long of a tail or unnecessary data, as this will take up useless space. Export sample as Wav signed 16-bit PCM.
All of the imported samples should be C-note so that they are congruent with the correct notation on GSS. If you’re using preloaded instruments from example songs, you’ll need to set the notes to B (+21 cents.) The reason for this is when the sound is implemented onto real hardware, it will sound +70 cents sharper. Just make sure nothing sounds out of tune when creating the music.
Although not comprehensive, this guide is enough to get you started making authentic 16-bit music for the Super Nintendo. The best thing to do now is to try making some songs yourself! There are even some sample songs in the GSS download, so you can experiment with and get a feel for the various setting and functions.
16-bit chiptune music has a special place in the hearts of many gamers. Now you can help that legacy live on by adding to it with your own genuine SNES music.
Question, comment, or correction? Please feel free to email us at: info@megacatstudios.com
]]>I'm Mitch, an audio engineer at Mega Cat Studios, and this blog will give you guys a quick guide on how to create music and sound effects for genuine NES games. That's right, the original Nintendo! It will cover Famitone limitations and what's needed to successfully get your music working on real Nintendo hardware, as well as how to format your work for Nintendo programmers and developers.
Go ahead and download Famitracker in the link below and let's get started!
http://famitracker.com/downloads.php
On the Famitracker site, download Famitone2 as well.
So for those of you who don’t know, FamiTracker is a Windows application that emulates the 2A03 sound-chip, the standard sound processor on NES consoles. It creates those sexy 8-bit sounds we love so much! Famitracker is only built for Windows OS, so mac/linux users will need to use a windows emulator.
This program enables you to input notes on a grid while the music scrolls vertically. There are only 5 channels (the five columns) to work with: 2 Pulse channels, triangle, the noisy channel, and DPCM used for imported audio samples.
Here is an overview of the interface:
Z on the keyboard is middle C-note, and the chromatic scale quick keys look like this:
Here are some useful key commands for when a note is selected on the grid:
Since we’re not able to use all the effect columns simultaneously, you'll want to create certain effects using the instrument editor, such as vibrato. Here is an example of a setting I’ve used in countless NES games:
On the left, Volume, Pitch, and Duty effects are checked. On the right is the Volume sequence editor, each individual block represents a volume change on the instrument. Under the sequence editor is the size, which is basically the length of the note (it adds more blocks).
Under instrument settings, click on Pitch. As you can see, I added a slight change to the pitch (one semitone up) at the very end then had it loop. This adds a variation in pitch that gives it the vibrato effect we're looking for.
Another effect you’ll want to utilize is the Arp (arpeggio). This particular effect on the 2A03 sound-chip has a very iconic sound, and can dramatically improve the music.
To get your music implemented onto NES hardware, you’ll need to follow these requirements:
Use this as a reference if you are still unsure about the limitations. Your music should look something like this:
Notice all the notes are within range (octave 1-6) and it doesn't use volume or effect column.
You can use DPCM samples, but there are limitations too, and I wouldn't recommend using them for your first project.
Famitracker converts .WAV samples to DMC automatically. Simply import the files to 00 instrument channel. Please note that if you do choose to use samples, they will take up way more space on the ROM, and implementing samples may be a headache for the developer. MCS games usually include at least one to three sound samples per soundtrack, to add a unique element. A simple but very effective sound sample to use for the music is a Bass kick drum or a Tom. A short bass drum sample converted to DMC is usually only 1kb in size, and it adds a nice low-end frequency to the mix, which adds a nice balance to the processor.
Audacity is a free digital audio workstation, and is great for downsampling and shortening .wav files. Make your samples as short as possible, and the audio is MONO, and export as an 8-bit PCM wav file.
Other guidelines for samples:
In addition to music, your game will need some sweet SFX. To create sound effects for the NES, put each sound effect into a separate sub song using the multi-song feature. Unlike music, you can use most of the FamiTracker effects, except sweep. Every effect should end with silence, by putting a C00 command.
There is a major limitation: one effect can't be larger than 255 bytes. Keep them short, and limit the number of effects and channels used.
Once the SFX are finalized, you’ll want to check to see if there will be any issues implementing them into Famitone2. This is the most important step because if your file won't work in Famitone2 then it will be incompatible for the developers. Their time can be better spent on other things rather than dealing with a C-7 note you accidentally put in a song.
This can be a bit tricky for those who have never used the command line before, but it’s better to solve these issues yourself than to send incompatible ftm files to programmers.
It's easier than it sounds. Just follow these steps:
Here’s what the command line should look like:
It shows that there are 23 sound effects in the file, and shows an error for Effect 0. In this case, the effect is too long and needs to be shortened.
You’ll need to export to an NSF-file (NES sound format) to get your Famitracker music working on real hardware. I prefer sending developers the FTM, NSF, and MP3s in a compressed folder.
The final step is listening to your music and SFX in-game! The mix will sound different after its converted. There will be less bass, and the high frequencies will sound sharper.
Now you should know the basics of creating music and SFX for authentic NES games, and how to format those groovy tunes properly so that they can live forever on hardware. Want more? Get involved in the community with the Battle of the Bits!
If you have any more questions, feel free to email me:
]]>
The limits imposed by hardware are the following:
Colors: Each SNES sprite can have 16 colors and a palette slot out of 8 total palette slots. Disregarding advanced tricks like rewriting palette data during a scanline, this is the general limit. The 0th entry of each palette slot is transparent, regardless of what color is specified there.
Sizes: A SNES sprite can be 8x8, 16x16, 32x32, or 64x64. Sizes cannot be chosen freely. A game can have two of the predetermined size combinations:
This means that once picked, the SNES will consider every sprite in the game to be one of these sizes. Thus, if a game is using 8x8 and 16x16 sprites, a 32x36 character would be considered as 3 sprites. If the game was using 32x32 and 64x64 sprites, then the 32x36 character would be 1 sprite.
Sprites per Scanline: 32. This is a hard limit. On top of that only 34 8x8 tiles can be displayed regardless of how big the sprites are. This is related to the next limit.
Sprite Pixels per Scanline: 256. This means no matter how many sprites are there, after 256 pixels the PPU starts cutting off sprites. The renderer always clips the frontmost (lower id) sprites.
Sprite VRAM Size: There are two 128x128 pixel areas that are allocated for VRAM. Each of them is assigned to... nothing actually. Each sprite can be told which size should it take and where from VRAM it should be taken from. There is a flag for each sprite for which VRAM area should be fetched from.
Sprite Positions: No limitations here.
Total On-Screen Sprites: 128. That’s how many simultaneous entries there are for sprites.
This stands for Object Attribute Memory. This is a memory area in the PPU taking up 512+32 bytes. This represents 128 sprites in total.
In the OAM the following information is stored:
Now that we have an understanding of the basics, we can discuss how to turn this information into a sprite engine. There are several ways to design a powerful tool around these capabilities/limitations. These are some common design guidelines:
Static VRAM Usage
This technique is useful when the sprites do not have too many animation frames and all the sprites a game ever wants to use fit into the VRAM area.
Static VRAM Usage with Streaming
Occasionally, all the necessary sprites will fit into the VRAM but their animation frames do not. That means their position is fixed in the VRAM but the frames are streamed (also known as “sprite pumping”) straight into the VRAM with the help of DMA.
Dynamic VRAM Usage
This usually explicitly means streaming of the frames since it makes no difference what sprite frame is handled dynamically. This method involves dynamically allocating sprite positions in VRAM and keeping a list of allocated and free slots.
VRAM is just one of the manageable resources. The other is the actual number of sprites and their composition. It is rare when a game element takes up just a single sprite. Either it is combined with multiple sprites or the same sprites are repeated but at different locations.
Static OAM Usage
This is similar to the static VRAM handling. Each sprite is assigned to a fixed slot in the OAM.
Dynamic OAM Allocation
In this method, the sprites are not mapped directly to OAM entries. This is done usually for flexibility and to overcome some of the limitations detailed below.
While it seems obvious, in most games it matters what happens when sprites cover each other. The easiest approach is to leave it up to the PPU which renders the sprites with FIFO, meaning that the first rendered sprite is on the top.
The common solution is to reorganize the sprites to have the desired priority. At this point, sprites will be handled as virtual sprites since there is no 1:1 assignment between OAM and their IDs.
The same thing happens when multiple sprites are used to compose one object. These are often called meta sprites.
Repeated sprites do take up multiple OAM locations but not necessarily multiple VRAM slots. At this point, the OAM locations are logically assigned to the virtual sprites.
Although more forgiving than the NES, the SNES still has plenty of considerations when it comes to creating and managing sprites. However, there are some tools and techniques developers can use to get the most out of this platform. As with any retro project, careful planning and an awareness of the restrictions will guide artists and the rest of the team towards a beautiful, feature-rich game.
Want more? Dig into the full SNES graphics guide right here on our blog! Need even more SNES dev tips? Check out some reflections from our intrepid SNES pioneers.
]]>Pixel art began simply as the visual representation of a game using incredibly low-resolution technology. Arguably, The Oregon Trail (1971) was among the first game to feature pixelated graphics, even if it featured vague, geological features set against an ominous black void. Titles such as Super Mario Bros (1985) was comprised of blocky, basic graphics because it had no other choice. AS games evolved, so too did the graphics; the Bit Wars turned into a competition to have the more powerful graphical processor, whether that be 16-bit, 32-bit, or the lofty 64-bit.
By the tail end of the century, pixel graphics began to be superseded by more ambitious 3-dimensional graphics, pioneered by Half-Life (1998) and The Sims (1999). With the new millennia came a slew of 3D first-person-shooters, like Counter Strike (2000), Halo (2001), and Splinter Cell (2002), as well as 3D role-playing games like Neverwinter Nights (2002) and EverQuest (2000).
Suffice to say, the 2000s were an age defined by incredible progress made for 3D graphics. The visuals of Halo and Halo 3 (2007), or Grand Theft Auto (1997) and Grand Theft Auto IV (2008) are incomparable. A new generation of consoles—the Xbox 360, PlayStation 3, and the Nintendo Wii—pushed the limits of graphical processing, and raised the ceilings for developers. The Bit Wars hadn’t ended; they only evolved.
Now devoted gamers work to max out the graphical processing on their own personal computers. The race for graphical realism continues in franchises like Call of Duty, Battlefield, and Far Cry. Even games without realistic graphics like Overwatch (2016) are constantly being pushed by PC players to play at the highest quality and FPS (frames per second). However, there has been a backlash; not everyone wants hyper-realism or cares about stunning performance.
Just as the Romantics of the 18th century rebelled against the Industrial Revolution in favor of a simpler, more nostalgic aesthetic, so too are game developers looking to the pixel graphics of yore, a medium rife with potential and nostalgic value. They would come to define a part of the 2010s as indie developers began to penetrate the market with retro-inspired titles.
Some of the largest titles from the 2010s proved with their pixelated visuals that graphics aren’t the only thing that has improved in gaming: narrative, game feel, and the sheer scale of games have also been improved, with titles like Undertale (2015), Hotline Miami (2012), and Minecraft (2009) exemplifying these improvements respectively, while still paying homage to the pixel. Even in 2018, games like the rogue-like Wizard of Legend combine quality game feel, solid mechanics, and impressive visuals with pixel graphics.
Pixel art has begun to reach beyond gaming -- it has become an artistic medium in and of itself. It is technically, yet tastefully, dated style. The works of Youth Toyoi, known simply as “1041uuu”, an illustrator from Japan, do a stunning job at embodying this. Much of his arts are gifs—living, breathing animations that loop endlessly. They’re hypnotic, with an incredible command of color. They seem to hold the past and the future in both hands, making the present—a Japanese cityscape, a distant Mt. Fuji, or a doe by a riverbank—that much richer and engulfing.
A large contributor to pixel art’s modern success has been its accessibility. It is an incredibly approachable medium, with applications like Piskel, Pixlr, and Gimp providing novices with easy-to-understand experiences in learning how to illustrate and animate using pixel art. Even better, these applications are also completely free. This means the general public has free and easy access to a medium that has an incredibly low skill floor and an incredibly high skill ceiling. It lends itself to absolute novices who can’t draw a stick figure to save their lives, yet still, allow for creators like Youth Toyoi to create emotionally evocative pieces.
Game engines have also become increasingly accessible to the public, which means that these home-brewed pixel graphics have a place to be implemented. The Godot Engine and GameMaker Studios have native pixel art editors, while Godot, Unity, and Unreal are engines that are free for anyone to use and try out.
Pixel art and graphics aren’t going anywhere; the pixel is the purest visual representation of video gaming, and as narrative, game feel, processing power, mechanics, and scope continue to improve within gaming, the pixel aesthetic will remain timeless.
]]>So you’re a programmer, designer, artist, or musician, and you want to make a retro game. You will work together with other programmers, designers, artists, and musicians on a game developed for the NES or SNES or Genesis - or probably some other 8 or 16-bit platform. Undoubtedly there will be stumbling blocks, problems, and edge cases that arise are slow development or, worse yet, bring the project to halt. In this blog, we hope to provide some advice on working through these issues, based on how we have solved them with our own projects.
When designing a game for retro consoles, it is helpful to have some idea of the limitations of these platforms but to not feel enslaved to them. Yes, there are many things you cannot do on these consoles. However, if you think only in terms of their restrictions, you will never try new, exciting things to push these consoles to (or over) their limits.
It’s best to aim high, then pare down your ideas to something that can be managed on the console. Oftentimes, you’d be surprised at what the NES, SNES, or Sega Genesis/Mega Drive are capable of. Many modern mechanics, like achievements or procedurally generated content, are possible on old systems.
The limitations can also be used to guide, rather than restrict, creativity, and design. For example, NES chips can only store so much graphical data. If you felt trapped by the limitations, you might focus on creating a small number of enemies. If you learn about the limitations, however, you begin to think differently and seek solutions to fit more content into the game. For example, many different enemy types can share tiles (using the same artwork for legs, perhaps) while still having other tiles that make them unique (like varied torsos and attacks).
Another example of this occurs with background art. Typically, there is only so much space for background tiles, and some of these are used for user interface elements (like the player HUD), so we design games with this limitation in mind.
Our desire for more, however, lead us to a trick that uses rastering to create a hard on-screen break and to pull art from different graphical pages in the memory, for each level. This allows us to devote more assets to both the background and the UI. In essence, our desire to squeeze the most out of these consoles, rather than feel restrained by their limitations, lead us to an innovative technical solution.
Teams can always accomplish more than a single person or solo designer. However, working together, managing egos, and staying on course can be more difficult with a group. Teams work best when there is a leader.
This doesn’t mean that the leader will be a tyrant, dictating every facet of the game. Rather, leaders should drive the momentum of the project, and help everyone work smoothly together. Leaders should assist team members in finding resources or making decisions if they get stuck.
This role is especially useful in retro dev, where they aren’t many established professionals anymore. Most of the people coming to work on the project will be strangers to the platforms and rules, and they will need someone to guide them and motivate them through the hurdles.
Another important part of being a designer is documentation. A good design document will keep team members organized, chart a course for a finished game, and help convey what the finished product should look like. It is an essential starting point.
Artists and programmers should be involved as much as possible. A good piece of concept art can set the tone for the game, and early input from designers can help avoid problems down the road. They can also provide feedback for anything that can make their lives easier. It is an iterative process of back-and-forth but everyone should agree at the end (possibly after just a few changes) of how to go on.
However, it is nigh impossible to provide the level of necessary detail in a single document. Designers should be prepared to create separate documents and to explain the same features each time, with pertinent information for each team member. It’s important to provide documentation that gives them what they need and cuts out extraneous information.
Documentation should also be actionable. It should have clear goals and objectives for the reader. So, for enemies, providing an artist with just a description is not as helpful as providing a list of animations needed for the enemy. On the other hand, always be open to team members that want to take some creative autonomy with their work, and are capable of doing so in a way that benefits the team and the game.
Note that you all want to finish the game, and to do that you first must start it!
The programmer and artist will have to work together to get the artwork finished and in the specification. The programmer should be as specific as possible what dimensions, color depth, and format are needed. The artist may not know all about the platform either, so plan on helping them understand its limits. Artists, for their part, should not assume when making the graphics and should ask the programmer for as much detail as possible.
All platforms from this era have tile-based graphics. They have strong limitations not only on the colors to be used but how and when those colors can be placed. Sprites are even more limited, especially on the NES. Metasprites and metatiles can help free up some space, but these need to be taken into consideration when creating art.
Programmers, even those familiar with Photoshop or Gimp, should try to keep their fixes and modifications to the minimum. They should be programmers first, not artists. Artists will typically be able to fix things about 5 times faster.
Similarly, artists should not expect the programmer to understand all of the visual and design aspects. Providing a screenshot and pointing out the issue with arrows and circles is helpful - a picture is worth a thousand words.
Programmers should help musicians and sound engineers to understand the limitations of the platform. Often the limited capacity of older systems will prevent musicians from being as liberal as they are used to. Again, however, these restrictions will force the musician to be creative and expressive in new ways.
Musicians also should not expect the programmer to hear if their work sounds good in the game. Ask for a test build. Unless it’s way off, the programmer will think it’s fine while it could be completely off-key, the wrong speed, or even full of pops and crackles. Conversely, there may be situations when the programmer has to use a sound system that doesn’t have support for any of the musician’s tools. This is unfortunate, but sometimes it is the only way to get music and sound effects into the game.
There are certain elements everyone wants to see in the artwork and music, and sometimes these assets will go through a few iterations. However, just keep in mind the game has to be finished at some point.
Programming the code on these platforms is not necessarily elegant or pretty. Programmers can make their life easier by using a lot of comments. Revisiting old code can be a nightmare unless you’ve left yourself clues to follow to help you understand the foundation of spaghetti you’ve created.
Programmers, early optimization is the root of all evil. You know this already. Don’t worry if the game starts stuttering or dropping frames, you can always optimize later. Do optimize when needed, not when it looks better in the code, or because it just feels more elegant.
When in doubt, programmers should not be afraid to ask for help in seeking solutions. There are other programmers who may have done this before. Try to avoid the “it can’t be done” or “I can’t do it” cards. Game development is not easy, but there are often communities you can pull support from. However, always be respectful and never steal or use copyrighted code.
Games that are under development will most frequently be created and tested on emulators. However, the ultimate test is putting the code on a physical cartridge and testing it on hardware. Oftentimes games will run completely different on hardware than on an emulator. Using multiple emulators can help eliminate some issues, but programmers should be prepared to make adjustments when necessary.
Game testers are often the last piece of the puzzle, and frequently spell bad news for programmers. They will endlessly playtest the game, and create bug reports for the programmer. We’ve found that creating videos to document bugs, as well as detailed explanations for how the bug was generated or encountered, can help the programmer diagnose and rectify the problem. Fortunately, many emulators have robust recording tools.
There’s a reason you would want to create new games for classic consoles. Maybe it’s the nostalgia and fond memories you have of enjoying these great platforms. Maybe it’s the challenge of developing for 20-year-old machines. Maybe it’s to create pixel art on the systems that first popularized and solidified this style as synonymous with video games.
Designing games for these old consoles is, in many cases, a childhood dream come true. However, it’s important to remember to combine the best of the new with the best of the old. As long as you focus on fun new mechanics or doing things that haven’t been done yet, you’ll be on the right track.
]]>3d. Compiling games
When it comes to NES Development, most of Mega Cat's Developers use the CC65 C compiler. For such a build environment, developers can either use the compiler on Windows or Linux. Compiling a game with Linux is much easier, since compiling C code with Linux's "make" command is built right into the OS.
This guide is a tutorial showing the reader how to set up a Debian Stretch Linux Distro within a Virtual Box VM. This guide will also show how to set up a CC65 NES Dev environment for both. Although there are more fully-fledged Linux distros out there, this guide will be using Debian Stretch (based off Raspberry Pi's Raspbian) in VM.
Note: The writer of this guide is acquainted with setting up Raspbian for NES Dev, and is using this OS to create a unified installation experience between people developing on Raspberry Pi and on PC through VM.
To begin setting up our build environment for NES Dev, we are first going to set up VirtualBox Software, and then install Debian Stretch on it. VirtualBox is virtualization software, which can run virtual OSes from a virtual hard drive. Your computer's host OS will stay intact, but will be able to run the guest OS as a separate, hypervised application.
Before we install VirtualBox, we will enable HAV (Hardware-Assisted Virtualization) if your host machine has the ability. If your machine and CPU allow such features, these settings will allow the virtualization to be assisted and sped up by hardware processes, making the virtualization run faster and smoother. These settings usually go by the name of "Virtualization Technology (VTx)" or "Virtualization Technology for Directed I/O", and may be found in your system's BIOS settings. Consult your machine's user manual about if it supports these features, and where to find them in the BIOS. The BIOS settings can usually be accessed by pressing F1, F5, F8, or Esc on the boot of most computers.
For the machine used in this tutorial (an HP EliteBook 8570w laptop) and for most HP computers, the settings can be found and toggled as such:
With HAV enabled (if available), you should now install VirtualBox. It can be downloaded and installed from virtualbox.org. On the "Downloads" page, you should download a "Windows hosts" package, as well as the Extension Pack. The Extension Pack will allow you to plug in USB 2.0/3.0 media and devices (Flash Drives etc), which will be useful if you need to shuffle files between your virtual OS and a real one for sharing of files.
After double-clicking the installer. Select the features you will want to be installed and where to install VirtualBox. It is recommended installing all features except Python support (you may want networking support if you want to connect to Slack through the browser or research on Google).
Afterward, select your shortcut preferences and install the software
Now that we have VirtualBox installed, we will download and install a Debian Stretch ISO image. This is the image that VirtualBox will boot when installing Debian Stretch to a Virtual guest OS.
Now that the Debian Stretch VM has been launched, the user should set up the VM for usage in NES development.
To begin NES development within Linux, the user needs to install the CC65 C dev toolchain, so that he can compile NES builds as needed. This installation is based on this guide for Linux.
Installation instructions
Next, the user should install Git Cola, which is a GUI-based tool for handling Git repositories. It will be needed for synchronizing changes to/from the local/remote Github repositories used in your projects.
To install Git-Cola, open up the Terminal, and run the following commands:
sudo apt install git-cola
If a Yes/No prompt appears, type "Y" (Yes). After installation of the Linux package, you shall be able to find the application under the "Programming" category on the Raspberry Pi Start Menu. Click "Git Cola" to launch the application.
Upon the first launch, you will need to Clone the repository from the Remote. Type in the URL to the remote repository, and then select a folder to place the local copy. Type in your Github username and password if necessary to access any private repositories
Afterward, the repository should be cloned locally, and you can begin using source control functionality. Please see this guide for the basics of using Git-Cola within Linux.
When developing NES games, it is important to test your games, both on real hardware and on emulators. It is recommended to use emulators for iterative development, and especially important to test on real hardware when reaching important milestones in game development. Sometimes code will run differently on real hardware vs. emulators.
To test compiled builds quickly on the same Linux machine, you should install an emulator. We recommend FCEUX. To install FCEUX, type the following into the terminal:
sudo apt install fceux
If a Yes/No prompt appears again, type "Y" (yes). Like earlier, the FCEUX application will appear in the "Games" category for the Raspberry Pi Start Menu. FCEUX has essentially the same functionality as on Windows.
You should now how everything you need for NES development on Linux! If you are not familiar with the command prompt at all, or with Linux Terminal, please read up on the most important commands. Use the "cd" command to navigate to the local repository of your game. In Linux, directories are handled via forward slashes ("/"), not backslashes ("\").
To build a game, simply type "make" at the root of the local repository. To clean the project, type "rm .o", which will remove all object files. To clear the terminal screen of text, type "clear". To take screenshots, and save files at the current directory, type "scrot" in the Terminal. If the project has no syntax or other errors, the game ([gamename].nes) shall appear in the root folder. That is all there is to it to compiling NES games on Linux!
Here are some notes about compiling for certain Mega Cat games currently in development.
In Cod We Trust utilizes TilED for creating levels. Fortunately, TilED is multiplatform and runs on Linux. Once levels are designed and saved in their native format (.tmx), the file will need to be converted into something the game will understand. The developer has created a few Python scripts for this (tmx2asm). Luckily, Python is included and pre-installed on Debian Stretch/Raspberry Pi.
In order to install TilED, simply type the following into the terminal
sudo apt install tiled
The application shall appear under the "Graphics" category in the Raspberry Pi Start Menu. It has the same functionality as on Windows.
To use TMX2ASM, simply type in the following into Terminal. tmx2asm.py script is located in "bin/tmx2asm/" folder. Since Python is pre-installed on Debian Stretch, usage is out-of-the-box.
python path/to/tmx2asm.py inputfile.tmx outputfile.asm
]]>A platformer might need just "collision" and "deadly" flags. A more complex metroidvania would need many more, from different kinds of doors to portals and speed-boosting areas.
Beat'em'ups can usually manage with just a collision flag, or with that and some small additions. Coffee Crisis only had a collision flag; Apeel's Court, our upcoming rogue brawler, will have collision and "jumpable" flags, for obstacles you can't walk through but can jump over.
If the levels are decently sized, you can usually get away with a straight array, containing the rendering data and the needed flags per 8x8 tile. For huge levels, you will need other approaches so you don't waste the 4mb budget on just level maps; metatiles are common.
Genesis rendering data takes two bytes per tile - it's conveniently stored as an array of u16, unsigned 16-bit ints. By default, it uses every bit, but with a clever design, we can pack a couple of bits into it - say, a collision bit maybe.
In Apeel's, we know two things that help us with the packing:
As the Genesis tilemap format has two bits for palettes (four values) and we're only using two, fitting into one bit, that makes one bit free for a collision. The format has 11 bits for the tile number, enough for 2048 tiles; as our level budget guarantees we stay below 1024, we can steal another bit from there. Now we have the two bits necessary for the game's collision and jumping metadata, without wasting space with extra arrays.
If your level budget stayed under 512 tiles, you could have another bit from there, and so on.
Another age-old question in game dev is getting data to the level format. The usual approaches are:
The best way depends on the game naturally. A small, single-screen game is usually fastest made with your text editor. Imagine a Pacman level as ASCII art.
For lots of custom functionality or large levels, a custom editor is often needed. It can show collision as an intuitive overlay, place enemy spawn points, or do other things as needed.
And what of in-betweens? Too large to type in, but too small to take the time to make an editor. Adapting an existing editor may be the best choice. Tiled and graphics programs like Gimp and Photoshop may be used for this.
For Coffee Crisis, we made a custom editor. Having the collision as an overlay was quite helpful in making accurate collisions for the levels, at 8x8 tile precision.
For Apeel's, we hijacked Gimp. The collision layers are simple black-and-white, with the grid set to 8 pixels. We then used custom tools to process the exported PNG into an array of ones and zeroes, and another tool inserted those into the tile array inappropriate bit positions.
For both of these beat 'em ups, we were lucky to get by with just the main tilemap array and to have levels small enough not to warrant complex schemes. Their runtime efficiency is practically perfect: reading the rendering information or the collision bit can be done with one read and one AND masking operation. No decompression or metatile indirection overhead.
Space-wise, an array of plain 8x8 tiles is naturally a bit wasteful, but as it's easy to handle and fast at runtime, and if there's the budget for it, there is no reason to invent something more advanced. Even simple compression-like RLE would drop the space quite a bit, but on the other hand, it would increase runtime overhead. It's always a balancing act.
]]>