FREE US SHIPPING ON ORDERS $175+

Translation missing: ru.general.language.dropdown_label

Translation missing: ru.general.currency.dropdown_label

0 Cart
Added to Cart
    You have items in your cart
    You have 1 item in your cart
      Total

      Game Development

      What is a Game Developer?

      What is a Game Developer?

      From the entertainment industry powerhouses to international medical device corporations, we have made games for clients in several verticals. Each industry is different, and each company starts the conversation with different expectations. Some have a solid idea or concept that we help them flesh out and bring to life. Others want to work closely with us on several iterations of a design doc. Still, other organizations request that we create a submission for an RFP (Request for Proposal).

      We understand that for many companies this might be their first experience in the video game world, and we are happy to go through whatever discovery process helps them make an educated and strategically beneficial decision. Through many conversations like these, we have gathered a set of criteria which represent the “best practices” to ensure that you – and we – are getting the necessary information for a successful partnership.

      1. Tell me your budget and ask me how we’ll spend it. Many times, companies are hesitant to talk numbers. However, it is difficult for us to provide an accurate scope of what is possible for your game without knowing where to begin, or where to stop. Furthermore, providing a budget in an RFP is advantageous to you because it puts you in control. You’ll be able to compare all proposals based on their content and not their price point.
      2. Tell me what your timeline is. Even the most carefully planned games undergo a process of iteration. When the design doc meets reality and playable builds are on hand, designers and artists inevitably find room for improvement and tweaking. Often, the serendipities experienced in actually playing a game reveal elements and polish that never would have been identified in a purely theoretical space. Knowing what your timeline allows us to budget time for this type of playtesting and iteration.
      3. Tell me what your digital strategy is. Games can complement a digital strategy in many ways. They can serve as client acquisition or lead nurturing tools. They can drive deeper brand engagement or catalyze more meaningful brand activations. Each situation is unique, and no two companies will have the same needs. Rather than have us guess what your current tactics are, tell us straight out, so we can tailor your game to synergize and enhance your current efforts.
      4. Tell me what your marketing strategy is. Similar to your digital strategy, informing us of your current marketing tactics can help us design your game to dovetail with them. Do you need to amplify your messaging? Reach a new demographic? Raise social sharing? A game can accomplish all of this and more – just let us know what is important to you.
      5. Tell me about your trade show and exhibition plans. Let’s use those events to your game’s advantage for user acquisition, pooling feedback, and most importantly, getting the engagement that matters at your booth.
      6. Ask me about Mega Cat Studios. You can get an idea of the company just by browsing our website or typing our name into a search engine. However, I’d also like the chance to explain why I think we’re the best match for your project or needs. Sending out an RFP inevitably means that there will be submissions from multiple companies – allow me to explain what sets us apart.
      7. Tell me your goals and objectives for the project and the company objectives it supports. A game can form the cornerstone of your mobile marketing strategy, a product launch, inject fans into a brand’s story, ignite your expo and event presence, or provide a medium for physical merchandise sales. Knowing what else you’re working towards allows us to deliver more value on the project.
      8. Ask me about game design for a project like this. Sometimes it is hard for companies to understand how their product or service could be turned into a game, let alone a fun and engaging game. This, however, is our strength. As a creative-first game studio, we see the world, and the offerings of every client, as an opportunity for play.
      9. Ask me about our game design ethos. One thing that sets us apart from the competition is how we think about and approach games. We believe that with the right game, anyone can be a gamer – especially your audience. Come see what makes a Mega Cat game different.

        Simultaneous Inputs & Button Timing Buffering for Mobile

        Simultaneous Inputs & Button Timing Buffering for Mobile

        Although the topic of timing and controls is generally reserved for fighting game conversations, we had some unique behind the scenes adjustments lately that we wanted to create a resource for.

        We are porting some of our NES games with a partner to distribute on the App Store & Google Play. Rather than having the games recreated and mobile-optimized, we’re using a custom emulator that, when complete, will allow us a near drag and drop solution for releasing them through these digital storefronts in the future.

        This might look familiar to some of you!

        For those of you that have played Log Jammers, you know it’s a fast-paced arcade sports game where timing and precise controls are critical for success. Looking at the image above, you’ll see that this game includes local co-op play, something we thought would be fun for mobile as well. After some iteration and community testing on timing, inputs, and an increase in the total area that you can touch and interact with, we had one final adjustment to make: simultaneous button press timing.

        In many games, two face button presses are required. In Almost Hero, as an example, A+B is what unlocks the jump kick, which is arguably the most important single move in the game.

        By default, the custom emulator we were using does allow an A+B press, the timing just required exacting precision that created a mediocre gameplay experience. Mobile games should have an additional eye towards accessibility, and this type of frustrating control requirement without a reward won’t be leaving anyone in mobile's general addressable audience feeling excited.

        Simultaneous inputs are possible without making any modifications to the emulator but are extremely difficult with touch controls. The strict timing is particularly noticeable because pressing the fingers down evenly lacks the physical feedback of button switches, which greatly helps in achieving truly simultaneous inputs.

        Buffering can be used to simulate this physical feedback by adding a delay for singular A/B presses (e.g, 50ms) and waiting for the other to be pressed. If the other is pressed at any point within the 50ms buffer window, they are both immediately submitted to the emulator at the same time. If the other button is not pressed within the buffer, just the one that was pressed is sent to the emulator.

        Software-level buffering like this is common, especially in fighting games, but even a very slight additional delay on top of the existing native delay from the emulator may have been too much.

        Without physical buttons or the use of a buffering solution, the difficulty of true simultaneous inputs, therefore, depends on the game's frame rate. The game has to receive both touches on the same frame for it to be registered as a true simultaneous input. If one button is even 1 frame off from another, it means the input systems will receive one button first and start acting upon that, causing it to not use the next button on the next frame (assuming another in-game action was started by the first button). This is assuming the emulated game code itself does not use a buffering solution on the inputs it receives, in which case a buffer at the emulator layer would not do any good.

        A phone I was testing on was somewhat laggy, running at about 30 FPS, which means 1000ms per sec / 30 frames per sec = 33.3 ms (per frame) window for simultaneous inputs. I can get simultaneous inputs around 50-75% reliably at that frame rate. If someone was running the game smoothly at 60fps, they would have a 16.67ms window to perform a simultaneous input, which is unreasonable and makes getting a valid simultaneous input impractical.

        To improve upon this foundation, we added an optional input buffering system into the emulator. This buffering system is easily customizable on a per-game basis (including whether it's used at all). Any games which depend on a lot of simultaneous inputs would have it turned on and tuned to a value that feels like a good compromise, and games with no simultaneous inputs would have it disabled.

        OBS Settings for Recording Game Footage

        OBS Settings for Recording Game Footage
        An easy guide to getting the perfect OBS settings for recording game footage for trailers or streaming.

        Read more

        Proc Gen My Friend

        Proc Gen My Friend

        If there’s one genre that’s taken the world of indie games by storm in the last few years, it’s the rogue-lite. Or, perhaps, the roguelike-like? While the specifics of what to call these games is often argued, most of them are addictive, replayable, and challenging thanks to the magic of procedural generation.

        Procedural generation is a technique that game developers employ to create content that generates its own unique challenges. This means it can reduce development times and costs, and thanks to its unpredictable nature, sometimes surprise both players and developers.

        What Is Procedural Generation?

        Simply put, data of any sort is procedurally generated when a mathematical algorithm is responsible for its creation. In the world of gaming, a wide assortment of things can be procedurally generated. For instance, a developer could create level assets like pits, enemies, obstacles, story elements, and power-ups and then, using procedural generation, set these things to appear at somewhat random locations throughout a level.

        The advantage of using this method is that potentially thousands of unique levels could be created without human intervention. This drives endless replayability. A procedurally generated game could be enjoyed for ages longer than a game with traditionally generated levels thanks to players enjoying “new” levels years after the game’s development has ended.

        Where Is Procedural Generation?

        As mentioned earlier, the procedural generation has its place in a level generation. However, good procedural generation is more complex than our illustration may lead one to believe. When used to fill out a video game level with obstacles, for instance, parameters still need to be determined in advance to keep the game both fair and fun. What if a poorly coded procedural generation algorithm threw an abnormally large number of enemies at the player in the first level? It’d certainly make the game more challenging, but it’d also make the game less fun for new players. A game can’t enjoy longevity if it has no early life to speak of!

        One deservedly well-loved rogue-lite that balances procedurally generated content with pre-determined elements is FTL: Faster Than Light in which players guide a ship through a galaxy full of hazards to deliver a message to the far side of the galaxy more or less in one piece - and then to defeat a massive, incredibly powerful enemy ship. While FTL can itself be beaten in a couple of hours (technically), the overwhelming majority of playthroughs end in death. Yet, players come back to the game over and over again, thanks to its use of procedural generation. There aren’t an amazing number of enemy types or items, the game’s story is neither lore dense nor dialogue-heavy, and yet it’s a game that keeps people hooked.

        Every new run in FTL presents new possibilities. It’s a bit like gambling, really: you could be blown out of the sky in the first sector or, thanks to random chance and skill acquired through playing, you could make it all the way. The random elements in FTL keep it challenging and replayable. However, they’re not the only reason why the game works - it’s also well balanced, carefully crafted, and manages to be challenging in other dimensions without being unfair and frustrating.

        Putting It to Work

        For our own game, Bite the Bullet, we recognized the value of procedural generation and, early on in the development cycle, put it to work. Bite the Bullet is a run-and-gun platformer with RPG eating elements. Choose a class based on your diet (like the vegetarian Slaughter of the Soil or the carnivorous and blood-soaked Gorivore), eat your enemies to turn them into XP, and unlock powerful abilities (like Appetite for Destruction, which lets you eat incoming enemy projectiles). This set-up opened the door for some procedurally generated systems.

        For example, there are plenty of side quests, bonus modes, and hidden areas in Bite the Bullet, but getting to them is a quest in itself. See, in BTB, side quest locations are randomized, so where you found that rideable hamster at a certain level isn’t where you’re going to find it the next time. Although the core of each level is designed by hand, this procedurally generated content keeps the gameplay fresh and engaging.

        One of the most exciting possibilities that procedural generation offers is in terms of equipment that becomes available to the player. In FTL, you’ll occasionally receive weapons and ship upgrades, each with their own pros and cons - each new combination of items opens up fresh gameplay possibilities. In Bite the Bullet, we take things a step further: weapons can be combined with mods in order to change their effects. Love your missile launcher? Well, you can combine it with a mod that allows you to shoot multiple missiles simultaneously. Not enough for you? That’s alright, it wasn’t enough for us either - you can find an incendiary element that sets fire to your foes.

        Worth It?

        We knew that for Bite the Bullet, procedural generation offered a lot of advantages, but it also came with some risks. The technology is brilliant, but it does have its limits. For instance, procedural generation is not well suited to creating strong puzzles. That’s why Image & Form, after having used procedurally generated levels in Steamworld Dig ditched them in the sequel, in order to create puzzles that procedural generation wouldn’t.

        Similarly, we were concerned about how procedural generation would impact the core mechanics of Bite the Bullet. We wanted levels that showcased all of the player’s abilities - jumping, dashing, and (of course) EATING. For example, the game’s calorie meter is drained for significant player actions, encouraging the player to keep gorging himself on his foes. If the procgen system didn’t sprinkle enough tasty enemy treats throughout, players would be a starving, weakened mess. This was another reason to design the levels by hand.

        Game design is undoubtedly a tricky business. What on the surface looks like a small decision can, with poor management, turn into an imbalanced and precarious catastrophe. Creating video games is as much an art as it is a science. Procedurally generated elements, exciting as they are, do not come without the ever-present element of risk.

        And yet, we are driven to include them. The magical spark of possibility that they open up to players is too powerful to ignore. At Mega Cat, we’re taking the risk, and we’re putting in the work on Bite the Bullet to create a game that you’ll love for a long time.


        Ready to chow down? Wish list Bite the Bullet on Steam! You can also step into the kitchen and help test the game by joining our Discord!

        Coffee Crisis Chroma Integration: A Behind-the-Scenes Look

        Coffee Crisis Chroma Integration: A Behind-the-Scenes Look

        Table of Contents

        1. Introduction 3
        2. Overview of Chroma Integration in Coffee Crisis 4
        3. Installing Razer Synapse for development 11
        4. Installing UnityChroma(Native) SDKs 12
        5. Creating animations 13
        6. Testing on real/emulated hardware 18
        7. Behind the scenes look 19

        1. Introduction

        We, Mega Cat Studios, have recently wrapped up development on Coffee Crisis, a multiplatform 2D Beat'em Up game for Sega Genesis, PC, and Xbox One! One of the features exclusive to the PC port that we implemented into Coffee Crisis was Chroma support. Chroma is a unique, proprietary, next-generation technology that Razer implements into its product line of high-end gaming equipment, which allows dynamic lighting on its equipment. Products created by Razer which implement their top-of-the-line Chroma technology include their keyboards, mice, mousepads, computer cases, and much more. Using the Chroma SDK, developers can integrate Chroma support into their games and applications, and configure the lighting on Razer's Chroma-enabled products. Such examples of Chroma integration include making the products light up as a VU meter in multimedia applications, encoding gameplay information on products, and even attempting to show images on the device by approximately color mapping colors in images to certain buttons/keys on the device.

        Coffee Crisis is a neo-rogue brawler that puts you in the shoes of the only baristas on Earth with enough heavy metal in their veins to fend off an alien assault. Play solo or join up with a friend to fight across eight unique locations ranging from your Coffee House HQ to the far reaches of outer space. Go up against an army of wild alien enemies, and the humans they have brainwashed with a variety of weapons, special moves, suplexes, and coffee!

        The Smurglian race has come to Earth and they're not leaving until they steal our three most prized commodities: heavy metal, free WiFi, and our coffee. Crunch through fistfuls of alien meat as you stop their invasion, and enjoy random modifiers to the enemies and action on each playthrough. It's a unique cup of beat 'em up action every time you play!


        1. Overview of Chroma Integration in Coffee Crisis

        As part of our feature set of Coffee Crisis, we implemented Chroma integration into our game. The game was created for PC/Xbox One using Unity3D, a closed-source but critically acclaimed video game engine created by Unity Technologies, applauded and used by Indie and professional game developers worldwide. To add Chroma integration into Coffee Crisis, we used the official Chroma and Chroma Native Unity3D SDKs. For our game, we utilized Chroma for showing colorific animations on the Blackwidow Chroma Keyboard in cutscenes and menus, and on encoding gameplay information. Specifically, we implemented the following:

        • Menus
          • Main Menu
            • Animating keyboard to depict the background animation

          • Credits
            • Displaying a static color image of the final cutscene's background

        • Cutscenes
          • Story cutscenes
            • Applying a 5-color, brown palette cycle of concentric squares on the keyboard


            • Death metal/mod mode intro cutscene
            • Displaying a static color image of cutscene's background

        • Game
          • Encoding various game information on the keyboard
          • Encoding a health bar on the top row FN keys
            • Keys
              • Keys F1-F12
              • Printscreen
              • Scroll Lock
              • Pause
            • Bar increases/decreases as health changes
            • Bar color tweens
              • From green (max health)
              • To red (low health)
          • Encoding the hit combo counter on the row of numeric keys
            • Number keys 0-9
            • Bar increases as hit combo increases
            • The bar becomes full and fully green after 20 hit combos
            • Bar color tweens
              • From red (low hit combo)
              • To green (high hit combo)
          • Encoding the hit combo cooldown timer on the first alphabetic row
            • Keys QWERTYUIOP
            • Bar decreases from full as cooldown timer decreases
            • Bar color tweens
              • From red (low amount of time left)
              • To green (high amount of time left)
          • Encoding the amount of time left on the invincibility and damage multiplier powerups
            • Feature only viewable on full-sized keyboards, not half-sized (Blade keyboards on Razer laptops)
            • The feature can be disabled by
              • Selecting the keyboard type in the options menu
                • Full-sized keyboards
                • Blade keyboard
              • This saves CPU cycles
            • Keys 0-9 on Numpad
            • Keys 1-9 color tween
              • From green (high amount of time left)
              • To red (low amount of time left)
            • Key 0 stays a particular color based on powerup type
              • Yellow for invincibility
              • Red for a Damage multiplier

          • Encoding modifier information
            • Features only available in mod modes (various options set in Options Menu)
              • Modifiers toggle set on
              • Twitch integration enabled
              • Mixer integration enabled
            • Keys M1-M5
            • During voting in a Finish Them Zone
              • Keys M1-M4
                • Encodes the number of votes for the mod category
                • Color tweens
                  • From green (low amount of votes)
                  • To red (high amount of votes)
                  • Zero votes display black

              • Key M5
                • Encodes the total amount of votes during the vote session
                • Color tweens
                  • From green (low amount of votes)
                  • To red (high amount of votes)
                  • Zero votes display black

            • After voting in a Finish Them Zone
              • Keys M1-M4
                • Encodes the number of modifiers in play for the mod category
                • Color tweens
                  • From green (low amount of mods)
                  • To red (high amount of mods)
                  • Zero mods display black
                • Modifier amount ranges
                  • Twitch/Mixer
                    • 0-2 mods
                  • Not Twitch/Mixer, but modifiers on
                    • 0-5 mods
              • Key M5
                • Encodes the total amount of mods in play during the Finish Them Zone
                • Color tweens
                  • From green (low amount of mods)
                  • To red (high amount of time left)
                  • Zero votes display black
          • Encoding pain/powerup pickup
            • Every time the player
              • Is hit
                • All other keys unused by other bullet points flash red
              • Picks up a powerup
                • All other keys unused by other bullet points flash yellow

        This guide will show aspiring Indie video game developers how to set up and use the Unity3D Chroma plugins for game development, as well as show an exclusive behind-the-scenes look on how we implemented the Chroma functionality in Coffee Crisis!


        1. Installing Razer Synapse for development

        Before you can even use a Blackwidow Chroma keyboard for development, you must plug it into your computer for the first time. It goes without saying, but Chroma development will only work for Chroma-enabled Blackwidow keyboards. Certain Blackwidow keyboards do not include Chroma support; please check your user's manual.

        Plugging in your Chroma Blackwidow keyboard

        Plug in your Chroma Blackwidow keyboard into your computer. Some Blackwidow keyboards have 2 USB cords; one as a piggyback cable, another for the keyboard. Make sure at a minimum to connect the USB cable labeled "Razer" and not "Port". After plugging in your Chroma Blackwidow keyboard, the keyboard's drivers should install from online, and it should light up. In order to control the lighting and handle it in code, you will next need to install Razer Synapse software.

        Installing Razer Synapse for development

        Razer Synapse is a piece of software created from Razer which will allow you to configure the Chroma lighting on your Chroma-enabled devices, as well as interface with the lighting with code (after we implement code and the Unity Chroma plugins).

        To begin, download and install Razer Synapse. At the time of this writing, the latest version is Razer Synapse 3 Beta, while the previous is Razer Synapse 2. Download and install either version (for this guide, we'll use Razer Synapse 3 Beta). After launching the installer, select which features you want to be installed, and where to install it. At a minimum, you will want to install Razer Synapse software and Chroma.

        1. Installing UnityChroma SDK

        Now that we have both Razer Synapse installed and the drivers installed with the Razer Chroma Keyboard (via plugging it in), it is time to set up our Unity project to interface with Chroma!

        In order for a Unity project to interface with Chroma devices, you will need to install the Unity3D Native and non-native plugins for Chroma SDK. You can find the native plugins here, and the non-native here. The former plugins are required for usage in compiled games (they interface with the hardware), while the latter plugins are used in the Editor only for creating Chroma animations. The latter ones should be removed for compiled builds, to reduce filesize bloat in the compiled builds. Please read the instructions from each download page on how to use the plugins and install them.

        1. Creating animations

        With the keyboard's drivers installed, Razer Synapse installed, and the Unity3D Razer plugins installed into your project, you should be good to go for developing with Chroma! Below are a few conceptual notes on how Chroma works in Unity. Full-details on how to use Chroma with Unity can be found in the tutorials on the pages where you downloaded the Unity3D Chroma plugins.

        Chroma color with the Unity3D plugins works in either one of 2 ways: via Chroma animations, or by manually updating the colors of keys on-the-fly. The former method will be discussed in this section, while the latter in the next section. Chroma animations should not be confused with Unity's animations. The latter is used for changing properties of a GameObject's components overtime via keyframes (especially sprites and image graphics), while the former is used for changing the colors of Chroma-enabled devices over time.

        Chroma animations are simply .chroma filetypes, stored in the StreamingAssets folder within the Assets folder in the root folder of the project. Unfortunately, Chroma devices are only supported on Windows machines, so when compiling the game for other platforms (Mac and Linux), you should remove the ChromaSDK plugins, UnityNativeChromaSDK plugins, and the StreamingAssets folder with the Chroma animations, since they will bloat up the build's filesize and are unused for those platforms.

        To create Chroma animation, go to GameObject>ChromaSDK>Create 1D/2D Animation. For Keyboard animations, we will want to use 2D Animations. The Chroma animations should be placed in your StreamingAssets folder.

        In order to edit Chroma animations, right-click the animation, and click ChromaSDK>Edit Chroma Animation. This will bring up a custom Chroma Editor in the Inspector.

        In the custom editor, you can select the device type ("Keyboard" for this tutorial), select key types from the keyboard, and assign colors to each key in each frame in the animation. You can also import an image to assign colors to each key (however, this feature seems to crash often). When modifying colors, the Chroma devices attached to the computer will update to display your color configuration.

        Alternatively, to individually assigning colors to each key, you can use the Chroma capture tools to map an image onto the various keys. To use these tools, Goto Windows>ChromaSDK>Open Chroma Particle Window. To learn how to use these capture windows, check out the tutorials here.

        Animation playback

        Now that we have our animations defined for the game, we will need to add code to playback our animation. Any Unity3D script that utilizes the native Chroma plugins will need this namespace added to the top of the script:

        #if UNITY_STANDALONE_WIN

        using ChromaSDK;

        #endif


        Furthermore, Chroma support is only supported in the Windows platform, so make sure to add #if UNITY_STANDALONE_WIN code blocks around Chroma code. Below is a quote from the API documentation here for the most important API functions for playback:

        1. Testing on real/emulated hardware

        Now that we have animations defined and code for playing the animations, you will want to test them on hardware. You can either test it as such on real hardware (by playing the game with the Chroma device connected) or with the Chroma Emulator. The Chroma emulator will simulate Chroma lighting for a variety of devices. At a bare minimum, you will need one real Chroma device setup first before it can be used. Usage should be straightforward.

        1. Behind the scenes look on Coffee Chroma Integration

        A limitation of the Unity Chroma setup is that animations are static; it doesn't really allow for combing several animations to encode data. When designing the in-game Chroma animation, we wanted to encode most of the game's information on the keyboard. Luckily, we were able to exploit a few things in the Unity Chroma set up as a workaround and allow dynamic key lighting. Coffee Crisis' in-game Chroma animation is simply a dummy Keyboard animation with no keys lit.

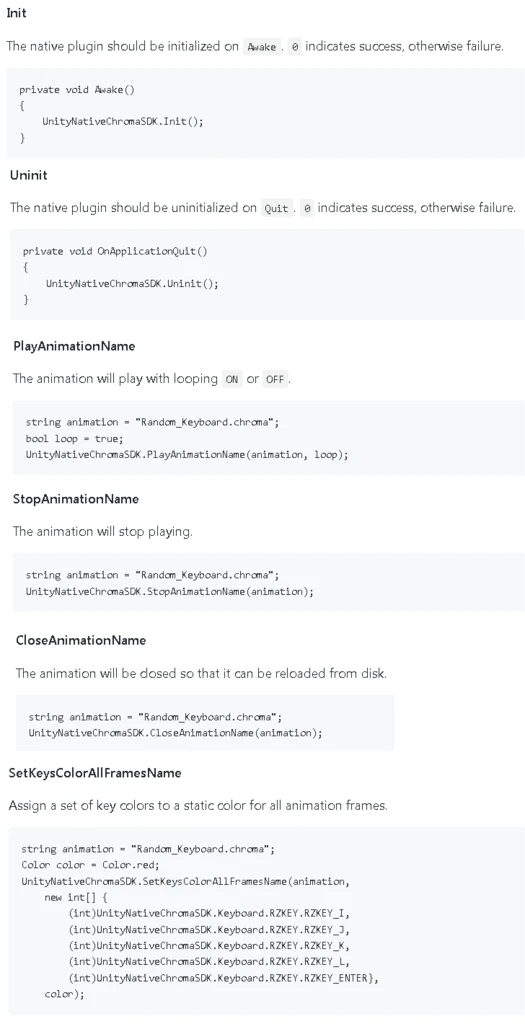
        We heavily utilize the SetKeysColorAllFramesName API function in order to manually update the keys in an Update() thread; however, there is a catch to this method. In order to edit an animation during runtime, you must do the following:

        • Close it first with CloseAnimationName
        • Manually change your keys' colors with SetKeysColorAllFramesName
        • Play dynamic animation back with PlayAnimationName

        This sequence of code events was what allowed us to pull off dynamic animations in-game. A problem with using an update() thread to update dynamic Chroma animation in such a fashion is that it may lag other people's machines. Different models of Chroma keyboards have higher fresh rates, and running such an update thread at full speed will severely lag other people's machines. As a workaround to this issue, we added a cooldown timer, to update dynamic Chroma animations every 250ms. Please see our truncated, relevant code attached, for a sample of how we set up dynamic Chroma animations to work.