Retro Development — retro game
We Got Dungeons - Dev Log 5
Happy Holidays and welcome back to the dev log for our upcoming game We Got Dungeons!
Today we'll talk a little about the AI of the NPCs.
We talked about many different ways of approaching the AI in our game. Through our discussions, we realized that what we wanted is a couple of things from our enemies.
First and foremost they should be consistent. This might run counter to intuition but ultimately, what good AI should do is not "outsmart" the player, it should instead give the player a sense of accomplishment and strategic mastery. This cannot be achieved if the enemies act randomly. On top of that random AI generates unpredictability which is a tactical game that can lead to frustration as all your master strategies are thwarted not by something that's "smart" but by something random.
The next thing we wanted to be was for the enemies to be complimentary and varied in their behavior. This creates the potential for emergent game-play and keeps every encounter interesting and enjoyable. Chess wouldn't be much fun if all the pieces moved like the peons.
Ultimately the AI should give character to the enemies. Furtive hit and run AI conveys a much different character than one that actively hunts you down.
These principles work together to create a combat system that is fun and engaging and also acts as a puzzle of sorts. The player can predict the enemy's behavior, plan accordingly, and formulate a winning strategy. And that always feels awesome.
Let's look at an example AI
They [VHS enemies] will attempt to attack in melee and will use their constrict attack once every three turns. They will attack if a player is adjacent to them, but they will always try to target the player with the least HP.

You can see how this simple and predictable behavior instantly gives character and strategic depth to the opponents in combat.
Now let's talk about the implementation. Our good friends, the function pointers, make an appearance once again here.
In our general-purpose creature struct, we have a pointer to a void function that takes a game object (itself) as a parameter.

Next, we declare the enemy data as a constant which means it is stored in the ROM and we just set the pointer of the function to the according to AI module function.

This approach allows us the easy making of AI modules that are completely independent of the rest of the code base, which in turn speeds up the debugging and tweaking one of the most fickle aspects of game development. One can easily see how bad AI can be just switched off (Stop Dave...) and quickly repaired.
That concludes our chat on enemy AI. Join us next time when we'll be revealing even more details about We Got Dungeons.NES Background Art II: Teaching as a Pixel Sensei
We Got Dungeons - Dev Log 3

A look at structures and game objects for our tactical RPG on the Sega Genesis and Mega Drive.
Super Nintendo Graphics Guide

OVERVIEW OF PPU CONCEPTS
- Super "Picture Processing Unit"
- Video controller chip that handles the SNES' tile graphics, scroll planes, and sprites.
-
Similar in function to PPU in NES, but super
- VRAM
- "Video RAM"
- RAM used by the Super PPU
- Holds tiles
- Each screen mode uses a different tile size for tiles
- Sizes usually 8x8 px or 16x16 px per tile
-
64 KB of VRAM
- OAM
- Holds sprite definition data
- Can hold data up to a maximum of 128 sprites
-
Similar to OAM in NES, but super
- OAM data held for each sprite
- x position of the sprite
- (9-bit, 0-511 or $00-$1FF)
- y position of the sprite
- (8-bit, 0-239 or $00-$EF)
-
"Values 0-239 are on-screen. -63 through -1 are "off the top", so the bottom part of the sprite comes in at the top of the screen. Note that this implies a really big sprite can go off the bottom and come back in the top."
- First tile ID of sprite
-
8-bit index
-
Nametable of sprite
- Palette ID used by sprite
- (0-7/$00-$07)
-
Recall sprites use subpalette indices in latter 8 sub palettes, so ID used is 7+N)
- Sprite Size
- 1-bit
- 0=smaller sprite size available for mode (usually 1 tile of 16x16px)
-
1=larger sprite size available for mode (usually 4 tiles (2x2 16x16 px tile))
- Sprite Priority
- OAM priority
- 2-bit
- These bits determine sprite's priority wrt to the background plans (see graphics plane section below)
- Priority wrt to other sprites
- 0th sprite in OAM has the highest priority
- 1st sprite in OAM has a lower priority
- 2nd sprite in OAM has even lower priority, etc.

Two main machine types
- "Super Nintendo (SNES)", 60Hz machines, primarily found in North America, certain countries in South America, the Philippines, Myanmar, Taiwan, South Korea, and Japan.
- Screen resolution of 256x224 px (just like NTSC NES)
-
Mega Cat games are NTSC releases, so use these resolutions!
- "Super Famicom (SFC)", 50Hz machines, covers most of Western Europe, China, India, Australia, most of Africa, and elsewhere.
- Screen resolution of 256x240 px (just like PAL Famicom)


Tilemaps
- SNES has 8 different "modes" for how to handle the background
- Named Mode 0-7
- Mode 1 has a variation mode
- Mode 7 has a submode called Mode 7 Ext. BG
- Each mode has a different amount of background planes available
- Each mode has a different amount of colors for the available background planes for that mode
- Each mode has slightly different rendering properties
- For all modes and for all graphics planes, color index 0 for any subpalette is the transparency color.

- 4 graphics planes
- The SNES can handle up to 4 graphics planes, named BG1-BG4
- These graphic planes can be scrolled as necessary
- Tilemap sizes
- The tilemap sizes of the scroll planes can be either 32x32 tiles, 32x64, 64x32, or 64x64 tiles.
- Depending on the size of each block in the tilemap (Blocks of 16x16 px/1 tile, or blocks of 32x32px/2x2 tiles), the tilemap size can range from 256x256px to 1024x1024px
- See "Tile Maps & Character Maps" from here for more info on tile sizes in tilemaps
- Properties of each tile in a tilemap
- V/HFlip of tile
- Tile priority (low/high)
- Palette number
- (3-bit, 0-7/$00-$07)
- Recall that planes use the 1st 8 sub palettes of CGRAM; the 2nd 8 is used for sprites (OAM)
- Tile ID

- 4 BGs each with 4 colors
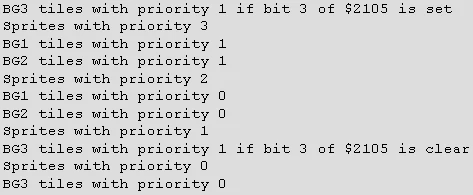
- BG Priority (from front to back)

- 2 BGs of 16 colors
- 1 BG of 4 colors
- BG Priority (front to back)
- Priority varies depending upon the setting of bit 3 of $2105

-
- 2 BGs with 16 colors each
- BG Priority (front to back)

- 1st "offset-per-tile" mode (read Mode 2 here for more info)
- 1 BG with 256 colors
- 1 BG with 16 colors
- BG Priority (from front to back)

-
Direct Color Mode available (register $2130)
- 1 BG with 256 Colors
- 1 BG with 4 colors
- BG Priority (from front to back)

-
2nd "offset-per-tile" mode (read Mode 4 here for more info)
- 1 BG with 16 colors
- 1 BG with 4 colors
- BG Priority (from front to back)

- Is different from the other modes
-
"Mode 5 is rather different from the previous modes. Instead of using an 8/16 pixel wide tile as normal, it always takes a 16-pixel wide tile (the height may still be 8 or 16) and only uses half the pixels (zero-based, the even pixels for subscreen tiles and the odd pixels for main screen tiles). Then it forces pseudo-hires on to render a 512-pixel wide scanline. Also, if Interlace mode is on (see bit 0 of $2133), the screen is 448 or 478 half-lines high instead of 224 or 239. Either the odd half-lines or the even half-lines are drawn each frame, as indicated by bit 7 of $213f. Note that this means you must set $212c and $212d to the same value to get the ‘expected’ display."
- 1 BG with 16 colors
- BG Priority (from front to back)

- Special properties
- Has same oddities as Mode 5
- Is also an offset-per-tile mode
- Like with Mode 2
- "However, remember that Mode 6 always uses 8 pixels (16 half-pixel) wide tiles, this applies to BG3 as well as BG1. You can’t apply the offset to an 8-half-pixel tile nor to a 16-pixel wide-area (except by using two offset values for the two 8-pixel areas)."
- 1 BG of 256 colors
- Very special mode; allows for matrix transformations of BG layer
- Used for the pseudo-3D effects in games such as Super Mario Kart, FZero, etc
- Read Mode 7 for full details


CGRAM
- Holds color information for palettes
- Holds a total of 256 ($FF) color palette entries.
- Each graphics mode divides the 256 palette entries into sub palettes, each with N colors
- "N" depends on the video mode
- By default, each subpalette is 16 color entries (256 colors/16 color for subpalette = 16 subpalettes)
- By default, the first 8 subpalettes (subpalette IDs 0-7/$00-$07, palette entry IDs 0-63/$00-$3F) are used for FG tiles, while the last 8 subpalettes (subpalette IDs 8-16/$08-$10, palette entry IDs 64-127 or $40-$80) are for Sprite objects
-
First color entry in a subpalette will be rendered transparent for tiles/sprite tiles that use the subpalette
- 15-bit BGR color format
- Each color entry in CGRAM is in the format of 2 bytes (a "word") of format 0BBBBBGG GGGRRRRR (B=Blue bits, G=Green bits, R=Red bits)
- 16-bit, 1st bit is unused, so 15-bit color range
- Each color component (B, G, R) ranges from values of 0-31 (decimal) or $00-$1F (hexadecimal)

RECOMMENDED DEBUGGING AND ART TOOLS
Finding good software for creating retro graphics, quantizing pixel art into tiles, and reducing the color count to handle the SNES various video modes can be difficult. Below is a list of the recommended art software to deal with retro graphics, and specialized emulators that allow the user to look at VRAM contents and planes
Art software:
- YY-CHR
- Multi-platform tile editor
- Newer C# version
- Old C++ version
- Irfanview
- Generic image viewer/editor, with plugins and very large support for many image file types
- Can edit, export, and import palettes, as well as increase/decrease the color count of images, and view color count
- FOSS software
- Has PNG plugin in order to change color depth while preserving palette order
- Info links
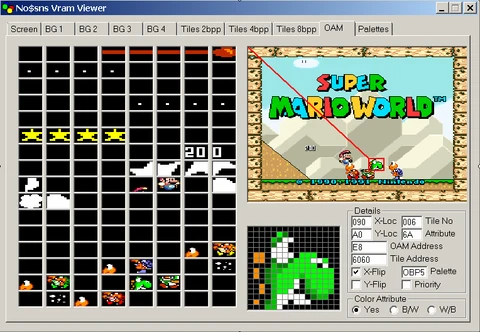
Recommended specialty emulators for Super PPU debugging
- Debugger-oriented SNES emulator
- Can emulate SNES-CD Super Disc prototype homebrew
- Can view machine/CPU state
- Can view BG layers on- the-fly
- Can view OAM on-the-fly
- Can view VRAM tile contents in various color modes
- Can view CGRAM contents
- Info
- Higan
- Emulator emulating various retro consoles
- Has very accurate, cycle-accurate emulation of SNES hardware; should be used for emulating/debugging SNES hardware issues
- Info
REFERENCES/FOR FURTHER READING
And you can always check out our NES graphics guide or our Sega Genesis/Mega Drive graphics guide!


