Creating Music and Sound for the NES: A Primer for Using Famitracker
The music from retro games has a way of staying in your ear long after you set the controller down. Some themes capture the feeling of the gameplay perfectly and create a memorable emotional experience. Others have super-catchy, hummable melodies. Either way, many a gamer has been inspired to try their hand at creating an authentic retro chiptune.
I'm Mitch, an audio engineer at Mega Cat Studios, and this blog will give you guys a quick guide on how to create music and sound effects for genuine NES games. That's right, the original Nintendo! It will cover Famitone limitations and what's needed to successfully get your music working on real Nintendo hardware, as well as how to format your work for Nintendo programmers and developers.
Go ahead and download Famitracker in the link below and let's get started!
http://famitracker.com/downloads.php
On the Famitracker site, download Famitone2 as well.
So for those of you who don’t know, FamiTracker is a Windows application that emulates the 2A03 sound-chip, the standard sound processor on NES consoles. It creates those sexy 8-bit sounds we love so much! Famitracker is only built for Windows OS, so mac/linux users will need to use a windows emulator.
The Basics
This program enables you to input notes on a grid while the music scrolls vertically. There are only 5 channels (the five columns) to work with: 2 Pulse channels, triangle, the noisy channel, and DPCM used for imported audio samples.

Here is an overview of the interface:

Z on the keyboard is middle C-note, and the chromatic scale quick keys look like this:

Here are some useful key commands for when a note is selected on the grid:
- Ctrl+F3 - octave down
- Ctrl+F4- octave up
- Ctrl+mouse scroll - changes note up or down
- 1-rest
Creating Musical Effects
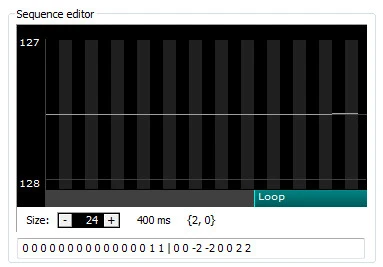
Since we’re not able to use all the effect columns simultaneously, you'll want to create certain effects using the instrument editor, such as vibrato. Here is an example of a setting I’ve used in countless NES games:

On the left, Volume, Pitch, and Duty effects are checked. On the right is the Volume sequence editor, each individual block represents a volume change on the instrument. Under the sequence editor is the size, which is basically the length of the note (it adds more blocks).

Under instrument settings, click on Pitch. As you can see, I added a slight change to the pitch (one semitone up) at the very end then had it loop. This adds a variation in pitch that gives it the vibrato effect we're looking for.
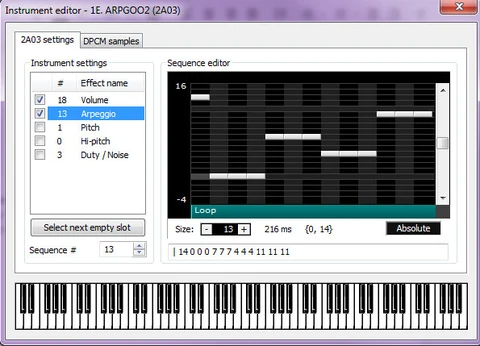
Another effect you’ll want to utilize is the Arp (arpeggio). This particular effect on the 2A03 sound-chip has a very iconic sound, and can dramatically improve the music.

Requirements for Hardware
To get your music implemented onto NES hardware, you’ll need to follow these requirements:
- Allowed notes are C-1..D-6, Note Cut (rest note)
- Only Volume, Arpeggio, and Pitch sequences are supported
- Make sure Volume box is checked on all instruments
- All instruments should have a volume envelope assigned
- Only the loop part of a sequence is supported, the release part is not supported
- Pitch envelope accumulate the offset at conversion time only, thus it can't go further than -64..63, and can't accumulate the offset with loop
- 64 instruments max
- No expansion chips
- No volume column support
- The global tempo must be set to 150bpm, speed can only be changed with effect column using F0x command (Fxx 1..21)
- Use Bxx effect for looping without an intro, does not support forward references
- D00 effect to cut patterns early
- No effects other than listed above are supported
- Up to 17 subsongs in a file, they will share instruments and pattern data
Use this as a reference if you are still unsure about the limitations. Your music should look something like this:

Notice all the notes are within range (octave 1-6) and it doesn't use volume or effect column.
Samples
You can use DPCM samples, but there are limitations too, and I wouldn't recommend using them for your first project.
Famitracker converts .WAV samples to DMC automatically. Simply import the files to 00 instrument channel. Please note that if you do choose to use samples, they will take up way more space on the ROM, and implementing samples may be a headache for the developer. MCS games usually include at least one to three sound samples per soundtrack, to add a unique element. A simple but very effective sound sample to use for the music is a Bass kick drum or a Tom. A short bass drum sample converted to DMC is usually only 1kb in size, and it adds a nice low-end frequency to the mix, which adds a nice balance to the processor.
Audacity is a free digital audio workstation, and is great for downsampling and shortening .wav files. Make your samples as short as possible, and the audio is MONO, and export as an 8-bit PCM wav file.
Other guidelines for samples:
- Keep samples as short as possible
- Samples in the ftm file should not exceed 12 kb in size.
- Only samples assigned to the instrument 0 are supported,
- Note range the same as for normal instruments, C-1..D-6.
- You can add any samples to the ftm SFX file as well, following the same guidelines
- You’ll want to create all the music in a single FTM file using the multi-song feature, this will save memory, and keep things organized.
Sound Effects
In addition to music, your game will need some sweet SFX. To create sound effects for the NES, put each sound effect into a separate sub song using the multi-song feature. Unlike music, you can use most of the FamiTracker effects, except sweep. Every effect should end with silence, by putting a C00 command.

There is a major limitation: one effect can't be larger than 255 bytes. Keep them short, and limit the number of effects and channels used.
Formatting SFX
Once the SFX are finalized, you’ll want to check to see if there will be any issues implementing them into Famitone2. This is the most important step because if your file won't work in Famitone2 then it will be incompatible for the developers. Their time can be better spent on other things rather than dealing with a C-7 note you accidentally put in a song.
This can be a bit tricky for those who have never used the command line before, but it’s better to solve these issues yourself than to send incompatible ftm files to programmers.
It's easier than it sounds. Just follow these steps:
- Download famitone2, you’ll be using a tool called nsf2data, this will give you a report on your ftm file.
- In Famitracker go to File/Export/NSF file.
- Export them as an NSF file and use the nsf2data converter (nsf2data sounds.nsf). The converter will report the size of each effect and warn you if an effect is too large. Use this converter for your music files as well, it will report if you made a mistake in following the limitations.
Here’s what the command line should look like:

It shows that there are 23 sound effects in the file, and shows an error for Effect 0. In this case, the effect is too long and needs to be shortened.
You’ll need to export to an NSF-file (NES sound format) to get your Famitracker music working on real hardware. I prefer sending developers the FTM, NSF, and MP3s in a compressed folder.
The final step is listening to your music and SFX in-game! The mix will sound different after its converted. There will be less bass, and the high frequencies will sound sharper.
The Final Note
Now you should know the basics of creating music and SFX for authentic NES games, and how to format those groovy tunes properly so that they can live forever on hardware. Want more? Get involved in the community with the Battle of the Bits!
If you have any more questions, feel free to email me:


